sphinx + git + read the docs
目录
1)创建基本框架(生成index.rst ;conf.py)
2) 其他版本和github上的branch/release tag对应编辑
一、sphinx
1 sphinx的安装
先安装Python3环境
Download Python | Python.org
cmd中输入python显示内容即安装成功

再安装sphinx环境
pip install -i https://pypi.tuna.tsinghua.edu.cn/simple sphinx2 本地构建文件框架
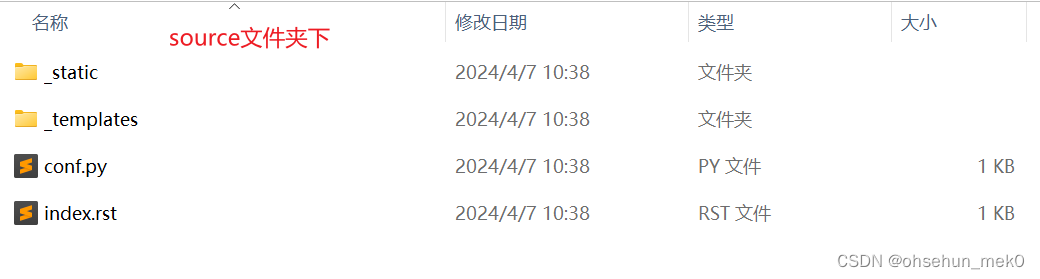
1)创建基本框架(生成index.rst ;conf.py)
创建一个空文件夹,输入
sphinx-quickstart根据提示输入内容

sphinx-quickstart后的文件夹结构
  .
├── build
├── make.bat
├── Makefile
└── source
    ├── conf.py
    ├── index.rst
    ├── _static
    └── _templates
conf.py默认内容
# Configuration file for the Sphinx documentation builder.
#
# For the full list of built-in configuration values, see the documentation:
# https://www.sphinx-doc.org/en/master/usage/configuration.html

# -- Project information -----------------------------------------------------
# https://www.sphinx-doc.org/en/master/usage/configuration.html#project-information

project = 'structrucshow'
copyright = '2024, test'
author = 'test'
release = 'v1.0'

# -- General configuration ---------------------------------------------------
# https://www.sphinx-doc.org/en/master/usage/configuration.html#general-configuration

extensions = []

templates_path = ['_templates']
exclude_patterns = []

language = 'zh_cn'

# -- Options for HTML output -------------------------------------------------
# https://www.sphinx-doc.org/en/master/usage/configuration.html#options-for-html-output

html_theme = 'alabaster'
html_static_path = ['_static']
index.rst默认内容
.. structrucshow documentation master file, created by
   sphinx-quickstart on Sun Apr  7 10:38:11 2024.
   You can adapt this file completely to your liking, but it should at least
   contain the root `toctree` directive.

Welcome to structrucshow's documentation!
=========================================

.. toctree::
   :maxdepth: 2
   :caption: Contents:


Indices and tables
==================

* :ref:`genindex`
* :ref:`modindex`
* :ref:`search`
2)生成页面(Windows系统下)
.\make html然后点击build/html文件夹下打开index.html浏览页面;
或者
sphinx-autobuild source build/html点击端口浏览,调整的时候页面会实变化,建议使用这个命令,方便实时查看变化。

参考资料
Sphinx+gitee+Read the Docs搭建在线文档系统 - 知乎
使用ReadtheDocs托管文档 - 知乎
3 编辑说明
1)图片:相对路径

2)文档编辑(官方)
reStructuredText 简介 — Sphinx 使用手册
3)页面主题:conf.py中配置
一般用这个主题:
html_theme = 'sphinx_rtd_theme'其他主题可以看官方文档
Read the Docs Sample — Read the Docs
4 多语言支持
小结:无法自动翻译,需要根据中文人工手动输入英文内容,然后进行转化(生成一个新的项目)。新项目导入到read the docs(注意设置语言),然后将翻译后的项目配置为原语言项目的子项目,在【翻译】中设置。
参考文档:【Open-Source】Sphinx+Read the Docs的多语言版本文档实现 - 知乎
关键语句(cr↑↑↑↑↑↑↑↑↑↑↑↑↑↑↑↑↑)
先向docs/source/conf.py文件添加:
# multi-language docs
language = 'en'
locale_dirs = ['../locales/']   # path is example but recommended.
gettext_compact = False  # optional.
gettext_uuid = True  # optional.
# 先切到docs目录下
cd docs
# 从./source/conf.py中读取文档设置,并调用从写好的rst或md的原文文档中在./build/gettext生成所有文档文件对应的.pot文件
sphinx-build -b gettext ./source build/gettext
# 在docs目录下生成目标翻译语言的目录(示例目标翻译语言为zh_CN)
# 这条指令会在docs/locales的目录下生成po文件
# 后续需要在po文件中填入对应的翻译内容
sphinx-intl update -p ./build/gettext -l zh_CN
# 翻译内容补充完成后,从写有中文翻译的.po文件和./source/conf.py中的设置来build中文文档,
# 生成的文档会在docs/build/html/zh_CN目录下
sphinx-build -b html -D language=zh_CN ./source/ build/html/zh_CN将对应的翻译内容填入双引号内

参考资料
Sphinx + Read the Docs 从懵逼到入门 - 知乎
官网:reStructuredText 简介 — Sphinx 使用手册
多语言支持(官网的介绍文档):
国际化 — Sphinx documentation
Localization and Internationalization — Read the Docs user documentation
How to manage translations for Sphinx projects — Read the Docs user documentation
二、git
1 git使用配置
GitHub创建项目的流程_github创建项目步骤-CSDN博客
使用Git将本地文件夹同步至github_git 某些文件同步到新文件-CSDN博客
关键:第一次用git bash需要设置SSH免密,创建public key
2 本地推送远程仓库
git init

git add .

git commit -m "描述你的提交"

git push origin 分支名
本地项目首次关联git仓库需要提供ssh: git remote add origin git@githuhb.com:XXXXXXX/XXXX.git
参考资料:如何从 GitHub 上创建/克隆一个仓库、进行修改、提交并上传回 GitHub 新手保姆级教程 - 知乎
git拉取项目、提交代码简单教程_git拉取代码-CSDN博客
3 github页面操作
github上创建分支并合并到master_github分支合并到主干-CSDN博客
4 git项目拉取
创建空文件夹
git clone+项目地址(如果用的https://xxx 链接报错,可尝试使用项目的ssh地址)
cd 项目名称(进入项目)
git branch (查看当前分支)
git checkout [branch name] (切换到新的分支)
git checkout -b 分支名 (创建并切换到新分支)
git branch -D 分支名 (删除本地分支)
参考资料:git创建新分支,并将本地代码提交到新分支上_建立新的本地分支-CSDN博客
5 git本地提交到新分支
git checkout -b [branch name] (创建分支的同时切换到该分支上)
git add .
git commit -m "add my code to new branchB"
git push origin [branch name]
三、read the docs
1 导入时的项目名称设置

The name of the project. It has to be unique across all the service, so it is better if you prepend your username, for example {username}-rtd-tutorial.
2 导入的项目要求
必须要有.readthedocs.yaml文件
【示例】
项目层级结构示意图:
  .
├── .git
├── .gitignore
├── .readthedocs.yaml
├── requirements.txt
├── images
└── docs
    ├── build
    ├── index.rst
    ├── make.bat
    ├── Makefile
    └── source6
        ├── _static
        ├── _templates
        ├── conf.py
        └── index.rst
.readthedocs.yaml文件内容:
version: "2"

build:
  os: "ubuntu-22.04"
  tools:
    python: "3.10"

python:
  install:
    - requirements: ./requirements.txt

sphinx:
  configuration: docs/source/conf.py
requirements.txt文件内容
sphinx==7.1.2
sphinx-rtd-theme==1.3.0rc1
build文件不用同步到git仓库,.gitignore中内容
docs/build/
参考资料:Configuration file overview — Read the Docs user documentation
3 项目多版本管理
1) latest:默认分支(可在【管理】中配置)

2) 其他版本和github上的branch/release tag对应
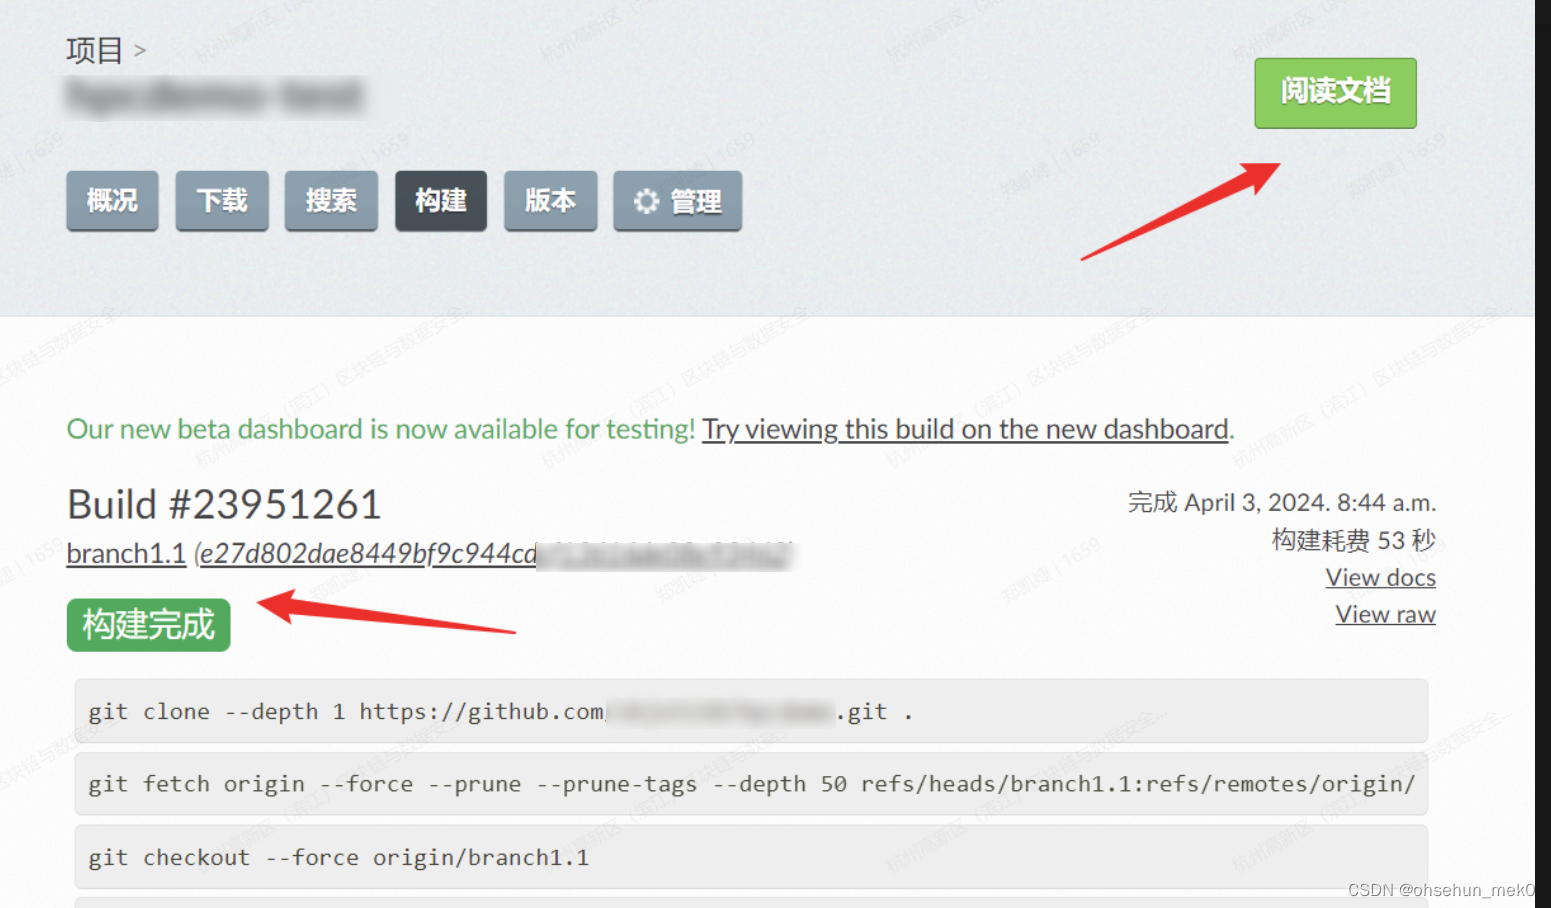
4 文档自动更新的关联
在项目管理中勾选后,git有更新,read the docs会同步重新构建,构建完成后页面变更【大概几分钟延迟】


5 离线格式下载
在.yaml文件中补充
# Optionally build your docs in additional formats such as PDF and ePub
formats:
  - pdf
  - epub
参考资料:
Configuration file reference — Read the Docs user documentation
四、小结
1 三者关系

latest默认对应master
read the docs的版本名称可以是分支名称,也可以是release的tag名称
2 文档更新过程
1)当有版本更新时,原先最新的版本release,tag命名vx.x,在项目-版本中激活vx.x
2)创建分支编辑更新
3)分支浏览效果是否合适
4)合适后把新的分支内容合并到master,版本管理中关闭该分支版本
【示例】
一开始只有latest(默认对应master,master永远是最新的),有新版本时:
-
master 分支 release v0.1,项目-版本——激活v0.1
-
修改内容后,发布为branch v0.2,查看内容是否OK
-
OK后合并到master(latest更新),项目-版本——隐藏 branch v0.2 版本
-
当v0.3推出时,master分支 release v0.2,项目-版本——激活v0.2
-
……
注意
避免二者(release tag和branch name)命名重复
如果都是v1.0,read the docs会自动命名为v1.0_a

但是在前端页面都是显示v1.0,所以要避免二者(release tag和branch name)命名重复


