目录
关闭防火墙、selinux、swap、dnsmasq(所有节点)
安装 kubeadm,kubelet 和 kubectl(所有节点)
安装kubernets 网络插件 calico(master节点操作)
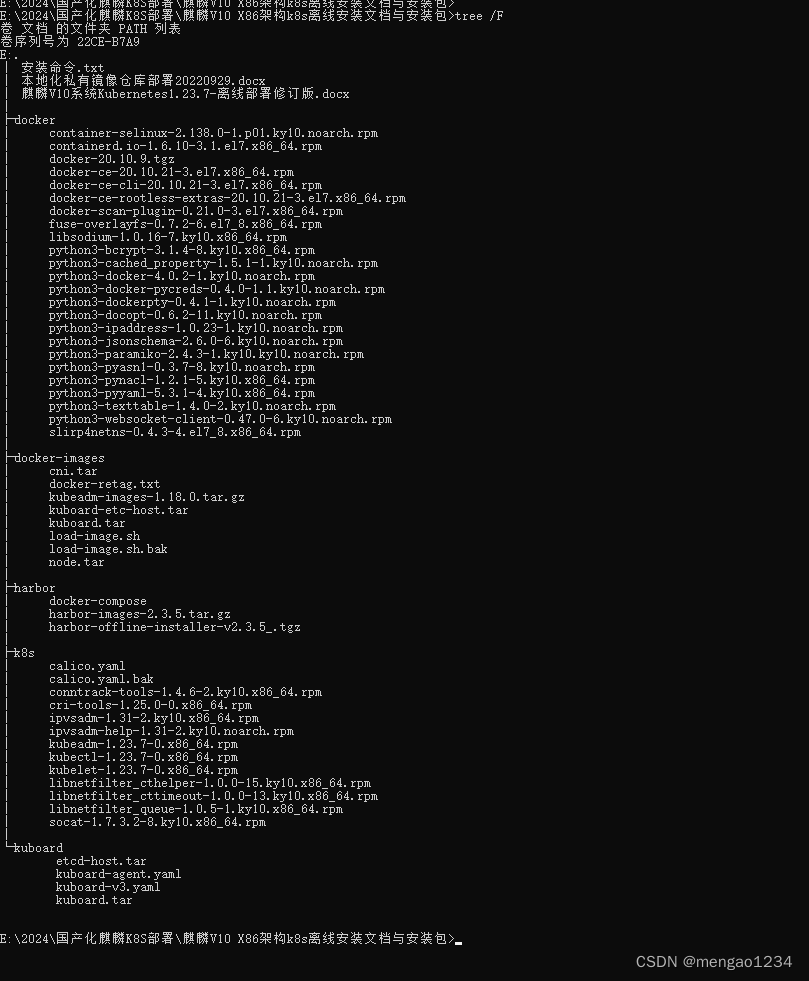
安装文件准备

主机准备
主机配置
172.171.16.147 crawler-k8s-master
172.171.16.148 crawler-k8s-node1
172.171.16.149 crawler-k8s-node2

修改主机名(三个节点分别执行)
172.171.16.147
hostnamectl set-hostname crawler-k8s-master172.171.16.148
hostnamectl set-hostname crawler-k8s-node1172.171.16.149
hostnamectl set-hostname crawler-k8s-node2查看主机名
hostnamectl #查看主机名配置hosts(所有节点)
配置 /etc/hosts 文件
cat >> /etc/hosts << EOF
172.171.16.147 crawler-k8s-master
172.171.16.148 crawler-k8s-node1
172.171.16.149 crawler-k8s-node2
EOF
关闭防火墙、selinux、swap、dnsmasq(所有节点)
关闭防火墙
systemctl stop firewalld
systemctl disable firewalld
关闭selinux
sed -i 's/enforcing/disabled/' /etc/selinux/config  #永久
setenforce 0  #临时
关闭swap(k8s禁止虚拟内存以提高性能)
sed -ri 's/.*swap.*/#&/' /etc/fstab #永久
swapoff -a #临时
//关闭dnsmasq(否则可能导致docker容器无法解析域名)
service dnsmasq stop
systemctl disable dnsmaq
安装依赖包(所有节点)
yum -y update
yum install wget -y
yum install vim -y
yum -y install conntranck ipvsadm ipset jq sysstat curl iptables libseccomp
系统参数设置(所有节点)
//制作配置文件 设置网桥参数
mkdir /etc/sysctl.d
vim /etc/sysctl.d/kubernetes.conf
net.bridge.bridge-nf-call-ip6tables = 1
net.bridge.bridge-nf-call-iptables = 1
net.ipv4.ip_forward = 1
vm.swappiness=0
vm.overcommit_memory = 1
vm.panic_on_oom = 0
fs.inotify.max_user_watches = 89100
/生效文件
sysctl -p /etc/sysctl.d/kubernetes.conf
如果报错:
[root@crawler-k8s-master ~]# sysctl -p /etc/sysctl.d/kubernetes.conf
sysctl: cannot stat /proc/sys/net/bridge/bridge-nf-call-ip6tables: 没有那个文件或目录
sysctl: cannot stat /proc/sys/net/bridge/bridge-nf-call-iptables: 没有那个文件或目录
//加载网桥过滤模块
modprobe br_netfilter
然后再次
sysctl -p /etc/sysctl.d/kubernetes.conf
时间同步(所有节点)
//安装时间同步服务
yum -y install chrony
//开启服务
systemctl start chronyd
systemctl enable chronyd
配置ipvs功能(所有节点)
在kubernetes中service有两种代理模型,一种是基于iptables的,一种是基于ipvs的
两者比较的话,ipvs的性能明显要高一些,但是如果要使用它,需要手动载入ipvs模块
//添加需要加载的模块写入脚本文件
vim /etc/sysconfig/modules/ipvs.modules
#!/bin/bash
modprobe -- ip_vs
modprobe -- ip_vs_rr
modprobe -- ip_vs_wrr
modprobe -- ip_vs_sh
modprobe -- nf_conntrack_ipv4
//为脚本文件添加执行权限
chmod +x /etc/sysconfig/modules/ipvs.modules
//执行脚本文件
/bin/bash /etc/sysconfig/modules/ipvs.modules
备注:如果报错可能是需要将 modprobe -- nf_conntrack_ipv4 改为modprobe -- nf_conntrack
安装docker(所有节点)
卸载老版本
yum remove docker docker-client docker-client-latest docker-common docker-latest docker-latest-logrotate docker-logrotate docker-engine安装docker
docker 安装包在准备文件的 docker目录下,上传到服务器
安装依赖
导入相关依赖至各个节点
安装相关依赖:
rpm -ivh containerd.io-1.6.10-3.1.el7.x86_64.rpm --force --nodeps

rpm -ivh container-selinux-2.138.0-1.p01.ky10.noarch.rpm --force --nodeps

rpm -ivh docker-ce-20.10.21-3.el7.x86_64.rpm --force --nodeps

rpm -ivh docker-ce-cli-20.10.21-3.el7.x86_64.rpm --force --nodepss

rpm -ivh docker-ce-cli-20.10.21-3.el7.x86_64.rpm --force --nodepss

rpm -ivh docker-compose-1.22.0-4.ky10.noarch.rpm --force --nodeps

rpm -ivh docker-scan-plugin-0.21.0-3.el7.x86_64.rpm --force --nodeps

rpm -ivh libsodium-1.0.16-7.ky10.x86_64.rpm --force --nodeps

rpm -ivh python3-bcrypt-3.1.4-8.ky10.x86_64.rpm --force --nodeps

rpm -ivh python3-cached_property-1.5.1-1.ky10.noarch.rpm --force --nodeps

rpm -ivh python3-docker-4.0.2-1.ky10.noarch.rpm --force --nodeps

rpm -ivh python3-dockerpty-0.4.1-1.ky10.noarch.rpm --force --nodeps

rpm -ivh python3-docker-pycreds-0.4.0-1.1.ky10.noarch.rpm --force --nodeps

rpm -ivh python3-docopt-0.6.2-11.ky10.noarch.rpm --force --nodeps

rpm -ivh python3-ipaddress-1.0.23-1.ky10.noarch.rpm --force --nodeps

rpm -ivh python3-jsonschema-2.6.0-6.ky10.noarch.rpm --force --nodeps

rpm -ivh python3-paramiko-2.4.3-1.ky10.ky10.noarch.rpm --force --nodeps

rpm -ivh python3-pyasn1-0.3.7-8.ky10.noarch.rpm --force --nodeps

rpm -ivh python3-pyyaml-5.3.1-4.ky10.x86_64.rpm --force --nodeps

rpm -ivh python3-texttable-1.4.0-2.ky10.noarch.rpm --force --nodeps

rpm -ivh python3-websocket-client-0.47.0-6.ky10.noarch.rpm --force --nodeps

rpm -ivh fuse-overlayfs-0.7.2-6.el7_8.x86_64.rpm

rpm -ivh slirp4netns-0.4.3-4.el7_8.x86_64.rpm
安装
tar xf docker-20.10.9.tgz

mv docker/* /usr/bin/
测试启动
dockerd
添加 system启动
编辑docker的系统服务文件
vim /usr/lib/systemd/system/docker.service[Unit]
Description=Docker Application Container Engine
Documentation=https://docs.docker.com
After=network-online.target firewalld.service
Wants=network-online.target
[Service]
Type=notify
ExecStart=/usr/bin/dockerd
ExecReload=/bin/kill -s HUP $MAINPID
LimitNOFILE=infinity
LimitNPROC=infinity
TimeoutStartSec=0
Delegate=yes
KillMode=process
Restart=on-failure
StartLimitBurst=3
StartLimitInterval=60s
[Install]
WantedBy=multi-user.target设置自启动
systemctl start docker & systemctl enable docker配置cgroupd
vim /etc/docker/daemon.json{
"exec-opts": ["native.cgroupdriver=systemd"]
}//设置开机启动
systemctl start docker
systemctl enable docker
//重启docker
systemctl daemon-reload
systemctl restart dockerk8s准备和安装
安装包在 准备文件的 docker-images下,上传到服务器/home 下

准备镜像(所有节点)
解压
cd /home/docker-images/
tar -zxvf kubeadm-images-1.18.0.tar.gz -C /home/docker-images/kubeadm-images-1.18.0 
制作加载镜像脚本
vim load-image.sh#!/bin/bash
ls /home/docker-images/kubeadm-images-1.18.0 > /home/images-list.txt
cd /home/docker-images/kubeadm-images-1.18.0
docker load -i /home/docker-images/cni.tar
docker load -i /home/docker-images/node.tar
docker load -i /home/docker-images/kuboard.tar
for i in $(cat /home/images-list.txt)
do
docker load -i $i
done
然后导入镜像
chmod +7 load-image.sh
./load-image.sh
修改镜像版本(所有节点)
修改K8S 1.23.7版本所需版本的images
修改命令:docker tag 【镜像ID】【镜像名称】:【tag版本信息】
docker tag registry.aliyuncs.com/google_containers/kube-apiserver:v1.25.4 registry.aliyuncs.com/google_containers/kube-apiserver:v1.23.7
docker tag registry.aliyuncs.com/google_containers/kube-proxy:v1.25.4 registry.aliyuncs.com/google_containers/kube-proxy:v1.23.7
docker tag registry.aliyuncs.com/google_containers/kube-scheduler:v1.25.4 registry.aliyuncs.com/google_containers/kube-scheduler:v1.23.7
docker tag registry.aliyuncs.com/google_containers/kube-controller-manager:v1.25.4 registry.aliyuncs.com/google_containers/kube-controller-manager:v1.23.7
docker tag registry.aliyuncs.com/google_containers/etcd:3.5.5-0 registry.aliyuncs.com/google_containers/etcd:3.5.5-0
docker tag registry.aliyuncs.com/google_containers/pause:3.8 registry.aliyuncs.com/google_containers/pause:3.8
docker tag registry.aliyuncs.com/google_containers/coredns:v1.9.3 registry.aliyuncs.com/google_containers/coredns:v1.9.3

这样就准备好了所有的镜像
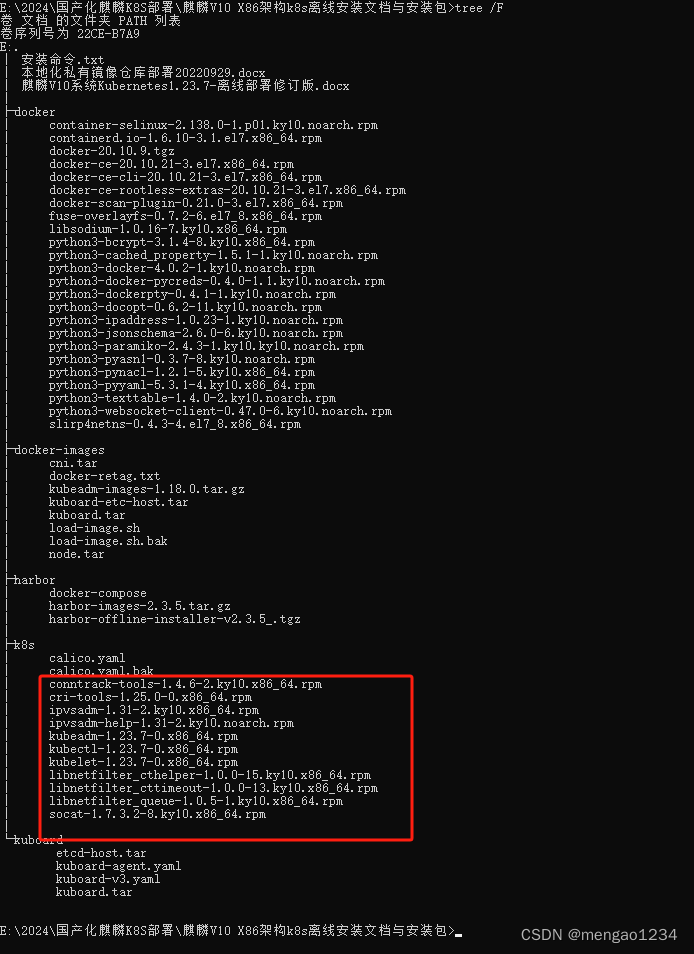
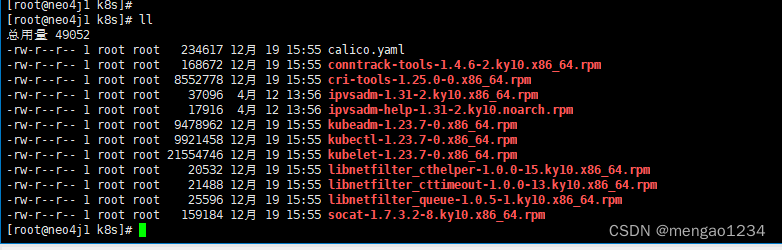
安装 kubeadm,kubelet 和 kubectl(所有节点)
安装包在 准备文件的 k8s下,上传到服务器/home 下
工具说明:
- kubeadm:部署集群用的命令
- kubelet:在集群中每台机器上都要运行的组件,负责管理pod、容器的什么周期
- kubectl:集群管理工具配置阿里云源:
安装:
cd /home/k8s

rpm -ivh *.rpm
设置开机自启动:
systemctl start kubelet && systemctl enable kubelet安装 master(master节点)
kubeadm init --apiserver-advertise-address=172.171.16.147 --image-repository registry.aliyuncs.com/google_containers --kubernetes-version v1.23.7 --service-cidr=10.96.0.0/16 --pod-network-cidr=10.244.0.0/16
日志如下:
[init] Using Kubernetes version: v1.23.7
[preflight] Running pre-flight checks
[preflight] Pulling images required for setting up a Kubernetes cluster
[preflight] This might take a minute or two, depending on the speed of your internet connection
[preflight] You can also perform this action in beforehand using 'kubeadm config images pull'
[certs] Using certificateDir folder "/etc/kubernetes/pki"
[certs] Generating "ca" certificate and key
[certs] Generating "apiserver" certificate and key
[certs] apiserver serving cert is signed for DNS names [crawler-k8s-master kubernetes kubernetes.default kubernetes.default.svc kubernetes.default.svc.cluster.local] and IPs [10.96.0.1 172.171.16.147]
[certs] Generating "apiserver-kubelet-client" certificate and key
[certs] Generating "front-proxy-ca" certificate and key
[certs] Generating "front-proxy-client" certificate and key
[certs] Generating "etcd/ca" certificate and key
[certs] Generating "etcd/server" certificate and key
[certs] etcd/server serving cert is signed for DNS names [crawler-k8s-master localhost] and IPs [172.171.16.147 127.0.0.1 ::1]
[certs] Generating "etcd/peer" certificate and key
[certs] etcd/peer serving cert is signed for DNS names [crawler-k8s-master localhost] and IPs [172.171.16.147 127.0.0.1 ::1]
[certs] Generating "etcd/healthcheck-client" certificate and key
[certs] Generating "apiserver-etcd-client" certificate and key
[certs] Generating "sa" key and public key
[kubeconfig] Using kubeconfig folder "/etc/kubernetes"
[kubeconfig] Writing "admin.conf" kubeconfig file
[kubeconfig] Writing "kubelet.conf" kubeconfig file
[kubeconfig] Writing "controller-manager.conf" kubeconfig file
[kubeconfig] Writing "scheduler.conf" kubeconfig file
[kubelet-start] Writing kubelet environment file with flags to file "/var/lib/kubelet/kubeadm-flags.env"
[kubelet-start] Writing kubelet configuration to file "/var/lib/kubelet/config.yaml"
[kubelet-start] Starting the kubelet
[control-plane] Using manifest folder "/etc/kubernetes/manifests"
[control-plane] Creating static Pod manifest for "kube-apiserver"
[control-plane] Creating static Pod manifest for "kube-controller-manager"
[control-plane] Creating static Pod manifest for "kube-scheduler"
[etcd] Creating static Pod manifest for local etcd in "/etc/kubernetes/manifests"
[wait-control-plane] Waiting for the kubelet to boot up the control plane as static Pods from directory "/etc/kubernetes/manifests". This can take up to 4m0s
[apiclient] All control plane components are healthy after 12.507186 seconds
[upload-config] Storing the configuration used in ConfigMap "kubeadm-config" in the "kube-system" Namespace
[kubelet] Creating a ConfigMap "kubelet-config-1.23" in namespace kube-system with the configuration for the kubelets in the cluster
NOTE: The "kubelet-config-1.23" naming of the kubelet ConfigMap is deprecated. Once the UnversionedKubeletConfigMap feature gate graduates to Beta the default name will become just "kubelet-config". Kubeadm upgrade will handle this transition transparently.
[upload-certs] Skipping phase. Please see --upload-certs
[mark-control-plane] Marking the node crawler-k8s-master as control-plane by adding the labels: [node-role.kubernetes.io/master(deprecated) node-role.kubernetes.io/control-plane node.kubernetes.io/exclude-from-external-load-balancers]
[mark-control-plane] Marking the node crawler-k8s-master as control-plane by adding the taints [node-role.kubernetes.io/master:NoSchedule]
[bootstrap-token] Using token: i4dp7i.7t1j8ezmgwkj1gio
[bootstrap-token] Configuring bootstrap tokens, cluster-info ConfigMap, RBAC Roles
[bootstrap-token] configured RBAC rules to allow Node Bootstrap tokens to get nodes
[bootstrap-token] configured RBAC rules to allow Node Bootstrap tokens to post CSRs in order for nodes to get long term certificate credentials
[bootstrap-token] configured RBAC rules to allow the csrapprover controller automatically approve CSRs from a Node Bootstrap Token
[bootstrap-token] configured RBAC rules to allow certificate rotation for all node client certificates in the cluster
[bootstrap-token] Creating the "cluster-info" ConfigMap in the "kube-public" namespace
[kubelet-finalize] Updating "/etc/kubernetes/kubelet.conf" to point to a rotatable kubelet client certificate and key
[addons] Applied essential addon: CoreDNS
[addons] Applied essential addon: kube-proxy

Your Kubernetes control-plane has initialized successfully!

To start using your cluster, you need to run the following as a regular user:

  mkdir -p $HOME/.kube
  sudo cp -i /etc/kubernetes/admin.conf $HOME/.kube/config
  sudo chown $(id -u):$(id -g) $HOME/.kube/config

Alternatively, if you are the root user, you can run:

  export KUBECONFIG=/etc/kubernetes/admin.conf

You should now deploy a pod network to the cluster.
Run "kubectl apply -f [podnetwork].yaml" with one of the options listed at:
  https://kubernetes.io/docs/concepts/cluster-administration/addons/

Then you can join any number of worker nodes by running the following on each as root:

kubeadm join 172.171.16.147:6443 --token i4dp7i.7t1j8ezmgwkj1gio \
	--discovery-token-ca-cert-hash sha256:9fb74686ff3bea5769e5ed466dbb2c32ed3fc920374ff2175b39b8162ac27f8f
在 master上进一步执行上面提示的命令
mkdir -p $HOME/.kube
cp -i /etc/kubernetes/admin.conf $HOME/.kube/config
chown $(id -u):$(id -g) $HOME/.kube/config
安装kubernets node(node节点)
将 node 添加到集群中
kubeadm join 172.171.16.147:6443 --token i4dp7i.7t1j8ezmgwkj1gio \
	--discovery-token-ca-cert-hash sha256:9fb74686ff3bea5769e5ed466dbb2c32ed3fc920374ff2175b39b8162ac27f8f
然后显示日志:
[preflight] Running pre-flight checks
[preflight] Reading configuration from the cluster...
[preflight] FYI: You can look at this config file with 'kubectl -n kube-system get cm kubeadm-config -o yaml'
[kubelet-start] Writing kubelet configuration to file "/var/lib/kubelet/config.yaml"
[kubelet-start] Writing kubelet environment file with flags to file "/var/lib/kubelet/kubeadm-flags.env"
[kubelet-start] Starting the kubelet
[kubelet-start] Waiting for the kubelet to perform the TLS Bootstrap...

This node has joined the cluster:
* Certificate signing request was sent to apiserver and a response was received.
* The Kubelet was informed of the new secure connection details.

Run 'kubectl get nodes' on the control-plane to see this node join the cluster.
安装kubernets 网络插件 calico(master节点操作)
安装包在 准备文件的 k8s/calico.yaml下,上传到服务器/home 下
下载 calico文档 https://docs.projectcalico.org/manifests/calico.yaml
修改文件中的镜像地址
grep image calico.yaml

sed -i 's#docker.io##g' calico.yaml
kubectl apply -f calico.yaml
可能出现的问题
(1)修改 CALICO_IPV4POOL_CIDR 参数为 :
kubeadm init --apiserver-advertise-address=172.171.16.147 --image-repository registry.aliyuncs.com/google_containers --kubernetes-version v1.23.7 --service-cidr=10.96.0.0/16 --pod-network-cidr=10.244.0.0/16
中的--pod-network-cidr值
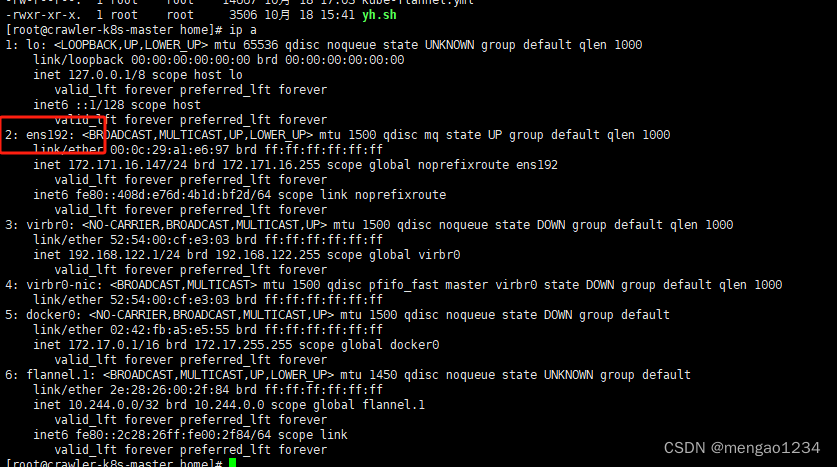
(2)修改 IP_AUTODETECTION_METHOD 的值为网卡名称(没有这个参数就不用修改)
ip a 查看网卡名称
kubenertes使用与测试
kubectl create deployment nginx --image=nginx #部署nginx
kubectl expose deployment nginx --port=80 --type=NodePort #暴露端口
kubectl get pod,svc #查看服务状态
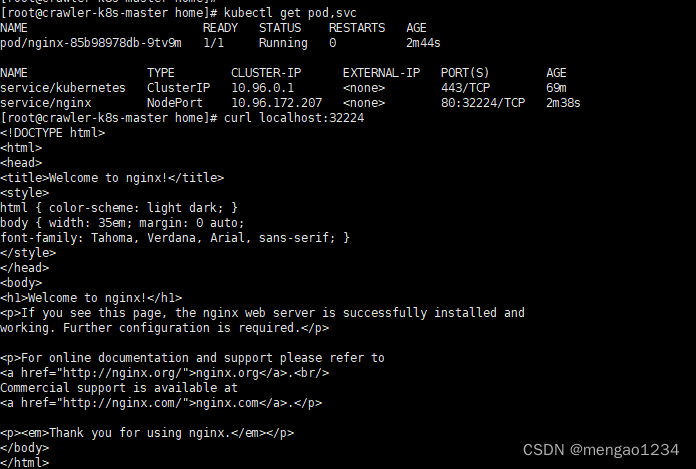
部署完成
安装kuboard
安装包在 准备文件的docker-images/kuboard.tar下,上传到服务器/home 下
安装包在 准备文件的kuboard下,上传到服务器/home 下
上面提到的两个目录下都有
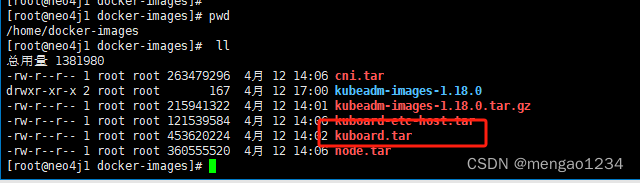
cd /home/docker-images
dpcker load -i kuboard.tar
内建用户库方式安装
官网安装地址:安装 Kuboard v3 - 内建用户库 | Kuboard
sudo docker run -d \
  --restart=unless-stopped \
  --name=kuboard \
  -p 80:80/tcp \
  -p 10081:10081/tcp \
  -e KUBOARD_ENDPOINT="http://172.171.16.147:80" \
  -e KUBOARD_AGENT_SERVER_TCP_PORT="10081" \
  -v /root/kuboard-data:/data \
  eipwork/kuboard:v3
  # 也可以使用镜像 swr.cn-east-2.myhuaweicloud.com/kuboard/kuboard:v3 ,可以更快地完成镜像下载。
  # 请不要使用 127.0.0.1 或者 localhost 作为内网 IP \
  # Kuboard 不需要和 K8S 在同一个网段,Kuboard Agent 甚至可以通过代理访问 Kuboard Server \
WARNING
- KUBOARD_ENDPOINT 参数的作用是,让部署到 Kubernetes 中的
kuboard-agent知道如何访问 Kuboard Server; - KUBOARD_ENDPOINT 中也可以使用外网 IP;
- Kuboard 不需要和 K8S 在同一个网段,Kuboard Agent 甚至可以通过代理访问 Kuboard Server;
- 建议在 KUBOARD_ENDPOINT 中使用域名;
- 如果使用域名,必须能够通过 DNS 正确解析到该域名,如果直接在宿主机配置
/etc/hosts文件,将不能正常运行;
参数解释
- 建议将此命令保存为一个 shell 脚本,例如
start-kuboard.sh,后续升级 Kuboard 或恢复 Kuboard 时,需要通过此命令了解到最初安装 Kuboard 时所使用的参数; - 第 4 行,将 Kuboard Web 端口 80 映射到宿主机的
80端口(您可以根据自己的情况选择宿主机的其他端口); - 第 5 行,将 Kuboard Agent Server 的端口
10081/tcp映射到宿主机的10081端口(您可以根据自己的情况选择宿主机的其他端口); - 第 6 行,指定 KUBOARD_ENDPOINT 为
http://内网IP,如果后续修改此参数,需要将已导入的 Kubernetes 集群从 Kuboard 中删除,再重新导入; - 第 7 行,指定 KUBOARD_AGENT_SERVER 的端口为
10081,此参数与第 5 行中的宿主机端口应保持一致,修改此参数不会改变容器内监听的端口10081,例如,如果第 5 行为-p 30081:10081/tcp则第 7 行应该修改为-e KUBOARD_AGENT_SERVER_TCP_PORT="30081"; - 第 8 行,将持久化数据
/data目录映射到宿主机的/root/kuboard-data路径,请根据您自己的情况调整宿主机路径;
其他参数
- 在启动命令行中增加环境变量
KUBOARD_ADMIN_DERAULT_PASSWORD,可以设置admin用户的初始默认密码。
访问 Kuboard v3.x
在浏览器输入 http://172.171.16.147:80 即可访问 Kuboard v3.x 的界面,登录方式:
- 用户名:
admin - 密 码:
Kuboard123
kubernetes方式安装
安装包在 准备文件的 kuboard下,上传到服务器/home 下
参考文献:安装 Kuboard v3 - kubernetes | Kuboard
-
执行 Kuboard v3 在 K8S 中的安装
kubectl apply -f https://addons.kuboard.cn/kuboard/kuboard-v3.yaml
# 您也可以使用下面的指令,唯一的区别是,该指令使用华为云的镜像仓库替代 docker hub 分发 Kuboard 所需要的镜像
# kubectl apply -f https://addons.kuboard.cn/kuboard/kuboard-v3-swr.yaml
等待 Kuboard v3 就绪
执行指令 watch kubectl get pods -n kuboard,等待 kuboard 名称空间中所有的 Pod 就绪,如下所示,
如果结果中没有出现 kuboard-etcd-xxxxx 的容器,请查看 常见错误 中关于 缺少 Master Role 的描述。
[root@node1 ~]# kubectl get pods -n kuboard
NAME                               READY   STATUS    RESTARTS   AGE
kuboard-agent-2-65bc84c86c-r7tc4   1/1     Running   2          28s
kuboard-agent-78d594567-cgfp4      1/1     Running   2          28s
kuboard-etcd-fh9rp                 1/1     Running   0          67s
kuboard-etcd-nrtkr                 1/1     Running   0          67s
kuboard-etcd-ader3                 1/1     Running   0          67s
kuboard-v3-645bdffbf6-sbdxb        1/1     Running   0          67s
访问 Kuboard
-
在浏览器中打开链接
http://your-node-ip-address:30080 -
输入初始用户名和密码,并登录
- 用户名:
admin - 密码:
Kuboard123
- 用户名:
浏览器兼容性
- 请使用 Chrome / FireFox / Safari / Edge 等浏览器
- 不兼容 IE 以及以 IE 为内核的浏览器
添加新的集群
- Kuboard v3 是支持 Kubernetes 多集群管理的,在 Kuboard v3 的首页里,点击 添加集群 按钮,在向导的引导下可以完成集群的添加;
- 向 Kuboard v3 添加新的 Kubernetes 集群时,请确保:
- 您新添加集群可以访问到当前集群 Master 节点
内网IP的30080 TCP、30081 TCP、30081 UDP端口; - 如果您打算新添加到 Kuboard 中的集群与当前集群不在同一个局域网,请咨询 Kuboard 团队,帮助您解决问题。
- 您新添加集群可以访问到当前集群 Master 节点
卸载
-
执行 Kuboard v3 的卸载
kubectl delete -f https://addons.kuboard.cn/kuboard/kuboard-v3.yaml -
清理遗留数据
在 master 节点以及带有
k8s.kuboard.cn/role=etcd标签的节点上执行rm -rf /usr/share/kuboard
参考文献与常见错误(见参考文献)
Kubeadm部署k8s集群
Kubernetes安装和试用
kube-flannel.yml(已修改镜像下载数据源)
Linux高级---k8s搭建之使用calico网络插件


