系统负载自适应流控
规则配置
规则创建
public class SystemRule extends AbstractRule {
    private double highestSystemLoad = -1;
    private double highestCpuUsage = -1;
    private double qps = -1;
    private long avgRt = -1;
    private long maxThread = -1;
}
SystemRule类包含了以下几个指标。
highestSystemLoad:对应 Dashboard 上的 LOAD 菜单,代表系统最高负载值,默认为 -1,只有大于等于 0.0 才生效。avgRt:对应 Dashboard 上的 RT菜单,代表系统平均响应时间,默认为 -1,只有大于0才生效。maxThread:对应 Dashboard 上的线程数菜单,代表系统允许的最大线程数,默认为 -1,只有大于 0 才生效。qps:对应 Dashboard 上的入口 QPS 菜单,代表限流的阈值,默认为 -1,只有大于 0 才生效。highestCpuUsage:对应 Dashboard 上的 CPU 使用率菜单,代表最高CPU 使用率,取值是 [0,1] 之间,默认为 -1,只有大于等于0.0才生效
监听器实例化和管理
这部分和之前的黑白名单差不多
系统负载自适应规则的核心类是 SystemRuleManager,它负责管理系统负载自适应规则的加载、更新和监听。当系统负载自适应规则发生变化时,SystemRuleManager 通过观察者模式通知相应的 RulePropertyListener 进行更新
创建监听器的代码位置
public final class SystemRuleManager {
    // 省略其它代码...

    private static AtomicBoolean checkSystemStatus = new AtomicBoolean(false);

    private static SystemStatusListener statusListener = null;
    private final static SystemPropertyListener listener = new SystemPropertyListener();
    private static SentinelProperty<List<SystemRule>> currentProperty = new DynamicSentinelProperty<List<SystemRule>>();

    // 创建单核线程池
    private final static ScheduledExecutorService scheduler = Executors.newScheduledThreadPool(1,
                                                                                               new NamedThreadFactory("sentinel-system-status-record-task", true));

    static {

        checkSystemStatus.set(false);
        // 初始化系统状态监听器
        statusListener = new SystemStatusListener();
        // 任务调度, 一秒执行一次statusListener的任务, 即监听系统的负载状态
        scheduler.scheduleAtFixedRate(statusListener, 0, 1, TimeUnit.SECONDS);
        // 初始化SystemRule监听器
        currentProperty.addListener(listener);
    }

    // 省略其它代码...
}
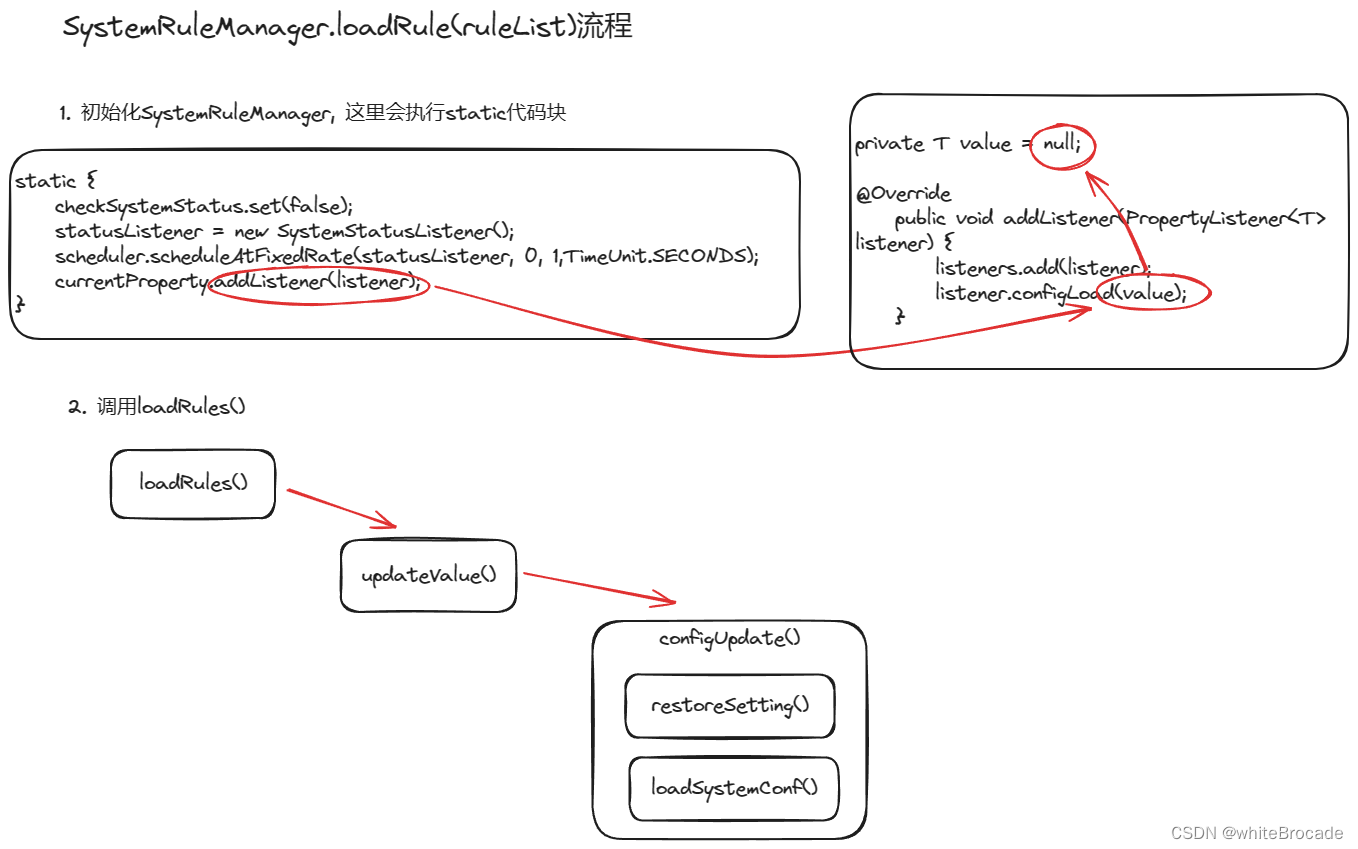
规则初始化
当调用SystemRuleManager的loadRules()时
public static void loadRules(List<SystemRule> rules) {
    currentProperty.updateValue(rules);
}


@Override
public boolean updateValue(T newValue) {
    if (isEqual(value, newValue)) {
        return false;
    }
    RecordLog.info("[DynamicSentinelProperty] Config will be updated to: {}", newValue);

    // 注意看这里, 和之前的黑白名单规则一样, 也是初始化了
    value = newValue;
    for (PropertyListener<T> listener : listeners) {
        // 遍历通知监听器
        listener.configUpdate(newValue);
    }
    return true;
}


@Override
public synchronized void configUpdate(List<SystemRule> rules) {
    // 为了恢复这些系统设置到初始状态,以便重新进行监控和设置
    restoreSetting();
    // systemRules = rules;
    // 如果配置SystemRule, 那么遍历规则, 并加载规则
    if (rules != null && rules.size() >= 1) {
        for (SystemRule rule : rules) {
            // 加载系统配置,根据传入的SystemRule对象中的参数设置系统最高负载、CPU使用率、平均响应时间、最大线程数和QPS
            loadSystemConf(rule);
        }
    } else { // 如果没有配置SystemRule, 那么关闭系统自适应检查
        checkSystemStatus.set(false);
    }

    // 省略其它代码...
}
核心loadSystemConf()
此方法会判断是否配置了 LOAD、RT、THREAD、QPS、CPU,如果配置这些规则中的某一个,那么就将 checkSystemStatus 置为 true,也就是打开系统自适应功能
也就是说, 系统自适应功能是否开启就看这个方法
public static void loadSystemConf(SystemRule rule) {
    boolean checkStatus = false;
    // Check if it's valid.

    // highestSystemLoad参数大于等于0且小于当前最高系统负载,则更新最高系统负载,并标记为已设置
    if (rule.getHighestSystemLoad() >= 0) {
        highestSystemLoad = Math.min(highestSystemLoad, rule.getHighestSystemLoad());
        highestSystemLoadIsSet = true;
        checkStatus = true;
    }

    // 如果highestCpuUsage参数大于0且小于等于1,则更新CPU使用率的最高限制,并标记为已设置,如果大于1则记录警告日志
    if (rule.getHighestCpuUsage() >= 0) {
        if (rule.getHighestCpuUsage() > 1) {
            RecordLog.warn(String.format("[SystemRuleManager] Ignoring invalid SystemRule: "
                                         + "highestCpuUsage %.3f > 1", rule.getHighestCpuUsage()));
        } else {
            highestCpuUsage = Math.min(highestCpuUsage, rule.getHighestCpuUsage());
            highestCpuUsageIsSet = true;
            checkStatus = true;
        }
    }

    // 如果果avgRt参数大于等于0,则更新平均响应时间的最高限制,并标记为已设置
    if (rule.getAvgRt() >= 0) {
        maxRt = Math.min(maxRt, rule.getAvgRt());
        maxRtIsSet = true;
        checkStatus = true;
    }

    // 如果maxThread参数大于等于0,则更新最大线程数的最高限制,并标记为已设置
    if (rule.getMaxThread() >= 0) {
        maxThread = Math.min(maxThread, rule.getMaxThread());
        maxThreadIsSet = true;
        checkStatus = true;
    }

    // 如果qps参数大于等于0,则更新QPS的最高限制,并标记为已设置
    if (rule.getQps() >= 0) {
        qps = Math.min(qps, rule.getQps());
        qpsIsSet = true;
        checkStatus = true;
    }

    // 根据上述值决定是否开启系统自适应检查
    checkSystemStatus.set(checkStatus);

}
流程图如下
规则验证
SystemSlot是第六个执行的slot
public class SystemSlot extends AbstractLinkedProcessorSlot<DefaultNode> {
    @Override
    public void entry(Context context, ResourceWrapper resourceWrapper, DefaultNode node, int count, boolean prioritized, Object... args) throws Throwable {
        // 检查系统规则
        SystemRuleManager.checkSystem(resourceWrapper, count);

        // 如果检查通过,继续执行后续的处理链
        fireEntry(context, resourceWrapper, node, count, prioritized, args);
    }

    @Override
    public void exit(Context context, ResourceWrapper resourceWrapper, int count, Object... args) {
        fireExit(context, resourceWrapper, count, args);
    }
}
核心方法就是checkSystem()
public static void checkSystem(ResourceWrapper resourceWrapper, int count) throws BlockException {
    // 参数验证,资源为空直接放行
    if (resourceWrapper == null) {
        return;
    }
    // 判断系统自适应功能是否开启,如果没开启则直接放行。
    if (!checkSystemStatus.get()) {
        return;
    }

    // 判断资源的流量是否为入口流量,如果不是IN,则直接放行,也就是说Sentinel系统自适应限流只对入口流量生效,如果类型为OUT则直接放行
    if (resourceWrapper.getEntryType() != EntryType.IN) {
        return;
    }

    // 获取当前qps,如果当前qps大于SystemRule规则配置的阈值,则直接抛BlockException异常
    double currentQps = Constants.ENTRY_NODE.passQps();
    if (currentQps + count > qps) {
        throw new SystemBlockException(resourceWrapper.getName(), "qps");
    }

    // 获取当前线程,如果当前线程大于SystemRule规则配置的阈值,则直接抛BlockException 异常
    int currentThread = Constants.ENTRY_NODE.curThreadNum();
    if (currentThread > maxThread) {
        throw new SystemBlockException(resourceWrapper.getName(), "thread");
    }

    // 获取当前平均响应时间指标,如果当前平均响应时间大于SystemRule规则配置的阈值,则直接抛BlockException异常
    double rt = Constants.ENTRY_NODE.avgRt();
    if (rt > maxRt) {
        throw new SystemBlockException(resourceWrapper.getName(), "rt");
    }

    // 如果当前系统负载大于规则配置的系统负载,则采取bbr算法验证
    if (highestSystemLoadIsSet && getCurrentSystemAvgLoad() > highestSystemLoad) {
        // bbr算法
        if (!checkBbr(currentThread)) {
            throw new SystemBlockException(resourceWrapper.getName(), "load");
        }
    }

    // 判断当前CPU使用率是否大于SystemRule规则配置的阈值,如果大于,则抛出BlockException异常
    if (highestCpuUsageIsSet && getCurrentCpuUsage() > highestCpuUsage) {
        throw new SystemBlockException(resourceWrapper.getName(), "cpu");
    }
}

// 使用BBR对负载进行校验
private static boolean checkBbr(int currentThread) {
    if (currentThread > 1 &&
        currentThread > Constants.ENTRY_NODE.maxSuccessQps() * Constants.ENTRY_NODE.minRt() / 1000) {
        return false;
    }
    return true;
}
上述有几个点需要说明
- BBR是什么?负载怎么获取的?
- Constants.ENTRY_NODE中的指标是什么存储进去的?
- CPU又是怎么获取的
BBR算法
BBR (Bottleneck Bandwidth and Round-trip propagation time) 是 Google 开发的一种拥塞控制算法,主要用于解决网络拥塞问题。下面我们将上面的代码进行拆解下:
- 首先检查当前线程数是否大于 1,如果不是,则直接返回
true,表示通过 BBR 检查。 - 如果当前线程数大于 1,那么检查当前线程数是否大于
(Constants.ENTRY_NODE.maxSuccessQps() * Constants.ENTRY_NODE.minRt() / 1000)maxSuccessQps()是每秒最大成功请求数minRt()是最小响应时间- 如果当前线程数大于这个计算值,那么返回
false,表示未通过 BBR 检查。否则,返回true。
用通俗的语言解释:检查当前线程数是否大于(每秒最大成功请求数 * 最小响应时间 / 1000),如果大于这个值,说明系统可能出现拥塞,返回 false,否则返回 true。
举个例子,假设 currentThread 为 5,maxSuccessQps() 为 10,minRt() 为 200。那么计算值为 (10 * 200) / 1000 = 2。因为 currentThread 大于计算值,所以返回 false,表示未通过 BBR 检查。
checkBbr 方法的目的是在系统负载较高的情况下,通过限制并行线程数来防止系统过载
Constants.ENTRY_NODE相关说明
其实Constants.ENTRY_NODE的指标其实就是在ClusterNode中统计的, 这个ClusterNode专门用户统计某资源在全部Context内的指标
public final static ClusterNode ENTRY_NODE = new ClusterNode(TOTAL_IN_RESOURCE_NAME, ResourceTypeConstants.COMMON);
ClusterNode最终也是通过StatisticSlot统计QPS、Thread、avgRt 这三个指标, 可以看到下边类图的继承关系
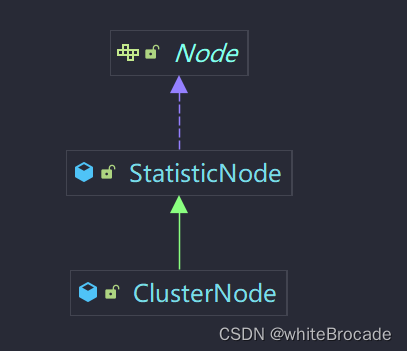
观察一下StatisticSlot是怎么收集这个几个资源的, 下边展示核心代码, 非核心代码省略
public class StatisticSlot extends AbstractLinkedProcessorSlot<DefaultNode> {
    @Override
    public void entry(Context context, ResourceWrapper resourceWrapper, DefaultNode node, int count, boolean prioritized, Object... args) throws Throwable {
        try {
            // 其它代码...
            if (resourceWrapper.getEntryType() == EntryType.IN) {
                // 通过线程数
                Constants.ENTRY_NODE.increaseThreadNum();
                // QPS通过数
                Constants.ENTRY_NODE.addPassRequest(count);
            }
        } catch (PriorityWaitException ex) {
            // 其它代码...
            if (resourceWrapper.getEntryType() == EntryType.IN) {
                // 拒绝线程数
                Constants.ENTRY_NODE.increaseThreadNum();
            }

            if (resourceWrapper.getEntryType() == EntryType.IN) {
                // 拒绝QPS数
                Constants.ENTRY_NODE.increaseBlockQps(count);
            }
        }
    }


    @Override
    public void exit(Context context, ResourceWrapper resourceWrapper, int count, Object... args) {
        // // 获取当前时间作为响应时间
        long completeStatTime = TimeUtil.currentTimeMillis();
        // rt(此次请求所耗费 的时间)= 响应时间 - 开始时间
        long rt = completeStatTime - context.getCurEntry().getCreateTimestamp();

        // 如果是请求类型是 IN
        if (resourceWrapper.getEntryType() == EntryType.IN) {
            // 则记录 rt 到 ClusterNode
            recordCompleteFor(Constants.ENTRY_NODE, count, rt, error);
        }
    }
}
可以看到上边代码判断流量类型为 EntryType.IN, 才调用 Constants.ENTRY_NODE相关的方法统计QPS、Thread、avgRt
CPU相关指标
获取
Java提供了与之对应的API供我们获取CPU指标, sentinel直接在这个基础上进行了封装, 代码位于com.alibaba.csp.sentinel.slots.system.SystemStatusListener#run, 这个工具类可以改造为我们所用
public class SystemStatusListener implements Runnable {

    volatile double currentLoad = -1;
    volatile double currentCpuUsage = -1;


    volatile long processCpuTime = 0;
    volatile long processUpTime = 0;

    /*
    通过JMX获取操作系统的系统负载、CPU使用率等指标信息,并计算当前进程的CPU使用率。如果系统负载超过预设阈值,则记录系统状态日志
    */
    @Override
    public void run() {
        try {
            // 获取操作系统的MXBean实例
            OperatingSystemMXBean osBean = ManagementFactory.getPlatformMXBean(OperatingSystemMXBean.class);
            // 获取系统平均负载值
            currentLoad = osBean.getSystemLoadAverage();

          	// 获取系统CPU使用率, 0.0代表所有CPU完全空闲,1.0代表所有CPU一直在满负荷运行
            double systemCpuUsage = osBean.getSystemCpuLoad();


            RuntimeMXBean runtimeBean = ManagementFactory.getPlatformMXBean(RuntimeMXBean.class);
            // 获取当前进程的CPU时间(以纳秒为单位)
            long newProcessCpuTime = osBean.getProcessCpuTime();
            // 获取当前Java虚拟机的运行时间(以毫秒为单位)
            long newProcessUpTime = runtimeBean.getUptime();
            // 获取可用的CPU核心数量
            int cpuCores = osBean.getAvailableProcessors();

            // 计算前后两次采集之间进程CPU时间的差值,并转换成毫秒
            long processCpuTimeDiffInMs = TimeUnit.NANOSECONDS
                    .toMillis(newProcessCpuTime - processCpuTime);
            // 计算运行时间的差值
            long processUpTimeDiffInMs = newProcessUpTime - processUpTime;
            // 将CPU时间差除以运行时间差,然后除以可用CPU核心数。这样得到的结果是每个CPU核心上的平均进程CPU使用率
            double processCpuUsage = (double) processCpuTimeDiffInMs / processUpTimeDiffInMs / cpuCores;

            // 更新全局变量存储最新的进程CPU时间和运行时间,以便下一次循环计算时使用
            processCpuTime = newProcessCpuTime;
            processUpTime = newProcessUpTime;

            // 将计算得到的进程CPU使用率与系统CPU使用率进行比较,取较大者作为当前CPU使用率
            currentCpuUsage = Math.max(processCpuUsage, systemCpuUsage);
            // 如果当前系统负载(currentLoad)大于预先设定的阈值(SystemRuleManager
            if (currentLoad > SystemRuleManager.getSystemLoadThreshold()) {
                // 调用writeSystemStatusLog()方法,将系统过载信息写入日志中
                writeSystemStatusLog();
            }
        } catch (Throwable e) {
            RecordLog.warn("[SystemStatusListener] Failed to get system metrics from JMX", e);
        }
    }
}
获取频率
public final class SystemRuleManager {

    // 这种线程池的创建方式值的学习,因为使用了NamedThreadFactory,将线程池里的线程做到见名知意
    private final static ScheduledExecutorService scheduler = Executors.newScheduledThreadPool(1, new NamedThreadFactory("sentinel-system-status-record-task", true));

    static {
        // 1s 执行一次
        scheduler.scheduleAtFixedRate(new SystemStatusListener(), 0, 1, TimeUnit.SECONDS);
    }
}
参考资料
通关 Sentinel 流量治理框架 - 编程界的小學生


