发文章是为了证明自己真的掌握了一个知识,同时给他人带来帮助,如有问题,欢迎指正,祝大家万事胜意!
目录
前言
本实验主要内容为操作系统参数检查、 openGauss 健康状态检查、数据库性能检查、日志检查
和清理、时间一致性检查、应用连接数检查、例行维护表等
我的环境:
| 设备名称 | 设备型号 | 软件版本 |
| 虚拟机 | VMware | VMware-workstation-full-17.5.1 |
| 操作系统 | openEuler | openEuler 22.3LTS |
| 数据库 | openGauss | openGauss 5.0.0 |
需要的工具,大家不用现在下,后面用到了再下也可以,如果需要相关文件,可以评论,其实大多数都是可以去官网下的哈,因为我只能通过网盘给大家,文件又有点大,网盘的速度大家都是清楚的哈哈,所以还是推荐大家去官网,如果实在找不到可以找我


openGauss数据库安全指导
1 用户权限控制
1.1 实验介绍
1.1.1 关于本实验
本实验主要描述用户的创建管理、角色的创建管理、 Schema 的创建管理、用户权限设置、用
户安全策略设置。
1.1.2 实验目的
掌握用户、角色、 Schema 的创建及管理;
掌握用户权限的授予各回收;
掌握用户安全策略如何设置。
1.2 用户
通过 CREATE USER 创建的用户,默认具有 LOGIN 权限;
通过 CREATE USER 创建用户的同时系统会在执行该命令的数据库中,为该用户创建一个同名
的 SCHEMA ;其他数据库中,则不自动创建同名的 SCHEMA ;用户可使用 CREATE SCHEMA
命令,分别在其他数据库中,为该用户创建同名 SCHEMA 。
1.2.1 创建、修改、删除用户
步骤 1 启动服务器,再使用 gsql 客户端以管理员用户身份连接 postgres 数据库,假设端口号为
15400 。
[omm@node0 ~]$ gsql -d postgres -p 26000 -r
failed to connect /opt/huawei/tmp:26000.
[omm@node0 ~]$ gsql -d postgres -p 15400 -r
gsql ((openGauss 5.0.0 build a07d57c3) compiled at 2023-03-29 03:37:13 commit 0 last mr  )
Non-SSL connection (SSL connection is recommended when requiring high-security)
Type "help" for help.
步骤 2 连接数据库后,进入 SQL 命令界面。创建用户 jim ,登录密码为 Bigdata@123 。
openGauss=# CREATE USER jim PASSWORD 'Bigdata@123';
CREATE ROLE
openGauss=#
说明:密码规则如下:
密码默认不少于 8 个字符;
不能与用户名及用户名倒序相同;
至少包含大写字母( A-Z ),小写字母( a-z ),数字( 0-9 ),非字母数字字符(限定为
~!@#$%^&*()-_=+\|[{}];:,<.>/? )四类字符中的三类字符;
创建用户时,应当使用双引号或单引号将用户密码括起来。
步骤 3 查看用户列表。
openGauss=#  SELECT * FROM pg_user;
 usename | usesysid | usecreatedb | usesuper | usecatupd | userepl |  passwd  | valbegin | valuntil |   respool    | parent | spacelimit | useconfig | nodegroup | tempspacelimit |
spillspacelimit | usemonitoradmin | useoperatoradmin | usepolicyadmin
---------+----------+-------------+----------+-----------+---------+----------+----------+----------+--------------+--------+------------+-----------+-----------+----------------+-
----------------+-----------------+------------------+----------------
 omm     |       10 | t           | t        | t         | t       | ******** |          |          | default_pool |      0 |            |           |           |                |
                | t               | t                | t
 lucy    |    49478 | f           | f        | f         | f       | ******** |          |          | default_pool |      0 |            |           |           |                |
                | f               | f                | f
 jim     |    82240 | f           | f        | f         | f       | ******** |          |          | default_pool |      0 |            |           |           |                |
                | f               | f                | f
(3 rows)
步骤 4 创建有 “ 创建数据库 ” 权限的用户,则需要加 CREATEDB 关键字。
openGauss=# CREATE USER dim CREATEDB PASSWORD 'Bigdata@123';
CREATE ROLE
openGauss=#
步骤 5 将用户 jim 的登录密码由 Bigdata@123 修改为 Abcd@123 。
openGauss=#  ALTER USER jim IDENTIFIED BY 'Abcd@123' REPLACE 'Bigdata@123';
ALTER ROLE
openGauss=#
步骤 6 为用户 jim 追加有创建角色的 CREATEROLE 权限。
openGauss=#  ALTER USER jim CREATEROLE;
ALTER ROLE
openGauss=#
步骤 7 锁定 jim 帐户。
openGauss=# ALTER USER jim ACCOUNT LOCK;
ALTER ROLE
openGauss=#
步骤 8 解锁 jim 帐户。
openGauss=#  ALTER USER jim ACCOUNT UNLOCK;
ALTER ROLE
openGauss=#
步骤 9 删除用户.
openGauss=# DROP USER jim CASCADE;
DROP ROLE
openGauss=#
1.3 角色
角色是拥有数据库对象和权限的实体。在不同的环境中角色可以认为是一个用户,一个组或者
兼顾两者。
在数据库中添加一个新角色,角色无登录权限。
创建角色的用户必须具备 CREATE ROLE 的权限或者是系统管理员。
1.3.1 创建、修改、删除角色
步骤 1 启动服务器,再使用 gsql 客户端以管理员用户身份连接 postgres 数据库,假设端口号为
15400 。
[omm@node0 ~]$ gsql -d postgres -p 15400 -r
gsql ((openGauss 5.0.0 build a07d57c3) compiled at 2023-03-29 03:37:13 commit 0 last mr  )
Non-SSL connection (SSL connection is recommended when requiring high-security)
Type "help" for help.

openGauss=#
步骤 2 创建一个角色,名为 manager ,密码为 Bigdata@123 。
openGauss=# CREATE ROLE manager IDENTIFIED BY 'Bigdata@123';
CREATE ROLE
openGauss=#
步骤 3 创建一个角色,从 2020 年 7 月 1 日开始生效,到 2020 年 12 月 1 日失效。
openGauss=# CREATE ROLE miriam WITH LOGIN PASSWORD 'Bigdata@123' VALID BEGIN '2020-07-01' VALID UNTIL '2020-12-01';
CREATE ROLE
openGauss=#
步骤 4 修改角色 manager 的密码为 abcd@123 。
openGauss=# ALTER ROLE manager IDENTIFIED BY 'abcd@123' REPLACE 'Bigdata@123';
ALTER ROLE
openGauss=#
步骤 5 修改角色 manager 为系统管理员。
openGauss=#  ALTER ROLE manager SYSADMIN;
ALTER ROLE
步骤 6 删除角色 manager。
openGauss=# DROP ROLE manager;
DROP ROLE
步骤 7 查看角色。
openGauss=#  SELECT * FROM PG_ROLES;
         rolname          | rolsuper | rolinherit | rolcreaterole | rolcreatedb | rolcatupdate | rolcanlogin | rolreplication | rolauditadmin | rolsystemadmin | rolconnlimit | rolp
assword |     rolvalidbegin      |     rolvaliduntil      |  rolrespool  | rolparentid | roltabspace | rolconfig |  oid  | roluseft | rolkind | nodegroup | roltempspace | rolspills
pace | rolmonitoradmin | roloperatoradmin | rolpolicyadmin
--------------------------+----------+------------+---------------+-------------+--------------+-------------+----------------+---------------+----------------+--------------+-----
--------+------------------------+------------------------+--------------+-------------+-------------+-----------+-------+----------+---------+-----------+--------------+----------
-----+-----------------+------------------+----------------
 dim                      | f        | t          | f             | t           | f            | t           | f              | f             | f              |           -1 | ****
****    |                        |                        | default_pool |           0 |             |           | 82244 | f        | n       |           |              |
     | f               | f                | f
 lucy                     | f        | t          | f             | f           | f            | t           | f              | f             | f              |           -1 | ****
****    |                        |                        | default_pool |           0 |             |           | 49478 | f        | n       |           |              |
     | f               | f                | f
 miriam                   | f        | t          | f             | f           | f            | t           | f              | f             | f              |           -1 | ****
****    | 2020-07-01 00:00:00+08 | 2020-12-01 00:00:00+08 | default_pool |           0 |             |           | 82252 | f        | n       |           |              |
     | f               | f                | f
 omm                      | t        | t          | t             | t           | t            | t           | t              | t             | t              |           -1 | ****
****    |                        |                        | default_pool |           0 |             |           |    10 | t        | n       |           |              |
     | t               | t                | t
 gs_role_directory_drop   | f        | t          | f             | f           | f            | f           | f              | f             | f              |           -1 | ****
****    |                        |                        | default_pool |           0 |             |           |  1059 | f        | n       |           |              |
     | f               | f                | f
 gs_role_directory_create | f        | t          | f             | f           | f            | f           | f              | f             | f              |           -1 | ****
****    |                        |                        | default_pool |           0 |             |           |  1056 | f        | n       |           |              |
     | f               | f                | f
 gs_role_pldebugger       | f        | t          | f             | f           | f            | f           | f              | f             | f              |           -1 | ****
****    |                        |                        | default_pool |           0 |             |           |  1055 | f        | n       |           |              |
     | f               | f                | f
 gs_role_account_lock     | f        | t          | f             | f           | f            | f           | f              | f             | f              |           -1 | ****
****    |                        |                        | default_pool |           0 |             |           |  1048 | f        | n       |           |              |
     | f               | f                | f
 gs_role_replication      | f        | t          | f             | f           | f            | f           | f              | f             | f              |           -1 | ****
****    |                        |                        | default_pool |           0 |             |           |  1047 | f        | n       |           |              |
     | f               | f                | f
 gs_role_tablespace       | f        | t          | f             | f           | f            | f           | f              | f             | f              |           -1 | ****
****    |                        |                        | default_pool |           0 |             |           |  1046 | f        | n       |           |              |
     | f               | f                | f
 gs_role_signal_backend   | f        | t          | f             | f           | f            | f           | f              | f             | f              |           -1 | ****
****    |                        |                        | default_pool |           0 |             |           |  1045 | f        | n       |           |              |
     | f               | f                | f
 gs_role_copy_files       | f        | t          | f             | f           | f            | f           | f              | f             | f              |           -1 | ****
****    |                        |                        | default_pool |           0 |             |           |  1044 | f        | n       |           |              |
     | f               | f                | f
(12 rows)
1.4 Schema
Schema 又称作模式。通过管理 Schema ,允许多个用户使用同一数据库而不相互干扰。
每个数据库包含一个或多个 Schema 。
在数据库创建用户时,系统会自动帮助用户创建一个同名 Schema 。
1.4.1 创建、修改、删除 Schema
步骤 1 启动服务器,再使用 gsql 客户端以管理员用户身份连接 postgres 数据库,假设端口号为
15400 。
步骤 2 创建模式 ds 。
openGauss=# CREATE SCHEMA ds;
CREATE SCHEMA
openGauss=#
步骤 3 将当前模式 ds 更名为 ds_new 。
openGauss=#  ALTER SCHEMA ds RENAME TO ds_new;
ALTER SCHEMA
openGauss=#
步骤 4 创建用户 jack 。
步骤 5 将 DS_NEW 的所有者修改为 jack。步骤 5 将 DS_NEW 的所有者修改为 jack。
openGauss=# ALTER SCHEMA ds_new OWNER TO jack;
ALTER SCHEMA
步骤 6 查看 Schema 所有者。
openGauss=# SELECT s.nspname,u.usename AS nspowner FROM pg_namespace s, pg_user u WHERE s.nspowner = u.usesysid;
      nspname       | nspowner
--------------------+----------
 pg_toast           | omm
 cstore             | omm
 pkg_service        | omm
 dbe_perf           | omm
 snapshot           | omm
 blockchain         | omm
 pg_catalog         | omm
 sqladvisor         | omm
 dbe_pldebugger     | omm
 dbe_pldeveloper    | omm
 dbe_sql_util       | omm
 information_schema | omm
 db4ai              | omm
 public             | omm
 tpcds              | omm
 pmk                | omm
 lucy               | lucy
 dim                | dim
 jack               | jack
 ds_new             | jack
步骤 7 删除用户 jack 和模式 ds_new 。
openGauss=# DROP SCHEMA ds_new;
DROP SCHEMA
openGauss=#  DROP USER jack;
DROP ROLE
1.5 用户权限设置及回收
使用 GRANT 命令进行用户授权包括以下三种场景:
将系统权限授权给角色或用户。
将数据库对象授权给角色或用户。
将角色或用户的权限授权给其他角色或用户。
1.5.1 将系统权限授权给用户或者角色
步骤 1 启动服务器,再使用 gsql 客户端以管理员用户身份连接 postgres 数据库,假设端口号
为 15400 。
[omm@node0 ~]$ gsql -d postgres -p 15400 -r
gsql ((openGauss 5.0.0 build a07d57c3) compiled at 2023-03-29 03:37:13 commit 0 last mr  )
Non-SSL connection (SSL connection is recommended when requiring high-security)
Type "help" for help.
步骤 2 创建名为 joe 的用户,并将 sysadmin 权限授权给 joe 。
openGauss=# CREATE USER joe PASSWORD 'Bigdata@123';
CREATE ROLE
openGauss=# GRANT ALL PRIVILEGES TO joe;
ALTER ROLE
1.5.2 将数据库对象授权给角色或用户
步骤 1 撤销 joe 用户的 sysadmin 权限,然后创建 tpcds 模式,并给 tpcds 模式下创建一张 reason
表。
openGauss=# REVOKE ALL PRIVILEGES FROM joe;
ALTER ROLE
openGauss=# CREATE SCHEMA tpcds;
CREATE SCHEMA
openGauss=#  CREATE TABLE tpcds.reason
openGauss-# (
openGauss(#  r_reason_sk INTEGER NOT NULL,
openGauss(#  r_reason_id CHAR(16) NOT NULL,
openGauss(#  r_reason_desc VARCHAR(20)
openGauss(# );
CREATE TABLE
openGauss=#
步骤 2 将模式 tpcds 的使用权限和表 tpcds.reason 的所有权限授权给用户 joe 。
openGauss=# GRANT USAGE ON SCHEMA tpcds TO joe;
GRANT
openGauss=# GRANT ALL PRIVILEGES ON tpcds.reason TO joe;
GRANT
openGauss=#
授权成功后, joe 用户就拥有了 tpcds.reason 表的所有权限,包括增删改查等权限。
步骤 3 将 tpcds.reason 表中 r_reason_sk 、 r_reason_id 、 r_reason_desc 列的查询权限,
r_reason_desc 的更新权限授权给 joe 。
openGauss=# GRANT select (r_reason_sk,r_reason_id,r_reason_desc),update (r_reason_desc) ON tpcds.reason TO joe;
GRANT
openGauss=#
步骤 4 将数据库 postgres 的连接权限授权给用户 joe ,并给予其在 postgres 中创建 schema 的权限, 而且允许 joe 将此权限授权给其他用户。
openGauss=# GRANT create,connect on database postgres TO joe WITH GRANT OPTION;
GRANT
openGauss=#
步骤 5 创建角色 tpcds_manager ,将模式 tpcds 的访问权限授权给角色 tpcds_manager ,并授予
该角色在 tpcds 下创建对象的权限,不允许该角色中的用户将权限授权给其人。
openGauss=# CREATE ROLE tpcds_manager PASSWORD 'Bigdata@123';
CREATE ROLE
openGauss=#  GRANT USAGE,CREATE ON SCHEMA tpcds TO tpcds_manager;
GRANT
openGauss=#
1.5.3 将用户或者角色的权限授权给其他用户或角色
步骤 1 创建角色 manager ,将 joe 的权限授权给 manager ,并允许该角色将权限授权给其他人。
openGauss=# CREATE ROLE manager PASSWORD 'Bigdata@123';
CREATE ROLE
openGauss=#  GRANT joe TO manager WITH ADMIN OPTION;
GRANT ROLE
openGauss=#
步骤 2 创建用户 senior_manager ,将用户 manager 的权限授权给该用户。
openGauss=#  CREATE ROLE senior_manager PASSWORD 'Bigdata@123';
CREATE ROLE
openGauss=#
1.5.4 权限回收
步骤 1 撤销权限,并清理用户。
openGauss=# REVOKE joe FROM manager;
REVOKE ROLE
openGauss=# REVOKE manager FROM senior_manager;
WARNING:  role "senior_manager" is not a member of role "manager"
REVOKE ROLE
openGauss=# DROP USER manager;
DROP ROLE
openGauss=# REVOKE ALL PRIVILEGES ON tpcds.reason FROM joe;
REVOKE
openGauss=# REVOKE ALL PRIVILEGES ON SCHEMA tpcds FROM joe;
REVOKE
openGauss=# REVOKE USAGE,CREATE ON SCHEMA tpcds FROM tpcds_manager;
REVOKE
openGauss=# DROP ROLE tpcds_manager;
DROP ROLE
openGauss=# DROP ROLE senior_manager;
DROP ROLE
openGauss=# DROP USER joe CASCADE;
DROP ROLE
注意:实验完成后请尽量清理本实验的对象,以免影响与其它实验产生冲突。
1.6 安全策略设置
为了保证帐户安全,如果用户输入密码次数超过一定次数( failed_login_attempts ),系统将
自动锁定该帐户,默认值为 10 。次数设置越小越安全,但是在使用过程中会带来不便。
当帐户被锁定时间超过设定值( password_lock_time ),则当前帐户自动解锁,默认值为 1 天。
时间设置越长越安全,但是在使用过程中会带来不便。
1.6.1 设置账户安全策略
步骤 1 启动服务器,再使用 gsql 客户端以管理员用户身份连接 postgres 数据库,假设端口号为
15400 。
[omm@node0 ~]$ gsql -d postgres -p 15400 -r
gsql ((openGauss 5.0.0 build a07d57c3) compiled at 2023-03-29 03:37:13 commit 0 last mr  )
Non-SSL connection (SSL connection is recommended when requiring high-security)
Type "help" for help.
步骤 2 配置 failed_login_attempts 参数。
查看已配置的参数。
openGauss=# SHOW failed_login_attempts;
 failed_login_attempts
-----------------------
 10
(1 row)
如果显示结果不为 10 ,执行 “ \q ” 命令退出数据库。
然后在操作系统 omm 用户下执行如下命令设置成默认值 10 。
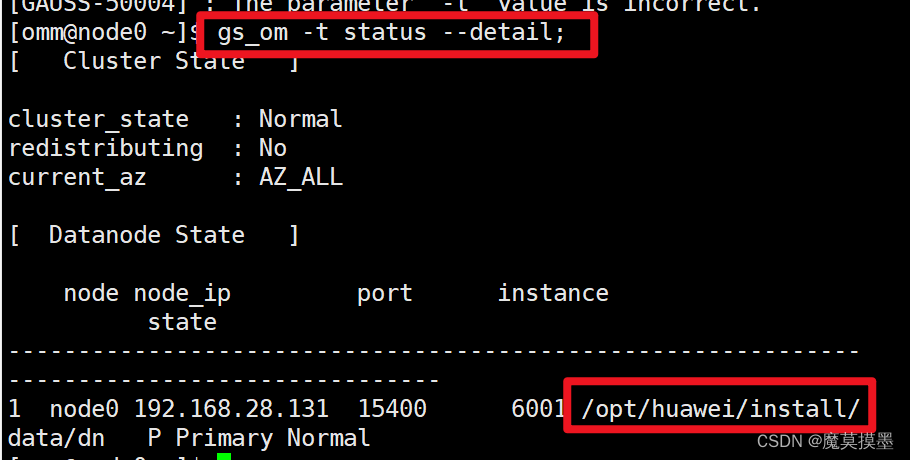
注意: /gaussdb/data/dbnode 指的是数据目录,要根据自己实际情况调整。
(在omm用户下使用 gs_om -t status --detail 可以查询到数据目录)
比如数据目录 /opt/huawei/install/data/dn ,执行结果如下。
openGauss=# SHOW failed_login_attempts;
 failed_login_attempts
-----------------------
 10
(1 row)

openGauss=# \q
[omm@node0 ~]$ gs_om -t status --detail;
[   Cluster State   ]

cluster_state   : Normal
redistributing  : No
current_az      : AZ_ALL

[  Datanode State   ]

    node node_ip         port      instance                            state
--------------------------------------------------------------------------------------------
1  node0 192.168.28.131  15400      6001 /opt/huawei/install/data/dn   P Primary Normal
[omm@node0 ~]$ gs_guc reload -D /opt/huawei/install/data/dn -c "failed_login_attempts=10" ;
The gs_guc run with the following arguments: [gs_guc -D /opt/huawei/install/data/dn -c failed_login_attempts=10 reload ].
expected instance path: [/opt/huawei/install/data/dn/postgresql.conf]
gs_guc reload: failed_login_attempts=10: [/opt/huawei/install/data/dn/postgresql.conf]
server signaled

Total instances: 1. Failed instances: 0.
Success to perform gs_guc!
步骤 3 配置 password_lock_time 参数。
查看已配置的参数。
[omm@node0 ~]$ gsql -d postgres -p 15400 -r
gsql ((openGauss 5.0.0 build a07d57c3) compiled at 2023-03-29 03:37:13 commit 0 last mr  )
Non-SSL connection (SSL connection is recommended when requiring high-security)
Type "help" for help.

openGauss=# SHOW password_lock_time;
 password_lock_time
--------------------
 1d
(1 row)
如果显示结果不为 1 ,执行 “ \q ” 命令退出数据库。
然后在操作系统 omm 用户下执行如下命令设置成默认值 1 。
openGauss=# \q
[omm@node0 ~]$ gs_guc reload -N all -I all -c "password_lock_time=1"
The gs_guc run with the following arguments: [gs_guc -N all -I all -c password_lock_time=1 reload ].
NOTICE: password_lock_time and failed_login_attempts must have positive for lock and unlock functions to work as.
Begin to perform the total nodes: 1.
Popen count is 1, Popen success count is 1, Popen failure count is 0.
Begin to perform gs_guc for datanodes.
Command count is 1, Command success count is 1, Command failure count is 0.

Total instances: 1. Failed instances: 0.
ALL: Success to perform gs_guc!
1.6.2 设置账号有效期
创建新用户时,需要限制用户的操作期限(有效开始时间和有效结束时间)。
不在有效操作期内的用户需要重新设定帐号的有效操作期。
步骤 1 启动服务器,再使用 gsql 客户端以管理员用户身份连接 postgres 数据库,假设端口号为
15400 。
[omm@node0 ~]$ gsql -d postgres -p 15400 -r
gsql ((openGauss 5.0.0 build a07d57c3) compiled at 2023-03-29 03:37:13 commit 0 last mr  )
Non-SSL connection (SSL connection is recommended when requiring high-security)
Type "help" for help.
步骤 2 创建用户并制定用户的有效开始时间和有效结束时间。
openGauss=#  CREATE USER joe WITH PASSWORD 'Bigdata@123' VALID BEGIN '2020-07-10 08:00:00' VALID UNTIL '2022-10-10 08:00:00';
CREATE ROLE
步骤 3 重新设定帐号的有效期。
openGauss=# ALTER USER joe WITH VALID BEGIN '2020-11-10 08:00:00' VALID UNTIL '2021-11-10 08:00:00';
ALTER ROLE
1.6.3 设置密码安全策略
用户密码存储在系统表 pg_authid 中,为防止用户密码泄露, openGauss 对用户密码可进行加
密存储、密码复杂度设置、密码重用天数设置、密码有效期限设置等。
步骤 1 启动服务器,再使用 gsql 客户端以管理员用户身份连接 postgres 数据库,假设端口号为
15400 。
[omm@node0 ~]$ gsql -d postgres -p 15400 -r
gsql ((openGauss 5.0.0 build a07d57c3) compiled at 2023-03-29 03:37:13 commit 0 last mr  )
Non-SSL connection (SSL connection is recommended when requiring high-security)
Type "help" for help.
步骤 2 配置的加密算法。
查看已配置的参数。
openGauss=#  SHOW password_encryption_type;
 password_encryption_type
--------------------------
 2
(1 row)
如果显示结果为 0 或 1 ,执行 “ \q ” 命令退出数据库。
然后在操作系统 omm 用户下执行如下命令将其设置为安全的加密算法。
openGauss=#  SHOW password_encryption_type;
 password_encryption_type
--------------------------
 2
(1 row)

openGauss=# \q
[omm@node0 ~]$ gs_guc reload -N all -I all -c "password_encryption_type=2"
The gs_guc run with the following arguments: [gs_guc -N all -I all -c password_encryption_type=2 reload ].
Begin to perform the total nodes: 1.
Popen count is 1, Popen success count is 1, Popen failure count is 0.
Begin to perform gs_guc for datanodes.
Command count is 1, Command success count is 1, Command failure count is 0.

Total instances: 1. Failed instances: 0.
ALL: Success to perform gs_guc!
注意说明:
当参数 password_encryption_type 设置为 0 时,表示采用 md5 方式对密码加密。 md5 为
不安全的加密算法,不建议使用。
当参数 password_encryption_type 设置为 1 时,表示采用 sha256 和 md5 方式对密码加
密。其中包含 md5 为不安全的加密算法,不建议使用。
当参数 password_encryption_type 设置为 2 时,表示采用 sha256 方式对密码加密,为默
认配置。
步骤 3 配置密码安全参数。
查看已配置的参数。
[omm@node0 ~]$ gsql -d postgres -p 15400 -r
gsql ((openGauss 5.0.0 build a07d57c3) compiled at 2023-03-29 03:37:13 commit 0 last mr  )
Non-SSL connection (SSL connection is recommended when requiring high-security)
Type "help" for help.

openGauss=#  SHOW password_policy;
 password_policy
-----------------
 1
(1 row)
如果显示结果不为 1 ,执行 “ \q ” 命令退出数据库。
然后在操作系统 omm 下执行如下命令设置成默认值 1 。
openGauss=# \q
[omm@node0 ~]$ gs_guc reload -N all -I all -c "password_policy=1"
The gs_guc run with the following arguments: [gs_guc -N all -I all -c password_policy=1 reload ].
Begin to perform the total nodes: 1.
Popen count is 1, Popen success count is 1, Popen failure count is 0.
Begin to perform gs_guc for datanodes.
Command count is 1, Command success count is 1, Command failure count is 0.

Total instances: 1. Failed instances: 0.
ALL: Success to perform gs_guc!
注意说明:
参数 password_policy 设置为 1 时表示采用密码复杂度校验,默认值;
参数 password_policy 设置为 0 时表示不采用任何密码复杂度校验,设置为 0 会存在安全
风险,不建议设置为 0 ,即使需要设置也要将所有 openGauss 节点中的 password_policy
都设置为 0 才能生效。
步骤 4 配置密码重用。
查看不可重用天数已配置的参数。
[omm@node0 ~]$ gsql -d postgres -p 15400 -r
gsql ((openGauss 5.0.0 build a07d57c3) compiled at 2023-03-29 03:37:13 commit 0 last mr  )
Non-SSL connection (SSL connection is recommended when requiring high-security)
Type "help" for help.

openGauss=# SHOW password_reuse_time;
 password_reuse_time
---------------------
 60
(1 row)
如果显示结果不为 60 ,执行 “ \q ” 命令退出数据库。
然后在操作系统 omm 下执行如下命令设置成默认值 60 。
openGauss=# \q
[omm@node0 ~]$ gs_guc reload -N all -I all -c "password_reuse_time=60"
The gs_guc run with the following arguments: [gs_guc -N all -I all -c password_reuse_time=60 reload ].
NOTICE: Checks the configuration parameters password_reuse_time and password_reuse_max when modifying password, as long as either one, can be considered the password can be reused.
Begin to perform the total nodes: 1.
Popen count is 1, Popen success count is 1, Popen failure count is 0.
Begin to perform gs_guc for datanodes.
Command count is 1, Command success count is 1, Command failure count is 0.

Total instances: 1. Failed instances: 0.
ALL: Success to perform gs_guc!
查看不可重用次数已配置的参数。
[omm@node0 ~]$ gsql -d postgres -p 15400 -r;
gsql ((openGauss 5.0.0 build a07d57c3) compiled at 2023-03-29 03:37:13 commit 0 last mr  )
Non-SSL connection (SSL connection is recommended when requiring high-security)
Type "help" for help.

openGauss=# SHOW password_reuse_max;
 password_reuse_max
--------------------
 0
(1 row)
如果显示结果不为 0 ,执行 “ \q ” 命令退出数据库。
然后在操作系统 omm 下执行如下命令设置成默认值 0 。
openGauss=# \q
[omm@node0 ~]$ gs_guc reload -N all -I all -c "password_reuse_max = 0"
The gs_guc run with the following arguments: [gs_guc -N all -I all -c password_reuse_max = 0 reload ].
Begin to perform the total nodes: 1.
Popen count is 1, Popen success count is 1, Popen failure count is 0.
Begin to perform gs_guc for datanodes.
Command count is 1, Command success count is 1, Command failure count is 0.

Total instances: 1. Failed instances: 0.
ALL: Success to perform gs_guc!
注意说明:
不可重用天数默认值为 60 天,不可重用次数默认值是 0 ;
这两个参数值越大越安全,但是在使用过程中会带来不便,其默认值符合安全标准,用户
可以根据需要重新设置参数,提高安全等级。
步骤 5 配置密码有效期限。
数据库用户的密码都有密码有效期( password_effect_time ),当达到密码到期提醒天数
( password_notify_time )时,系统会在用户登录数据库时提示用户修改密码。
配置 password_effect_time 参数。
查看已配置的参数。
openGauss=# SHOW password_effect_time;
 password_effect_time
----------------------
 90
(1 row)

openGauss=#
如果显示结果不为 90 ,执行 “ \q ” 命令退出数据库。
然后在操作系统 omm 下执行如下命令设置成默认值 90 (不建议设置为 0 )。
openGauss=# \q
[omm@node0 ~]$ gs_guc reload -N all -I all -c "password_effect_time = 90"
The gs_guc run with the following arguments: [gs_guc -N all -I all -c password_effect_time = 90 reload ].
Begin to perform the total nodes: 1.
Popen count is 1, Popen success count is 1, Popen failure count is 0.
Begin to perform gs_guc for datanodes.
Command count is 1, Command success count is 1, Command failure count is 0.

Total instances: 1. Failed instances: 0.
ALL: Success to perform gs_guc!
步骤 6 配置 password_notify_time 参数。
查看已配置的参数。
[omm@node0 ~]$ gsql -d postgres -p 15400 -r;
gsql ((openGauss 5.0.0 build a07d57c3) compiled at 2023-03-29 03:37:13 commit 0 last mr  )
Non-SSL connection (SSL connection is recommended when requiring high-security)
Type "help" for help.

openGauss=# SHOW password_notify_time;
 password_notify_time
----------------------
 7
(1 row)
如果显示结果不为 7 ,执行 “ \q ” 命令退出数据库。
然后在操作系统 omm 下执行如下命令设置成默认值 7 (不建议设置为 0 )。
openGauss=# \q
[omm@node0 ~]$ gs_guc reload -N all -I all -c "password_notify_time = 7"
The gs_guc run with the following arguments: [gs_guc -N all -I all -c password_notify_time = 7 reload ].
Begin to perform the total nodes: 1.
Popen count is 1, Popen success count is 1, Popen failure count is 0.
Begin to perform gs_guc for datanodes.
Command count is 1, Command success count is 1, Command failure count is 0.

Total instances: 1. Failed instances: 0.
ALL: Success to perform gs_guc!
用户权限控制实验结束。
2 审计
2.1 实验介绍
2.1.1 关于本实验
数据库安全对数据库系统来说至关重要, openGauss 将用户对数据库的所有操作写入审计日志,
数据库安全管理员可以利用这些日志信息,重现导致数据库现状的一系列事件,找出非法操作
的用户、时间和内容等。
本实验主要描述如何来设置数据库审计,主要包括审计开关、查看审计结果、维护审计日志。
2.1.2 实验目的
掌握如何设置数据库审计及审计日志的查看。
2.2 审计开、关
审计总开关 audit_enabled 支持动态加载。在数据库运行期间修改该配置项的值会立即生效,
无需重启数据库。默认值为 on ,表示开启审计功能。
除了审计总开关,各个审计项也有对应的开关。只有开关开启,对应的审计功能才能生效。
各审计项的开关支持动态加载。在数据库运行期间修改审计开关的值,不需要重启数据库便可
生效。
步骤 1 审计总开关设置。
启动服务器,再使用 gsql 客户端以管理员用户身份连接 postgres 数据库,假设端口号为 15400 。
[omm@node0 ~]$ gsql -d postgres -p 15400 -r
gsql ((openGauss 5.0.0 build a07d57c3) compiled at 2023-03-29 03:37:13 commit 0 last mr  )
Non-SSL connection (SSL connection is recommended when requiring high-security)
Type "help" for help.
查看已配置审计总开关参数。
openGauss=# show audit_enabled;
 audit_enabled
---------------
 on
(1 row)
如果显示结果不为 on ,执行 “\q” 命令退出数据库。
然后在操作系统 omm 下执行如下命令设置成默认值 on (不建议设置为 off )。
openGauss=# \q
[omm@node0 ~]$ gs_guc reload -N all -I all -c "audit_enabled = on"The gs_guc run with the following arguments: [gs_guc -N all -I all -c audit_enabled = on reload ].
Begin to perform the total nodes: 1.
Popen count is 1, Popen success count is 1, Popen failure count is 0.
Begin to perform gs_guc for datanodes.
Command count is 1, Command success count is 1, Command failure count is 0.

Total instances: 1. Failed instances: 0.
ALL: Success to perform gs_guc!
步骤 2 审计项开关设置。
查看已配置审计项参数。
以下以数据库启动、停止、恢复和切换审计项为例。
openGauss=# show audit_database_process;
 audit_database_process
------------------------
 1
(1 row)
如果显示结果不为 1 ,执行 “\q” 命令退出数据库。
然后在操作系统 omm 下执行如下命令设置成默认值 1
openGauss=# \q
[omm@node0 ~]$ gs_guc reload -N all -I all -c " audit_database_process = 1"
The gs_guc run with the following arguments: [gs_guc -N all -I all -c  audit_database_process = 1 reload ].
Begin to perform the total nodes: 1.
Popen count is 1, Popen success count is 1, Popen failure count is 0.
Begin to perform gs_guc for datanodes.
Command count is 1, Command success count is 1, Command failure count is 0.

Total instances: 1. Failed instances: 0.
ALL: Success to perform gs_guc!
注意说明:
用户登录、注销审计。
参数:audit_login_logout。
默认值为 7,表示开启用户登录、退出的审计功能。设置为 0 表示关闭用户登录、退出的审计
功能。不推荐设置除 0 和 7 之外的值。
数据库启动、停止、恢复和切换审计。
参数:audit_database_process。
默认值为 1,表示开启数据库启动、停止、恢复和切换的审计功能。
用户锁定和解锁审计。
参数:audit_user_locked。
默认值为 1,表示开启审计用户锁定和解锁功能。
用户访问越权审计。
参数:audit_user_violation。
默认值为 0,表示关闭用户越权操作审计功能。
授权和回收权限审计。
参数:audit_grant_revoke。
默认值为 1,表示开启审计用户权限授予和回收功能。
数据库对象的 CREATE,ALTER,DROP 操作审计。
参数:audit_system_object。
默认值为 12295,表示只对 DATABASE、SCHEMA、USER、DATA SOURCE 这四类数据库对
象的 CREATE、ALTER、DROP 操作进行审计。
具体表的 INSERT、UPDATE 和 DELETE 操作审计。
参数:audit_dml_state。
默认值为 0,表示关闭具体表的 DML 操作(SELECT 除外)审计功能。
SELECT 操作审计。
参数:audit_dml_state_select。
默认值为 0,表示关闭 SELECT 操作审计功能。
COPY 审计。
参数:audit_copy_exec。
默认值为 0,表示关闭 copy 操作审计功能。
存储过程和自定义函数的执行审计。
参数:audit_function_exec。
默认值为 0,表示不记录存储过程和自定义函数的执行审计日志。
SET 审计 参数:audit_set_parameter。
默认值为 1,表示记录 set 操作审计日志。
2.3 查看审计结果
步骤 1 启动服务器,再使用 gsql 客户端以管理员用户身份连接 postgres 数据库,假设端口号为15400。
[omm@node0 ~]$ gsql -d postgres -p 15400 -r
gsql ((openGauss 5.0.0 build a07d57c3) compiled at 2023-03-29 03:37:13 commit 0 last mr  )
Non-SSL connection (SSL connection is recommended when requiring high-security)
Type "help" for help.
步骤 2 查询审计记录
openGauss=# SELECT time,type,result,username,object_name FROM pg_query_audit('2020-07-10 10:00:00','2020-08-15 09:47:33');
 time | type | result | username | object_name
------+------+--------+----------+-------------
(0 rows)

openGauss=#
2.4 维护审计日志
设置自动删除审计日志。
步骤 1 启动服务器,再使用 gsql 客户端以管理员用户身份连接 postgres 数据库,假设端口号为
15400 。
[omm@node0 ~]$ gsql -d postgres -p 15400 -r
gsql ((openGauss 5.0.0 build a07d57c3) compiled at 2023-03-29 03:37:13 commit 0 last mr  )
Non-SSL connection (SSL connection is recommended when requiring high-security)
Type "help" for help.
步骤 2 配置审计文件占用磁盘空间的大小( audit_space_limit )。
查看已配置的参数。
openGauss=# SHOW audit_space_limit;
 audit_space_limit
-------------------
 1GB
(1 row)
如果显示结果不为 1GB ( 1024MB ),执行 “\q” 命令退出数据库。
然后在操作系统 omm 用户下执行如下命令设置成默认值 1024MB 。
openGauss=# \q
[omm@node0 ~]$ gs_guc reload -N all -I all -c "audit_space_limit=1024MB"
The gs_guc run with the following arguments: [gs_guc -N all -I all -c audit_space_limit=1024MB reload ].
Begin to perform the total nodes: 1.
Popen count is 1, Popen success count is 1, Popen failure count is 0.
Begin to perform gs_guc for datanodes.
Command count is 1, Command success count is 1, Command failure count is 0.

Total instances: 1. Failed instances: 0.
ALL: Success to perform gs_guc!
步骤 3 配置审计文件个数的最大值( audit_file_remain_threshold )。
查看已配置的参数。
openGauss=# SHOW audit_file_remain_threshold;
 audit_file_remain_threshold
-----------------------------
 1048576
(1 row)
如果显示结果不为 1048576,执行“\q”命令退出数据库。
然后在操作系统 omm 用户执行如下命令设置成默认值 1048576 。
openGauss=# \q
[omm@node0 ~]$ gs_guc reload -N all -I all -c "audit_file_remain_threshold=1048576"
The gs_guc run with the following arguments: [gs_guc -N all -I all -c audit_file_remain_threshold=1048576 reload ].
Begin to perform the total nodes: 1.
Popen count is 1, Popen success count is 1, Popen failure count is 0.
Begin to perform gs_guc for datanodes.
Command count is 1, Command success count is 1, Command failure count is 0.

Total instances: 1. Failed instances: 0.
ALL: Success to perform gs_guc!
步骤 4 手动删除审计日志。
当不再需要某时段的审计记录时,可以使用审计接口命令 pg_delete_audit 进行手动删除。
以删除 2020/7/10 到 2020/7/20 之间的审计记录为例:
[omm@node0 ~]$ gsql -d postgres -p 15400 -r
gsql ((openGauss 5.0.0 build a07d57c3) compiled at 2023-03-29 03:37:13 commit 0 last mr  )
Non-SSL connection (SSL connection is recommended when requiring high-security)
Type "help" for help.

openGauss=# ^C
openGauss=# SELECT pg_delete_audit('2020-07-10 ','2020-07-20');
 pg_delete_audit
-----------------

(1 row)
审计实验结束。


