实时监控目录下多个新文件
TAILDIR SOURCE【实现多目录监控、断点续传】
监视指定的文件,一旦检测到附加到每个文件的新行,就几乎实时地跟踪它们。如果正在写入新行,则该源将在等待写入完成时重试读取它们。它以JSON格式定期将每个文件的最后读位置写入给定的位置文件。如果Flume因某种原因停止或关闭,它可以从现有位置文件上写入的位置重新开始跟踪。
# Name the components on this agent
a1.sources = r1
a1.sinks = k1
a1.channels = c1

# Describe/configure the source
a1.sources.r1.type = TAILDIR
# 多文件监控
a1.sources.r1.filegroups = f1 f2
a1.sources.r1.filegroups.f1 = /opt/module/flume/files/.*
a1.sources.r1.filegroups.f2 = /opt/module/flume/files2/.*
# 断点续传
a1.sources.r1.positionFile = /opt/module/flume/taildir_position.json

# Describe the sink
a1.sinks.k1.type = logger

# Use a channel which buffers events in memory
a1.channels.c1.type = memory
a1.channels.c1.capacity = 1000
a1.channels.c1.transactionCapacity = 100

# Bind the source and sink to the channel
a1.sources.r1.channels = c1
a1.sinks.k1.channel = c1
HDFS Sink
该sink将事件写入HDFS,可以根据经过的时间、数据大小或事件数量定期滚动文件(关闭当前文件并创建新文件)。
# Name the components on this agent
a1.sources = r1
a1.sinks = k1
a1.channels = c1

# Describe/configure the source
a1.sources.r1.type = TAILDIR
# 多文件监控
a1.sources.r1.filegroups = f1 f2
a1.sources.r1.filegroups.f1 = /opt/module/flume/files/.*
a1.sources.r1.filegroups.f2 = /opt/module/flume/files2/.*
# 断点续传
a1.sources.r1.positionFile = /opt/module/flume/taildir_position.json

# Describe the sink
a1.sinks.k1.type = hdfs
a1.sinks.k1.hdfs.path = hdfs://hadoop102:8020/flume/%Y-%m-%d/%H
a1.sinks.k1.hdfs.filePrefix = log-
# 实际开发使用时间需要调整为1h 学习使用改为10s
a1.sinks.k1.hdfs.rollInterval = 10
a1.sinks.k1.hdfs.rollSize = 134217700
a1.sinks.k1.hdfs.rollCount = 0
# 是否使用本地时间戳
a1.sinks.k1.hdfs.useLocalTimeStamp = true
# 设置文件类型,可支持压缩
a1.sinks.k1.hdfs.fileType = DataStream

# Use a channel which buffers events in memory
a1.channels.c1.type = memory
a1.channels.c1.capacity = 1000
a1.channels.c1.transactionCapacity = 100

# Bind the source and sink to the channel
a1.sources.r1.channels = c1
a1.sinks.k1.channel = c1
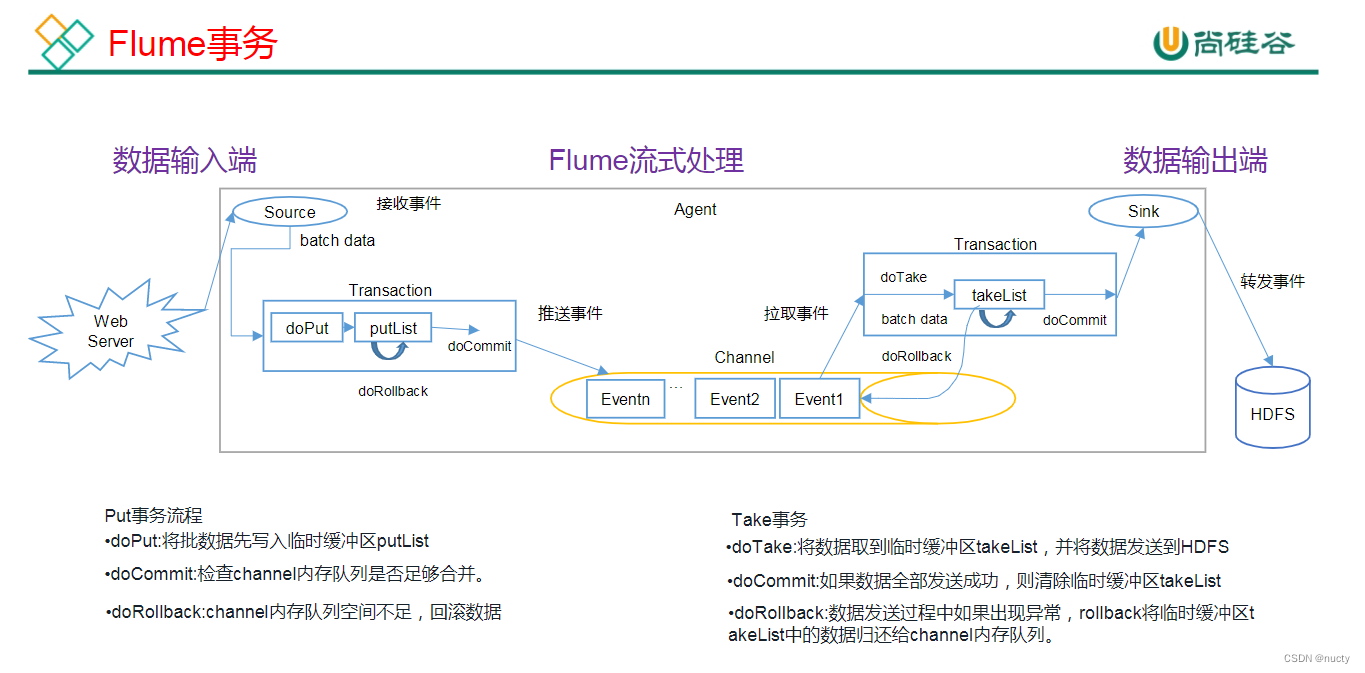
Flume事务
多路复用及拦截器的使用
在该案例中,我们以端口数据模拟日志,以数字(单个)和字母(单个)模拟不同类型的日志,我们需要自定义 interceptor 区分数字和字母,将其分别发往不同的分析系统(Channel)。

首先编写拦截器,我觉得起主要作用是对header打标签,后传给channel选择器来进行分通道传输。
package com.atguigu.flume;

import org.apache.flume.Context;
import org.apache.flume.Event;
import org.apache.flume.interceptor.Interceptor;

import java.util.List;
import java.util.Map;

/**
 * 1、 继承flume的拦截器接口
 * 2、 重写4个抽象方法
 * 3、 编写静态内部类 builder
 */

public class MyInterceptor implements Interceptor {
    public void initialize() {

    }

    // 处理单个event
    public Event intercept(Event event) {
        // 在event的头信息里面添加标记
        // 提供给channel selector 选择发送到不同的channel
        Map<String, String> headers = event.getHeaders();
        String log = new String(event.getBody());

        // 判断第一个单符 如果是字母发送到channel1, 如果是数字发送到channel2
        char c = log.charAt(0);
        if (c >= '0' && c <= '9') {
            // 判断c为数字
            headers.put("type", "number");
        } else if ((c >= 'A' && c <= 'Z') || (c >= 'a' && c <= 'z')) {
            // 判断c为字母
            headers.put("type", "letter");
        }

        event.setHeaders(headers);
        return event;
    }

    // 处理多个event
    public List<Event> intercept(List<Event> events) {
        for (Event event : events) {
            intercept(event);
        }
        return events;
    }

    public void close() {

    }

    public static class Builder implements Interceptor.Builder{
        // 创建一个拦截器对象
        public Interceptor build() {
            return new MyInterceptor();
        }

        // 读配置文件
        public void configure(Context context) {

        }
    }
}
其次完成配置文件的编写:
①为 hadoop102 上 的 Flume1 配 置 1 个 netcat source , 1 个 sink group ( 2 个 avro sink),并配置相应的 ChannelSelector 和 interceptor。
# Name the components on this agent
a1.sources = r1
a1.sinks = k1 k2
a1.channels = c1 c2

# Describe/configure the source
a1.sources.r1.type = netcat
a1.sources.r1.bind = localhost
a1.sources.r1.port = 44444

a1.sources.r1.selector.type = multiplexing
# 填写标记的key
a1.sources.r1.selector.header = type
# value对应的channel
a1.sources.r1.selector.mapping.number = c2
a1.sources.r1.selector.mapping.letter = c1
a1.sources.r1.selector.default = c2

a1.sources.r1.interceptors = i1
a1.sources.r1.interceptors.i1.type = com.atguigu.flume.MyInterceptor$Builder

# Describe the sink
a1.sinks.k1.type = avro
a1.sinks.k1.hostname = hadoop102
a1.sinks.k1.port = 4141

a1.sinks.k2.type = avro
a1.sinks.k2.hostname = hadoop102
a1.sinks.k2.port = 4142

# Use a channel which buffers events in memory
a1.channels.c1.type = memory
a1.channels.c1.capacity = 1000
a1.channels.c1.transactionCapacity = 100

a1.channels.c2.type = memory
a1.channels.c2.capacity = 1000
a1.channels.c2.transactionCapacity = 100

# Bind the source and sink to the channel
a1.sources.r1.channels = c1 c2
a1.sinks.k1.channel = c1
a1.sinks.k2.channel = c2
②为 hadoop102 上的 Flume4 配置一个 avro source 和一个 logger sink。
# Name the components on this agent
a1.sources = r1
a1.sinks = k1
a1.channels = c1

# Describe/configure the source
a1.sources.r1.type = avro
a1.sources.r1.bind = hadoop102
a1.sources.r1.port = 4141

# Describe the sink
a1.sinks.k1.type = logger

# Use a channel which buffers events in memory
a1.channels.c1.type = memory
a1.channels.c1.capacity = 1000
a1.channels.c1.transactionCapacity = 100

# Bind the source and sink to the channel
a1.sources.r1.channels = c1
a1.sinks.k1.channel = c1
③为 hadoop102 上的 Flume4 配置一个 avro source 和一个 logger sink。
# Name the components on this agent
a1.sources = r1
a1.sinks = k1
a1.channels = c1

# Describe/configure the source
a1.sources.r1.type = avro
a1.sources.r1.bind = hadoop102
a1.sources.r1.port = 4142

# Describe the sink
a1.sinks.k1.type = logger

# Use a channel which buffers events in memory
a1.channels.c1.type = memory
a1.channels.c1.capacity = 1000
a1.channels.c1.transactionCapacity = 100

# Bind the source and sink to the channel
a1.sources.r1.channels = c1
a1.sinks.k1.channel = c1
Flume聚合案例
(1)准备工作
分发 Flume xsync flume
在 hadoop102、hadoop103 以及 hadoop104 的/opt/module/flume/job 目录下创建一个group3 文件夹。 mkdir group3
(2)创建配置文件
配置 Source 用于监控文件,配置 Sink 输出数据到下一级 Flume。
# Name the components on this agent
a1.sources = r1
a1.sinks = k1
a1.channels = c1

# Describe/configure the source
a1.sources.r1.type = TAILDIR
a1.sources.r1.filegroups = f1
a1.sources.r1.filegroups.f1 = /opt/module/flume/files/.*
a1.sources.r1.positionFile = /opt/module/flume/taildir_position4.json

# Describe the sink
a1.sinks.k1.type = avro
a1.sinks.k1.hostname = hadoop104
a1.sinks.k1.port = 4141

# Use a channel which buffers events in memory
a1.channels.c1.type = memory
a1.channels.c1.capacity = 1000
a1.channels.c1.transactionCapacity = 100

# Bind the source and sink to the channel
a1.sources.r1.channels = c1
a1.sinks.k1.channel = c1
配置 Source 监控端口 44444 数据流,配置 Sink 数据到下一级 Flume:
# Name the components on this agent
a1.sources = r1
a1.sinks = k1
a1.channels = c1

# Describe/configure the source
a1.sources.r1.type = netcat
a1.sources.r1.bind = localhost
a1.sources.r1.port = 44444

# Describe the sink
a1.sinks.k1.type = avro
a1.sinks.k1.hostname = hadoop104
a1.sinks.k1.port = 4141

# Use a channel which buffers events in memory
a1.channels.c1.type = memory
a1.channels.c1.capacity = 1000
a1.channels.c1.transactionCapacity = 100

# Bind the source and sink to the channel
a1.sources.r1.channels = c1
a1.sinks.k1.channel = c1
配置 source 用于接收 flume1 与 flume2 发送过来的数据流,最终合并后 sink 到控制台。
# Name the components on this agent
a1.sources = r1
a1.sinks = k1
a1.channels = c1

# Describe/configure the source
a1.sources.r1.type = avro
a1.sources.r1.bind = hadoop104
a1.sources.r1.port = 4141

# Describe the sink
a1.sinks.k1.type = logger

# Use a channel which buffers events in memory
a1.channels.c1.type = memory
a1.channels.c1.capacity = 1000
a1.channels.c1.transactionCapacity = 100

# Bind the source and sink to the channel
a1.sources.r1.channels = c1
a1.sinks.k1.channel = c1
执行配置文件。


