这个标题名字可能有歧义,只是不知道如何更好的表达,总之就是将图片的像素转换成3D场景的模型,并设置这个模型的颜色,放到像素点对应的位置从而拼接成一个图片,起因是上文中用js分解了音乐,实现了模型跳动效果,既然音频可以分解,那图片应该也可以,所以就有个这篇博客。
大概得实现逻辑是这样的,先找一个图片,像素要小,越小越好,要有花纹,然后用canvas将图片的每个像素拆解出来,拆解后可以获得这个图片每个像素的位置,颜色,用集合保存每个像素的信息,在3D场景中循环,有了位置和颜色后,在循环中创建一个个正方体,将正方体的位置设置为像素的位置,y轴方向为1,创建贴图,并将贴图的颜色改为像素点的颜色,全部循环后就得到一副用正方体拼接出来的图片了。但是如果你的图片分辨率高,那么拆解出来的像素点很多,就需要筛选掉一些,否则浏览器会卡死,所以强调用分辨率低的图片。
这里先找一副图片:

下面开始代码:
首先创建场景,相机,灯光,渲染器等:
 initScene(){
      scene = new THREE.Scene();
    },
    initCamera(){
      this.camera = new THREE.PerspectiveCamera(45, window.innerWidth / window.innerHeight, 0.1, 10000);
      this.camera.position.set(200,400,200);
    },
    initLight(){
      //添加两个平行光
      const directionalLight1 = new THREE.DirectionalLight(0xffffff, 1.5);
      directionalLight1.position.set(300,300,600)
      scene.add(directionalLight1);
      const directionalLight2 = new THREE.DirectionalLight(0xffffff, 1.5);
      directionalLight2.position.set(600,200,600)
      scene.add(directionalLight2);
    },
initRenderer(){
      this.renderer = new THREE.WebGLRenderer({ antialias: true });
      this.container = document.getElementById("container")
      this.renderer.setSize(this.container.clientWidth, this.container.clientHeight);
      this.renderer.setClearColor('#AAAAAA', 1.0);
      this.container.appendChild(this.renderer.domElement);
    },
    initControl(){
      this.controls = new OrbitControls(this.camera, this.renderer.domElement);
      this.controls.enableDamping = true;
      this.controls.maxPolarAngle = Math.PI / 2.2;      // // 最大角度
    },
    initAnimate() {
      requestAnimationFrame(this.initAnimate);
      this.renderer.render(scene, this.camera);
    },
然后封装一个用canvas分解图片的方法
getImagePixels(image) {
      return new Promise((resolve) => {
        const canvas = document.createElement('canvas');
        const ctx = canvas.getContext('2d');
        canvas.width = image.width;
        canvas.height = image.height;
        ctx.drawImage(image, 0, 0);
        const imageData = ctx.getImageData(0, 0, canvas.width, canvas.height);
        const data = imageData.data;
        const pixels = [];
        for (let i = 0; i < data.length; i += 4) {
          const x = (i / 4) % canvas.width;
          const y = Math.floor((i / 4) / canvas.width);
          const r = data[i];
          const g = data[i + 1];
          const b = data[i + 2];
          const a = data[i + 3];
          pixels.push({ x, y, r, g, b, a });
        }
        resolve(pixels); // 返回所有像素的数据数组
      });
    },
然后调用这个方法获取到像素点集合信息,再循环这个集合,这里为了不卡顿,选择每40个像素点才生成一个模型,也就是下面的i%40===0的判断,
initBox(){
      const img = new Image();
      img.src = '/static/images/image.jpg';
      let geometry = new THREE.BoxGeometry(1, 1, 1);
      img.onload = async () => {
        let boxModel = []
        try {
          const allPixels = await this.getImagePixels(img);
          for (let i = 0; i < allPixels.length; i++) {
            if(i%40 === 0) {
              let r = allPixels[i].r;
              let g = allPixels[i].g;
              let b = allPixels[i].b;
              let x = allPixels[i].x;
              let y = allPixels[i].y;
              let cubeMaterial = new THREE.MeshPhysicalMaterial({color: 'rgb(' + r + ', ' + g + ', ' + b + ')'});
              this.boxMaterial.push(cubeMaterial)
              let mesh = new THREE.Mesh(geometry.clone(), cubeMaterial);
              mesh.position.set(x, 1, y);
              mesh.updateMatrix() // 更新投影矩阵,不更新各mesh位置会不正确
              boxModel.push(mesh.geometry.applyMatrix4(mesh.matrix));
            }
          }
          const boxGeometry = mergeGeometries(boxModel,true)
          let result = new THREE.Mesh(boxGeometry, this.boxMaterial)
          scene.add(result);
          console.log("執行完畢")
        } catch (error) {
          console.error('Error getting image pixels:', error);
        }
      };
    },
最终得到一副比较虚幻的图片

因为每个模型之间距离比较远,所以图片比较阴暗和虚幻,为了提高图片效果,可以将模型的宽和高改为5,
let geometry = new THREE.BoxGeometry(5, 5, 5);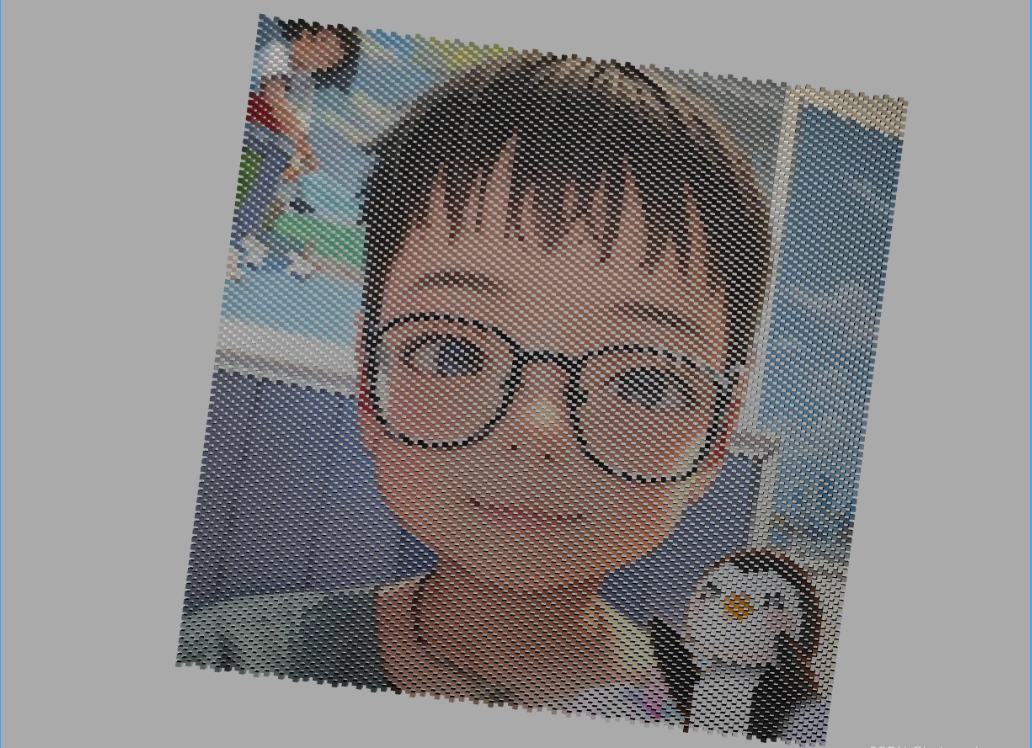
这样就真实点了,可以根据电脑性能来调整去选取的像素点个数,如果电脑足够好,也可以根据上一篇音乐的效果,给这个图片添加音乐效果的跳动。
完整代码如下:
<template>
  <div style="width:100px;height:100px;">
    <div id="container"></div>
  </div>
</template>

<script>
import * as THREE from 'three'
import {OrbitControls} from "three/addons/controls/OrbitControls";
import {mergeGeometries} from "three/addons/utils/BufferGeometryUtils";

let scene;
export default {
  name: "agv-single",
  data() {
    return{
      camera:null,
      cameraCurve:null,
      renderer:null,
      container:null,
      controls:null,
      imageData:[],
      boxMaterial:[],
    }
  },
  methods:{
    initScene(){
      scene = new THREE.Scene();
    },
    initCamera(){
      this.camera = new THREE.PerspectiveCamera(45, window.innerWidth / window.innerHeight, 0.1, 10000);
      this.camera.position.set(200,400,200);
    },
    initLight(){
      //添加两个平行光
      const directionalLight1 = new THREE.DirectionalLight(0xffffff, 1.5);
      directionalLight1.position.set(300,300,600)
      scene.add(directionalLight1);
      const directionalLight2 = new THREE.DirectionalLight(0xffffff, 1.5);
      directionalLight2.position.set(600,200,600)
      scene.add(directionalLight2);
    },
    initBox(){
      const img = new Image();
      img.src = '/static/images/image.jpg';
      let geometry = new THREE.BoxGeometry(5, 5, 5);
      img.onload = async () => {
        let boxModel = []
        try {
          const allPixels = await this.getImagePixels(img);
          for (let i = 0; i < allPixels.length; i++) {
            if(i%40 === 0) {
              let r = allPixels[i].r;
              let g = allPixels[i].g;
              let b = allPixels[i].b;
              let x = allPixels[i].x;
              let y = allPixels[i].y;
              let cubeMaterial = new THREE.MeshPhysicalMaterial({color: 'rgb(' + r + ', ' + g + ', ' + b + ')'});
              this.boxMaterial.push(cubeMaterial)
              let mesh = new THREE.Mesh(geometry.clone(), cubeMaterial);
              mesh.position.set(x, 1, y);
              mesh.updateMatrix() // 更新投影矩阵,不更新各mesh位置会不正确
              boxModel.push(mesh.geometry.applyMatrix4(mesh.matrix));
            }
          }
          const boxGeometry = mergeGeometries(boxModel,true)
          let result = new THREE.Mesh(boxGeometry, this.boxMaterial)
          scene.add(result);
          console.log("執行完畢")
        } catch (error) {
          console.error('Error getting image pixels:', error);
        }
      };
    },
    getImagePixels(image) {
      return new Promise((resolve) => {
        const canvas = document.createElement('canvas');
        const ctx = canvas.getContext('2d');
        canvas.width = image.width;
        canvas.height = image.height;
        ctx.drawImage(image, 0, 0);
        const imageData = ctx.getImageData(0, 0, canvas.width, canvas.height);
        const data = imageData.data;
        const pixels = [];
        for (let i = 0; i < data.length; i += 4) {
          const x = (i / 4) % canvas.width;
          const y = Math.floor((i / 4) / canvas.width);
          const r = data[i];
          const g = data[i + 1];
          const b = data[i + 2];
          const a = data[i + 3];
          pixels.push({ x, y, r, g, b, a });
        }
        resolve(pixels); // 返回所有像素的数据数组
      });
    },
    initRenderer(){
      this.renderer = new THREE.WebGLRenderer({ antialias: true });
      this.container = document.getElementById("container")
      this.renderer.setSize(this.container.clientWidth, this.container.clientHeight);
      this.renderer.setClearColor('#AAAAAA', 1.0);
      this.container.appendChild(this.renderer.domElement);
    },
    initControl(){
      this.controls = new OrbitControls(this.camera, this.renderer.domElement);
      this.controls.enableDamping = true;
      this.controls.maxPolarAngle = Math.PI / 2.2;      // // 最大角度
    },
    initAnimate() {
      requestAnimationFrame(this.initAnimate);
      this.renderer.render(scene, this.camera);
    },
    initPage(){
      this.initScene();
      this.initCamera();
      this.initLight();
      this.initBox();
      this.initRenderer();
      this.initControl();

      this.initAnimate();
    }
  },
  mounted() {
    this.initPage()
  }
}
</script>

<style scoped>
#container{
  position: absolute;
  width:100%;
  height:100%;
  overflow: hidden;
}

</style>


