数据丰富在本笔记本中,你将学习 Elasticsearch 查询语言 (ES|QL) 的基础知识。 你将使用官方 Elasticsearch Python 客户端。
你将学习如何:
- 运行 ES|QL 查询
- 使用处理命令
- 对表格进行排序
- 查询数据
- 链式处理命令
- 计算值
- 计算统计数据
- 访问列
- 创建直方图
- 丰富数据
- 处理数据
在一下的展示中,我将使用 Elastic Stack 8.12 来进行展示。
安装
安装 Elasticsarch 及 Kibana
如果你还没有安装好自己的 Elasticsearch 及 Kibana,请参考如下的链接来进行安装:
- 如何在 Linux,MacOS 及 Windows 上进行安装 Elasticsearch
- Kibana:如何在 Linux,MacOS 及 Windows上安装 Elastic 栈中的 Kibana
在安装的时候,我们选择 Elastic Stack 8.x 来进行安装。特别值得指出的是:ES|QL 只在 Elastic Stack 8.11 及以后得版本中才有。你需要下载 Elastic Stack 8.11 及以后得版本来进行安装。
在首次启动 Elasticsearch 的时候,我们可以看到如下的输出:

我们需要记下 Elasticsearch 超级用户 elastic 的密码。
我们还需要安装 Python 相关的包:
pip3 install elasticsearch$ pip3 list | grep elasticsearch
elasticsearch 8.12.1创建环境变量
我们在项目的根目录下创建如下的 .env 文件:
.env
ES_USER="elastic"
ES_PASSWORD="q2rqAIphl-fx9ndQ36CO"
ES_ENDPOINT="localhost"
你需要根据自己的 Elasticsearch 的配置来修改上面的值。
创建应用
在项目的根目录下打入如下的命令:
jupyter notebook拷贝 Elasticsearch 证书
我们把 Elasticsearch 的证书拷贝到当前的项目根目录下:
cp ~/elastic/elasticsearch-8.12.0/config/certs/http_ca.crt .你需要根据自己的安装目录进行相应的修改。
导入包并连接到 Elasticsearch
from dotenv import load_dotenv
from elasticsearch import Elasticsearch
from elasticsearch.helpers import bulk
import os

load_dotenv()

ES_USER = os.getenv("ES_USER")
ES_PASSWORD = os.getenv("ES_PASSWORD")
ES_ENDPOINT = os.getenv("ES_ENDPOINT")

url = f"https://{ES_USER}:{ES_PASSWORD}@{ES_ENDPOINT}:9200"

es = Elasticsearch(
    hosts=[url],
    ca_certs = "./http_ca.crt",
    verify_certs = True
)

print(es.info())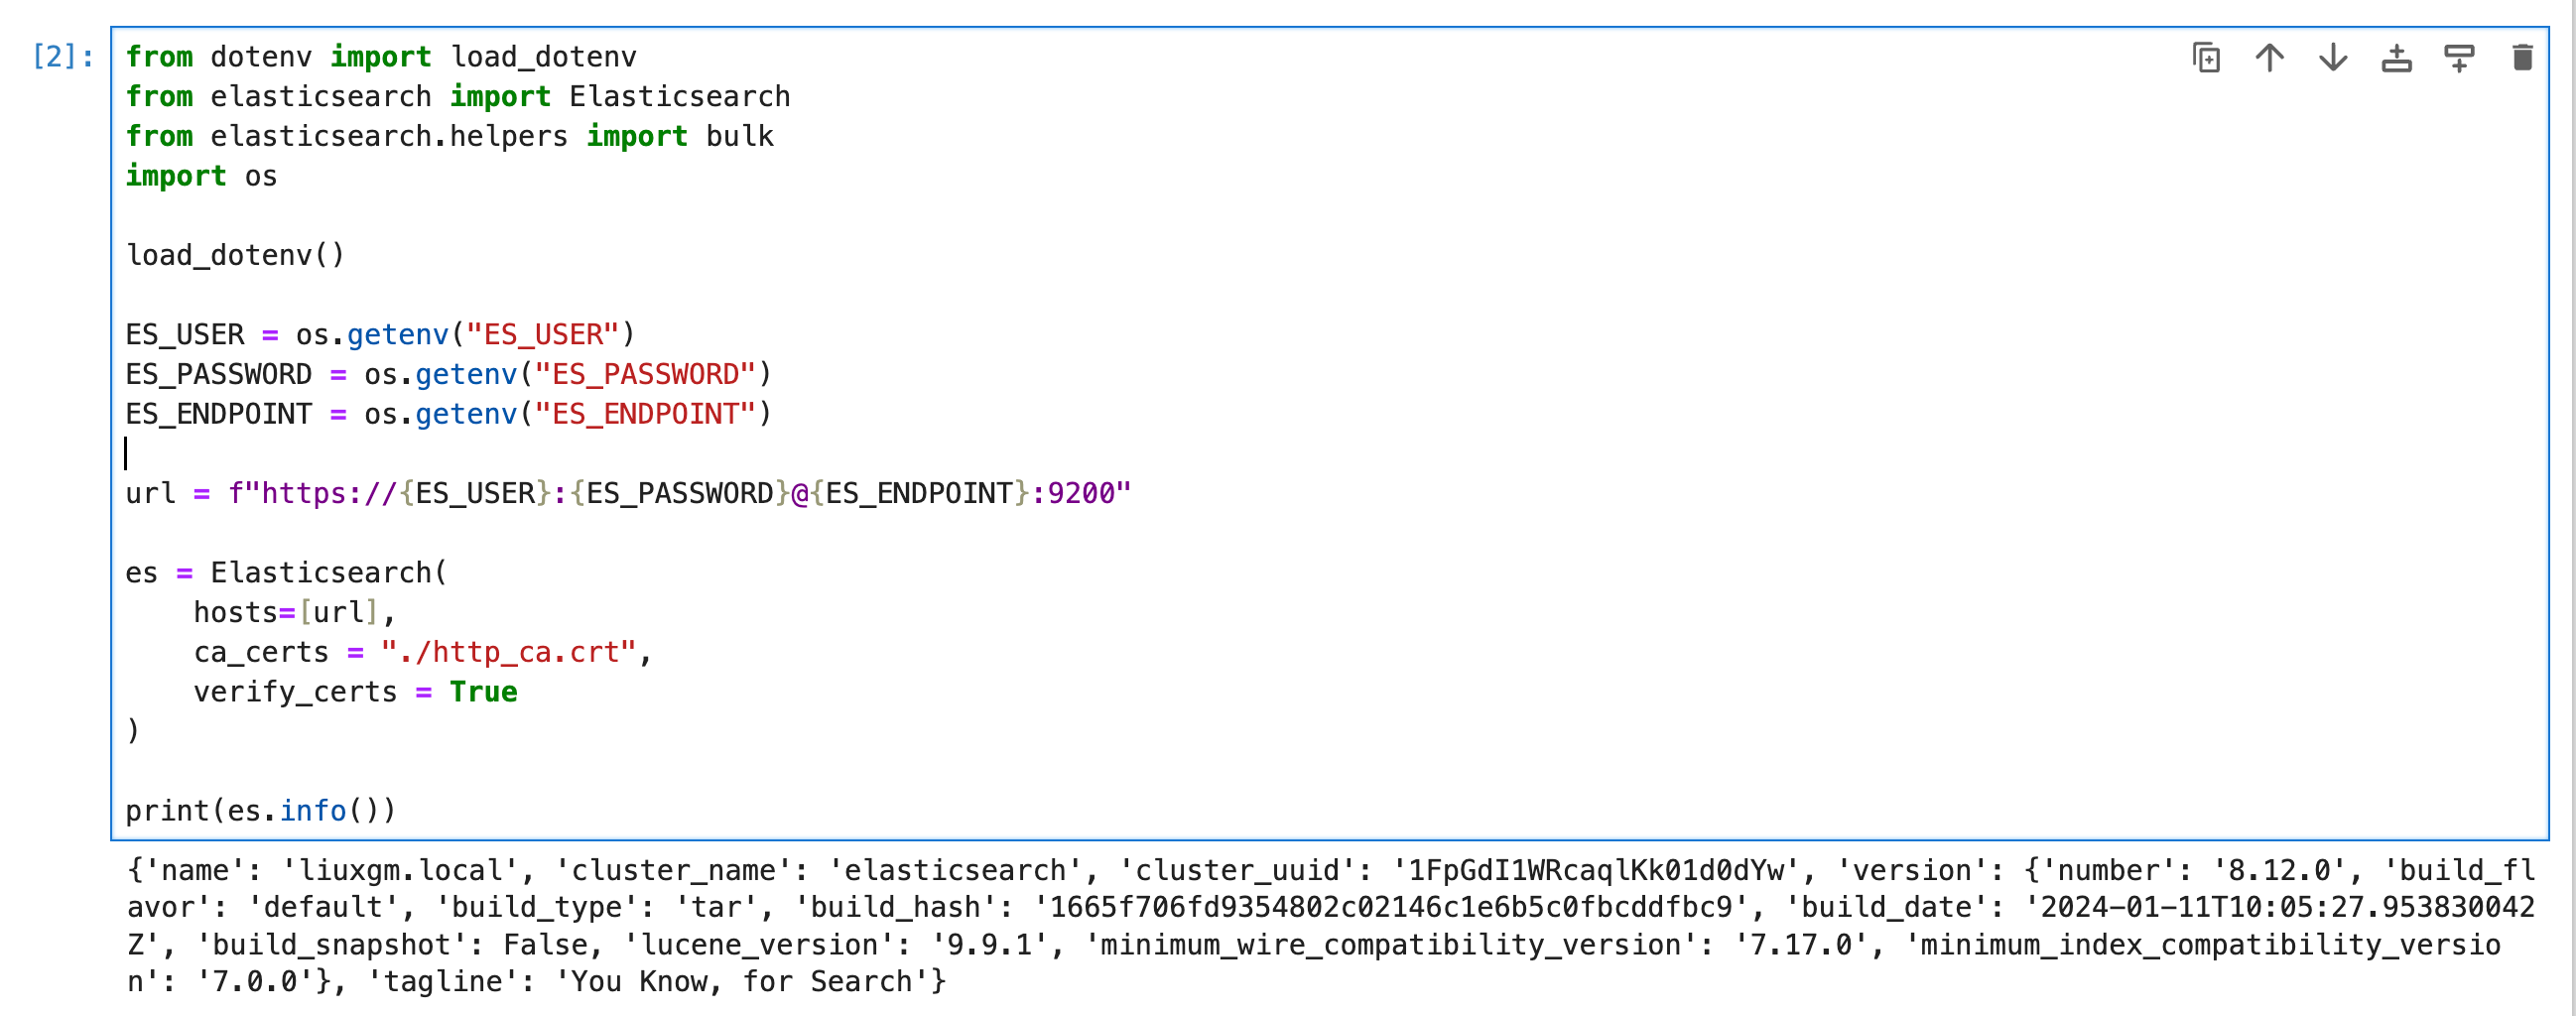
添加 sample data 到 Elasticsearch 中
在为示例数据集建立索引之前,让我们使用正确的映射创建一个名为 sample_data 的索引。
index_name = "sample_data"

mappings = {
    "mappings": {
        "properties": {"client_ip": {"type": "ip"}, "message": {"type": "keyword"}}
    }
}

# Create the index
if not es.indices.exists(index=index_name):
    es.indices.create(index=index_name, body=mappings)
接下来,我们使用 Elasticsearch Python 客户端的 bulk helpers 来索引数据:
# Documents to be indexed
documents = [
    {
        "@timestamp": "2023-10-23T12:15:03.360Z",
        "client_ip": "172.21.2.162",
        "message": "Connected to 10.1.0.3",
        "event_duration": 3450233,
    },
    {
        "@timestamp": "2023-10-23T12:27:28.948Z",
        "client_ip": "172.21.2.113",
        "message": "Connected to 10.1.0.2",
        "event_duration": 2764889,
    },
    {
        "@timestamp": "2023-10-23T13:33:34.937Z",
        "client_ip": "172.21.0.5",
        "message": "Disconnected",
        "event_duration": 1232382,
    },
    {
        "@timestamp": "2023-10-23T13:51:54.732Z",
        "client_ip": "172.21.3.15",
        "message": "Connection error",
        "event_duration": 725448,
    },
    {
        "@timestamp": "2023-10-23T13:52:55.015Z",
        "client_ip": "172.21.3.15",
        "message": "Connection error",
        "event_duration": 8268153,
    },
    {
        "@timestamp": "2023-10-23T13:53:55.832Z",
        "client_ip": "172.21.3.15",
        "message": "Connection error",
        "event_duration": 5033755,
    },
    {
        "@timestamp": "2023-10-23T13:55:01.543Z",
        "client_ip": "172.21.3.15",
        "message": "Connected to 10.1.0.1",
        "event_duration": 1756467,
    },
]

# Prepare the actions for the bulk API using list comprehension
actions = [{"_index": index_name, "_source": doc} for doc in documents]

# Perform the bulk index operation and capture the response
success, failed = bulk(es, actions)

if failed:
    print(f"Some documents failed to index: {failed}")
else:
    print(f"Successfully indexed {success} documents.")
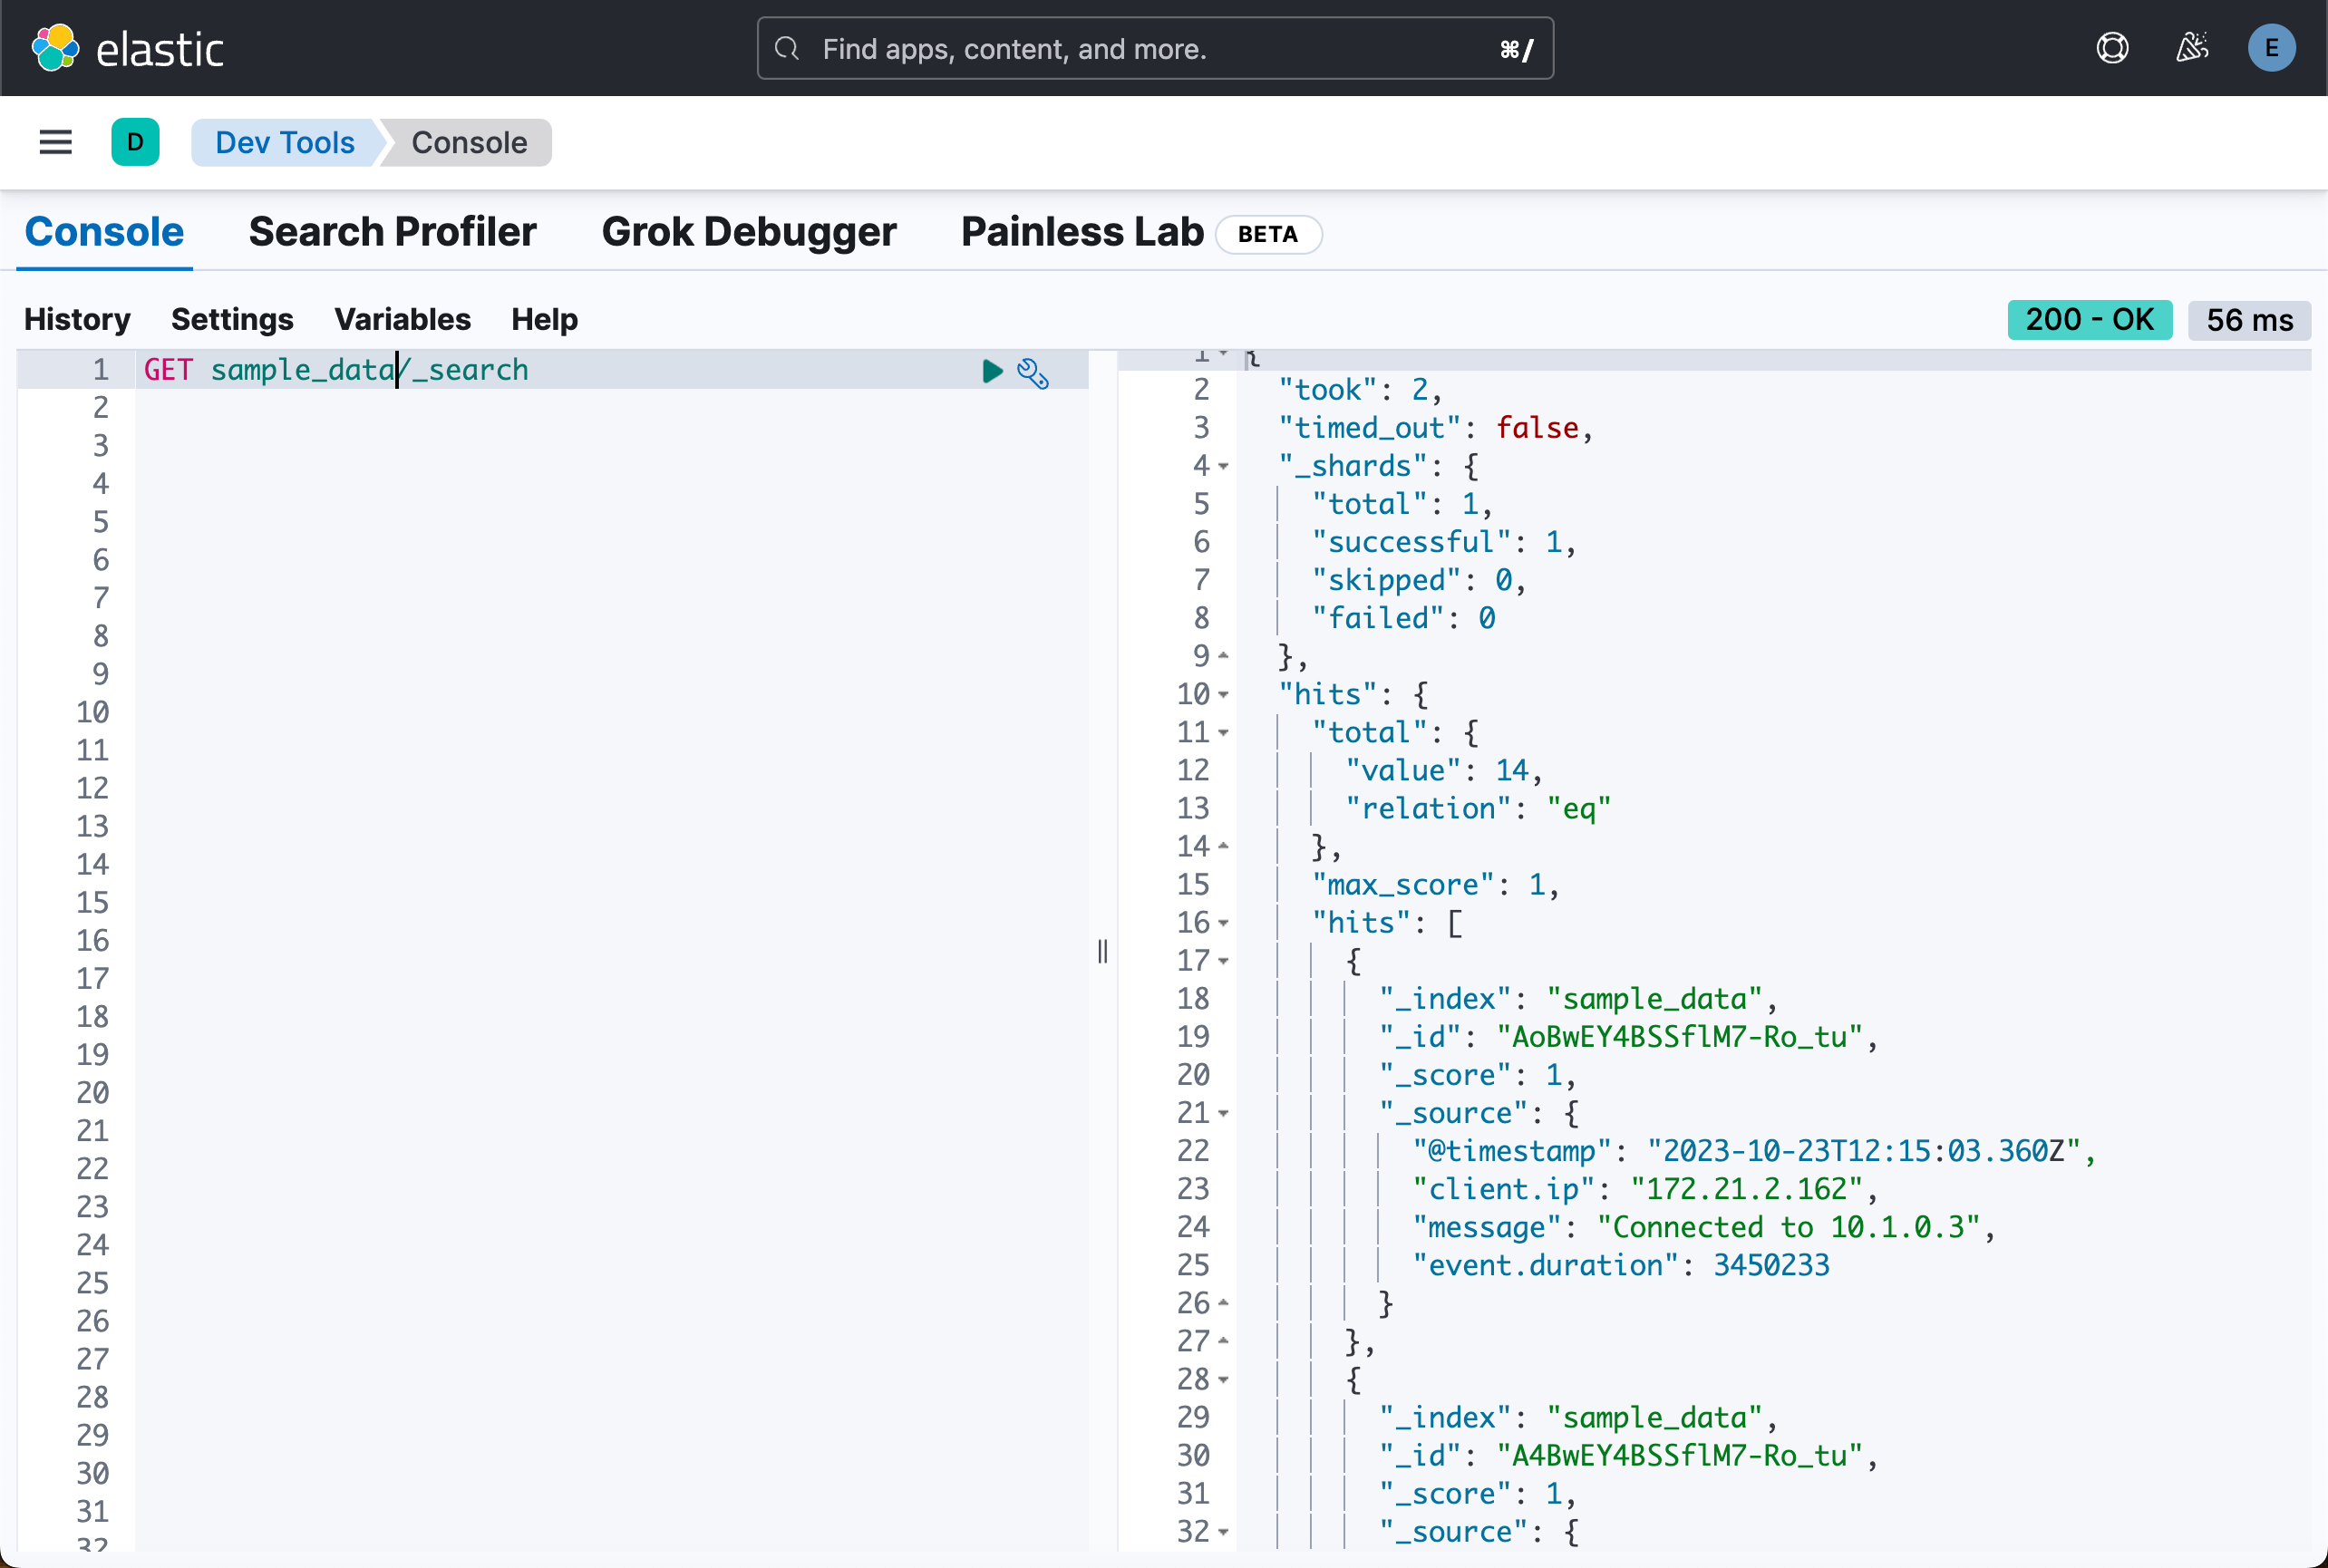
我们可以在 Kibana 中进行查看:
取消默认的 500 limit 警告
# Suppress specific Elasticsearch warnings about default limit of [500] that pollute responses

import warnings
from elasticsearch import ElasticsearchWarning

warnings.filterwarnings("ignore", category=ElasticsearchWarning)
格式化响应为可以阅读的格式
# Format response to return human-readable tables


def format_response(response_data):
    column_names = [col["name"] for col in response_data["columns"]]
    column_widths = [
        max(
            len(name),
            max(
                (
                    len(str(row[i]) if row[i] is not None else "None")
                    for row in response_data["values"]
                ),
                default=0,
            ),
        )
        for i, name in enumerate(column_names)
    ]
    row_format = " | ".join(["{:<" + str(width) + "}" for width in column_widths])
    print(row_format.format(*column_names))
    print("-" * sum(column_widths) + "-" * (len(column_widths) - 1) * 3)
    for row in response_data["values"]:
        # Convert None values in the row to "None" before formatting
        formatted_row = [(str(cell) if cell is not None else "None") for cell in row]
        print(row_format.format(*formatted_row))
你的第一个 ES|QL 查询
每个 ES|QL 查询都以源命令开头。 源命令会生成一个表,通常包含来自 Elasticsearch 的数据。
FROM source 命令返回一个表,其中包含来自数据流、索引或别名的文档。 结果表中的每一行代表一个文档。 此查询从 sample_data 索引中返回最多 500 个文档:
esql_query = "FROM sample_data"

response = es.esql.query(query=esql_query)
format_response(response)
每列对应一个字段,并且可以通过该字段的名称进行访问。
处理命令
源命令后面可以跟一个或多个处理命令,用竖线字符分隔:|。 处理命令通过添加、删除或更改行和列来更改输入表。 处理命令可以执行过滤、投影、聚合等。
例如,你可以使用 LIMIT 命令来限制返回的行数,最多为 10,000 行:
esql_query = """
FROM sample_data
| LIMIT 3
"""

response = es.esql.query(query=esql_query)
format_response(response)
对表格进行排序
另一个处理命令是 SORT 命令。 默认情况下,FROM 返回的行没有定义的排序顺序。 使用 SORT 命令对一列或多列上的行进行排序:
esql_query = """
FROM sample_data
| SORT @timestamp DESC
"""

response = es.esql.query(query=esql_query)
format_response(response)
查询数据
使用 WHERE 命令来查询数据。 例如,要查找持续时间超过 5 毫秒的所有事件:
esql_query = """
FROM sample_data
| WHERE event_duration > 5000000
"""

response = es.esql.query(query=esql_query)
format_response(response)
WHERE 支持多个运算符。
例如,你可以使用 LIKE 对消息列运行通配符查询:
esql_query = """
FROM sample_data
| WHERE message LIKE "Connected*"
"""

response = es.esql.query(query=esql_query)
format_response(response)
更多处理命令
还有许多其他处理命令,例如用于保留或删除列的 KEEP 和 DROP、用于使用 Elasticsearch 中索引的数据丰富表的 ENRICH 以及用于处理数据的 DISSECT 和 GROK。 有关概述,请参阅处理命令。
链式处理命令
你可以链接处理命令,并用竖线字符分隔:|。 每个处理命令都作用于前一个命令的输出表。 查询的结果是最终处理命令生成的表。
以下示例首先根据 @timestamp 对表进行排序,然后将结果集限制为 3 行:
esql_query = """
FROM sample_data
| SORT @timestamp DESC
| LIMIT 3
"""

response = es.esql.query(query=esql_query)
format_response(response)
计算值
使用 EVAL 命令将包含计算值的列追加到表中。 例如,以下查询附加一个 duration_ms 列。 该列中的值是通过将 event_duration 除以 1,000,000 计算得出的。 换句话说: event_duration 从纳秒转换为毫秒。
esql_query = """
FROM sample_data
| EVAL duration_ms = event_duration/1000000.0
"""

response = es.esql.query(query=esql_query)
format_response(response)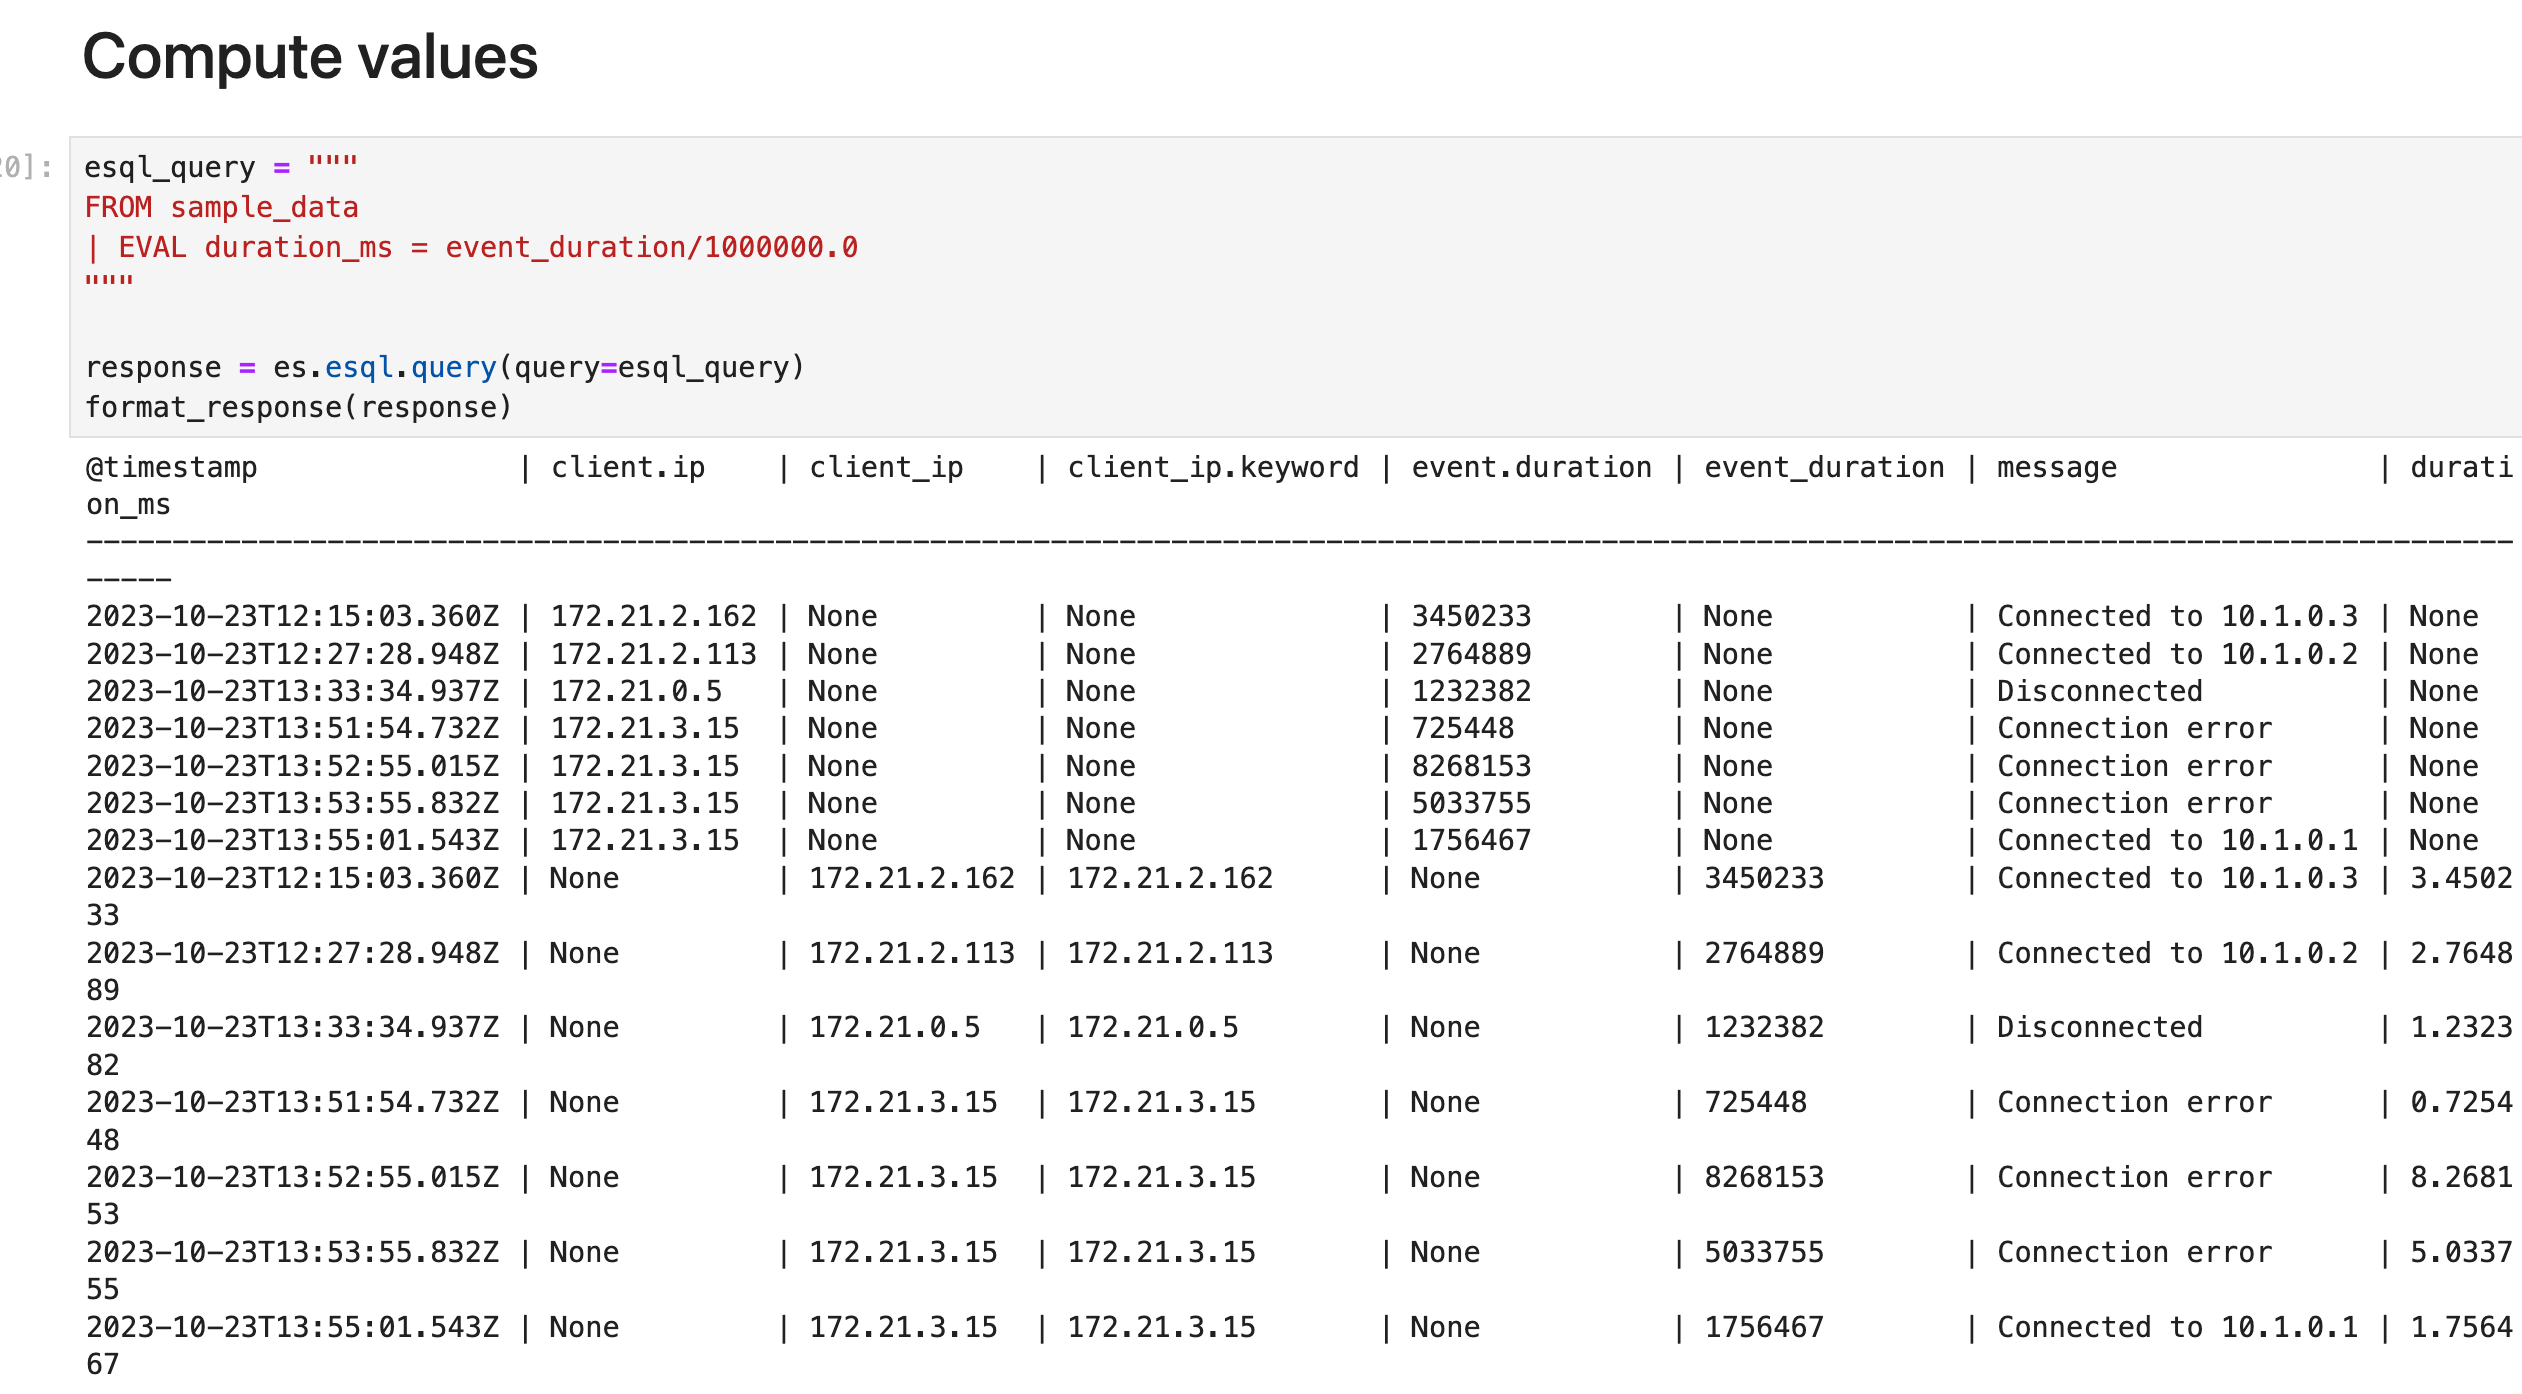
EVAL 支持多种函数。 例如,要将数字四舍五入为最接近指定位数的数字,请使用 ROUND 函数:
esql_query = """
FROM sample_data
| EVAL duration_ms = ROUND(event_duration/1000000.0, 1)
"""

response = es.esql.query(query=esql_query)
format_response(response)
计算统计数据
你还可以使用 ES|QL 来聚合数据。 使用 STATS ... BY 命令计算统计数据。
例如,计算中位持续时间:
esql_query = """
FROM sample_data
| STATS median_duration = MEDIAN(event_duration)
"""

response = es.esql.query(query=esql_query)
format_response(response)
你可以使用一个命令计算多个统计数据:
esql_query = """
FROM sample_data
| STATS median_duration = MEDIAN(event_duration), max_duration = MAX(event_duration)
"""

response = es.esql.query(query=esql_query)
format_response(response)
使用 BY 按一列或多列对计算的统计数据进行分组。 例如,要计算每个客户端 IP 的中位持续时间:
esql_query = """
FROM sample_data
| STATS median_duration = MEDIAN(event_duration) BY client_ip
"""

response = es.esql.query(query=esql_query)
format_response(response)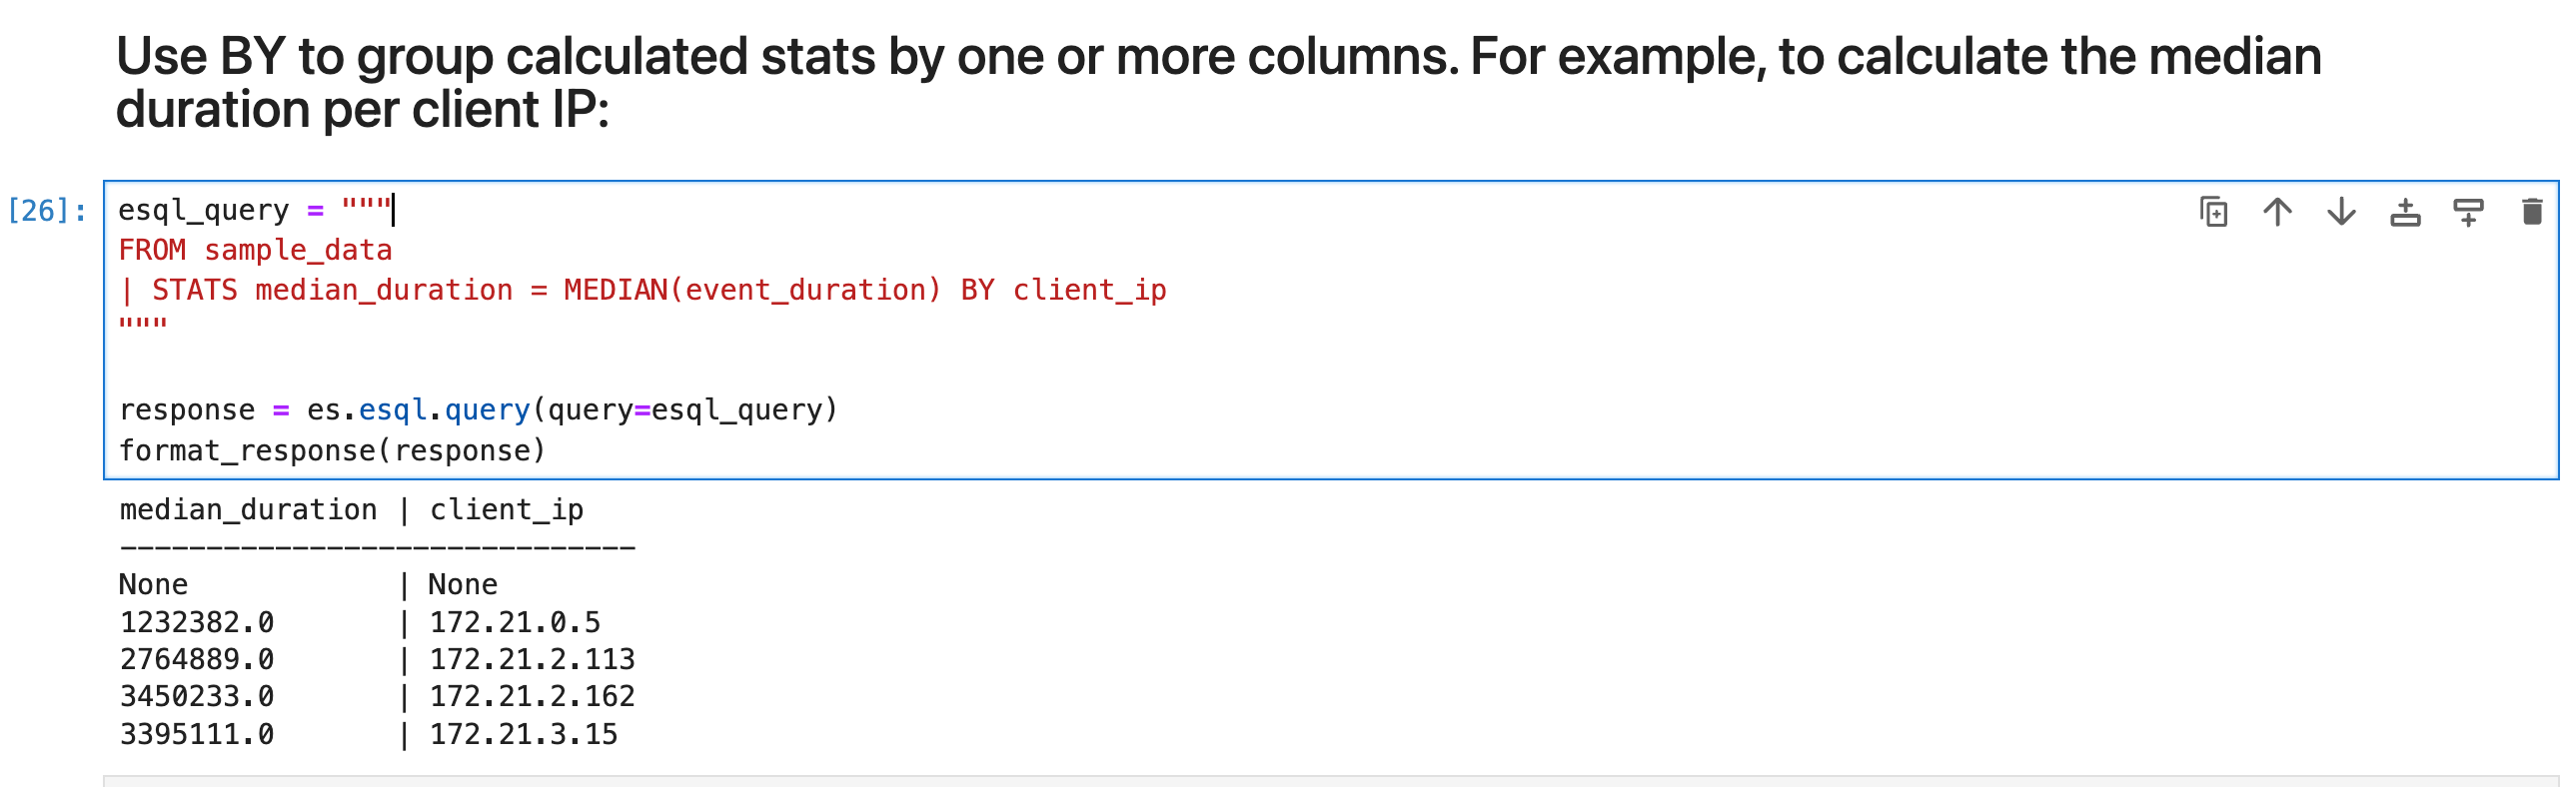
访问列
你可以通过名称访问列。 如果名称包含特殊字符,则需要用反引号(`)引起来。
为 EVAL 或 STATS 创建的列分配显式名称是可选的。 如果不提供名称,则新列名称等于函数表达式。 例如:
esql_query = """
FROM sample_data
| EVAL event_duration/1000000.0
"""

response = es.esql.query(query=esql_query)
format_response(response)
在此查询中,EVAL 添加一个名为 event_duration/1000000.0 的新列。 由于其名称包含特殊字符,因此要访问此列,请用反引号引用它:
esql_query = """
FROM sample_data
| EVAL event_duration/1000000.0
| STATS MEDIAN(`event_duration/1000000.0`)
"""
response = es.esql.query(query=esql_query)
format_response(response)
创建直方图
为了跟踪一段时间内的统计数据,ES|QL 允许你使用 AUTO_BUCKET 函数创建直方图。 AUTO_BUCKET 创建人性化的存储桶大小,并为每行返回一个与该行所属的结果存储桶相对应的值。
例如,要为 10 月 23 日的数据创建每小时存储桶:
esql_query = """
FROM sample_data
| KEEP @timestamp
| EVAL bucket = AUTO_BUCKET (@timestamp, 24, "2023-10-23T00:00:00Z", "2023-10-23T23:59:59Z")
"""
response = es.esql.query(query=esql_query)
format_response(response)
将 AUTO_BUCKET 与 STATS ... BY 结合起来创建直方图。 例如,要计算每小时的事件数:
esql_query = """
FROM sample_data
| KEEP @timestamp, event_duration
| EVAL bucket = AUTO_BUCKET (@timestamp, 24, "2023-10-23T00:00:00Z", "2023-10-23T23:59:59Z")
| STATS COUNT(*) BY bucket
"""
response = es.esql.query(query=esql_query)
format_response(response)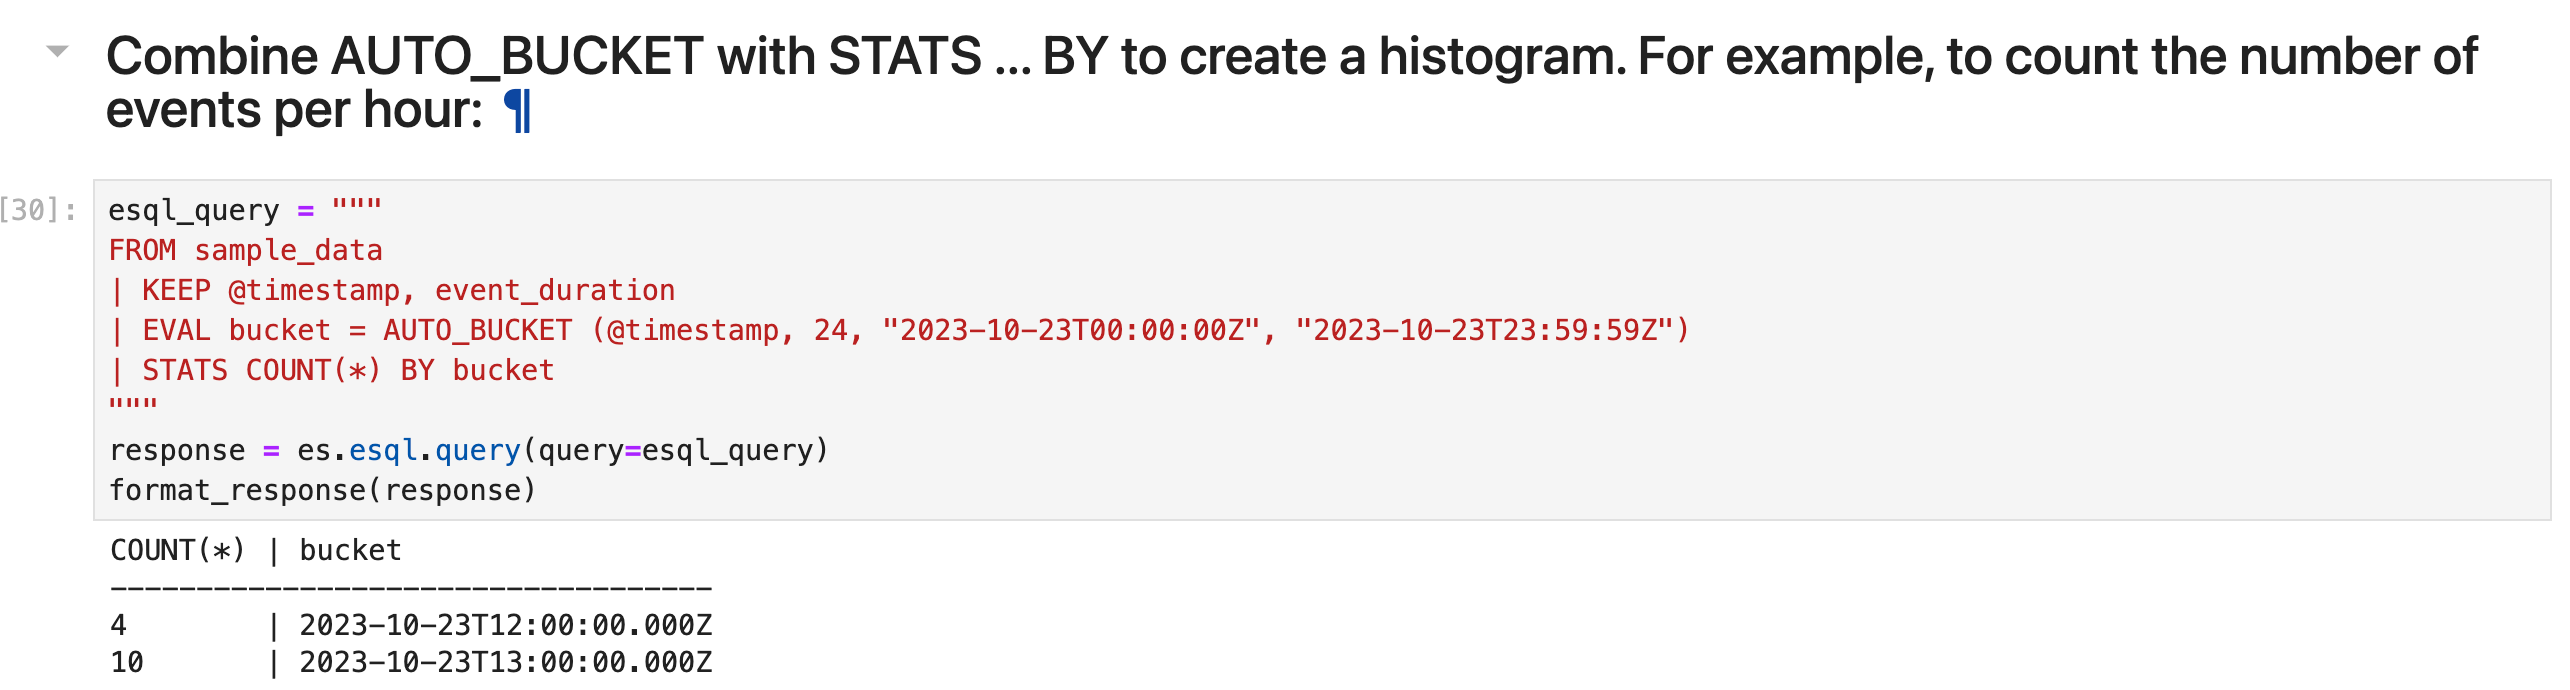
或每小时的中位持续时间:
esql_query = """
FROM sample_data
| KEEP @timestamp, event_duration
| EVAL bucket = AUTO_BUCKET (@timestamp, 24, "2023-10-23T00:00:00Z", "2023-10-23T23:59:59Z")
| STATS median_duration = MEDIAN(event_duration) BY bucket
"""
response = es.esql.query(query=esql_query)
format_response(response)
丰富数据
ES|QL 使你能够使用 ENRICH 命令使用 Elasticsearch 中索引的数据来丰富表。
以下请求创建并执行名为 clientip_policy 的策略。 该策略将 IP 地址链接到环境(“Development”、“QA” 或 “Production”)。
# Define the mapping
mapping = {
    "mappings": {
        "properties": {"client_ip": {"type": "keyword"}, "env": {"type": "keyword"}}
    }
}

# Create the index with the mapping
es.indices.create(index="clientips", body=mapping)

# Prepare bulk data
bulk_data = [
    {"index": {}},
    {"client_ip": "172.21.0.5", "env": "Development"},
    {"index": {}},
    {"client_ip": "172.21.2.113", "env": "QA"},
    {"index": {}},
    {"client_ip": "172.21.2.162", "env": "QA"},
    {"index": {}},
    {"client_ip": "172.21.3.15", "env": "Production"},
    {"index": {}},
    {"client_ip": "172.21.3.16", "env": "Production"},
]

# Bulk index the data
es.bulk(index="clientips", body=bulk_data)

# Define the enrich policy
policy = {
    "match": {
        "indices": "clientips",
        "match_field": "client_ip",
        "enrich_fields": ["env"],
    }
}

# Put the enrich policy
es.enrich.put_policy(name="clientip_policy", body=policy)

# Execute the enrich policy without waiting for completion
es.enrich.execute_policy(name="clientip_policy", wait_for_completion=True)
创建并执行策略后,你可以将其与 ENRICH 命令一起使用:
esql_query = """
FROM sample_data
| KEEP @timestamp, client_ip, event_duration
| EVAL client_ip = TO_STRING(client_ip)
| ENRICH clientip_policy ON client_ip WITH env
"""
response = es.esql.query(query=esql_query)
format_response(response)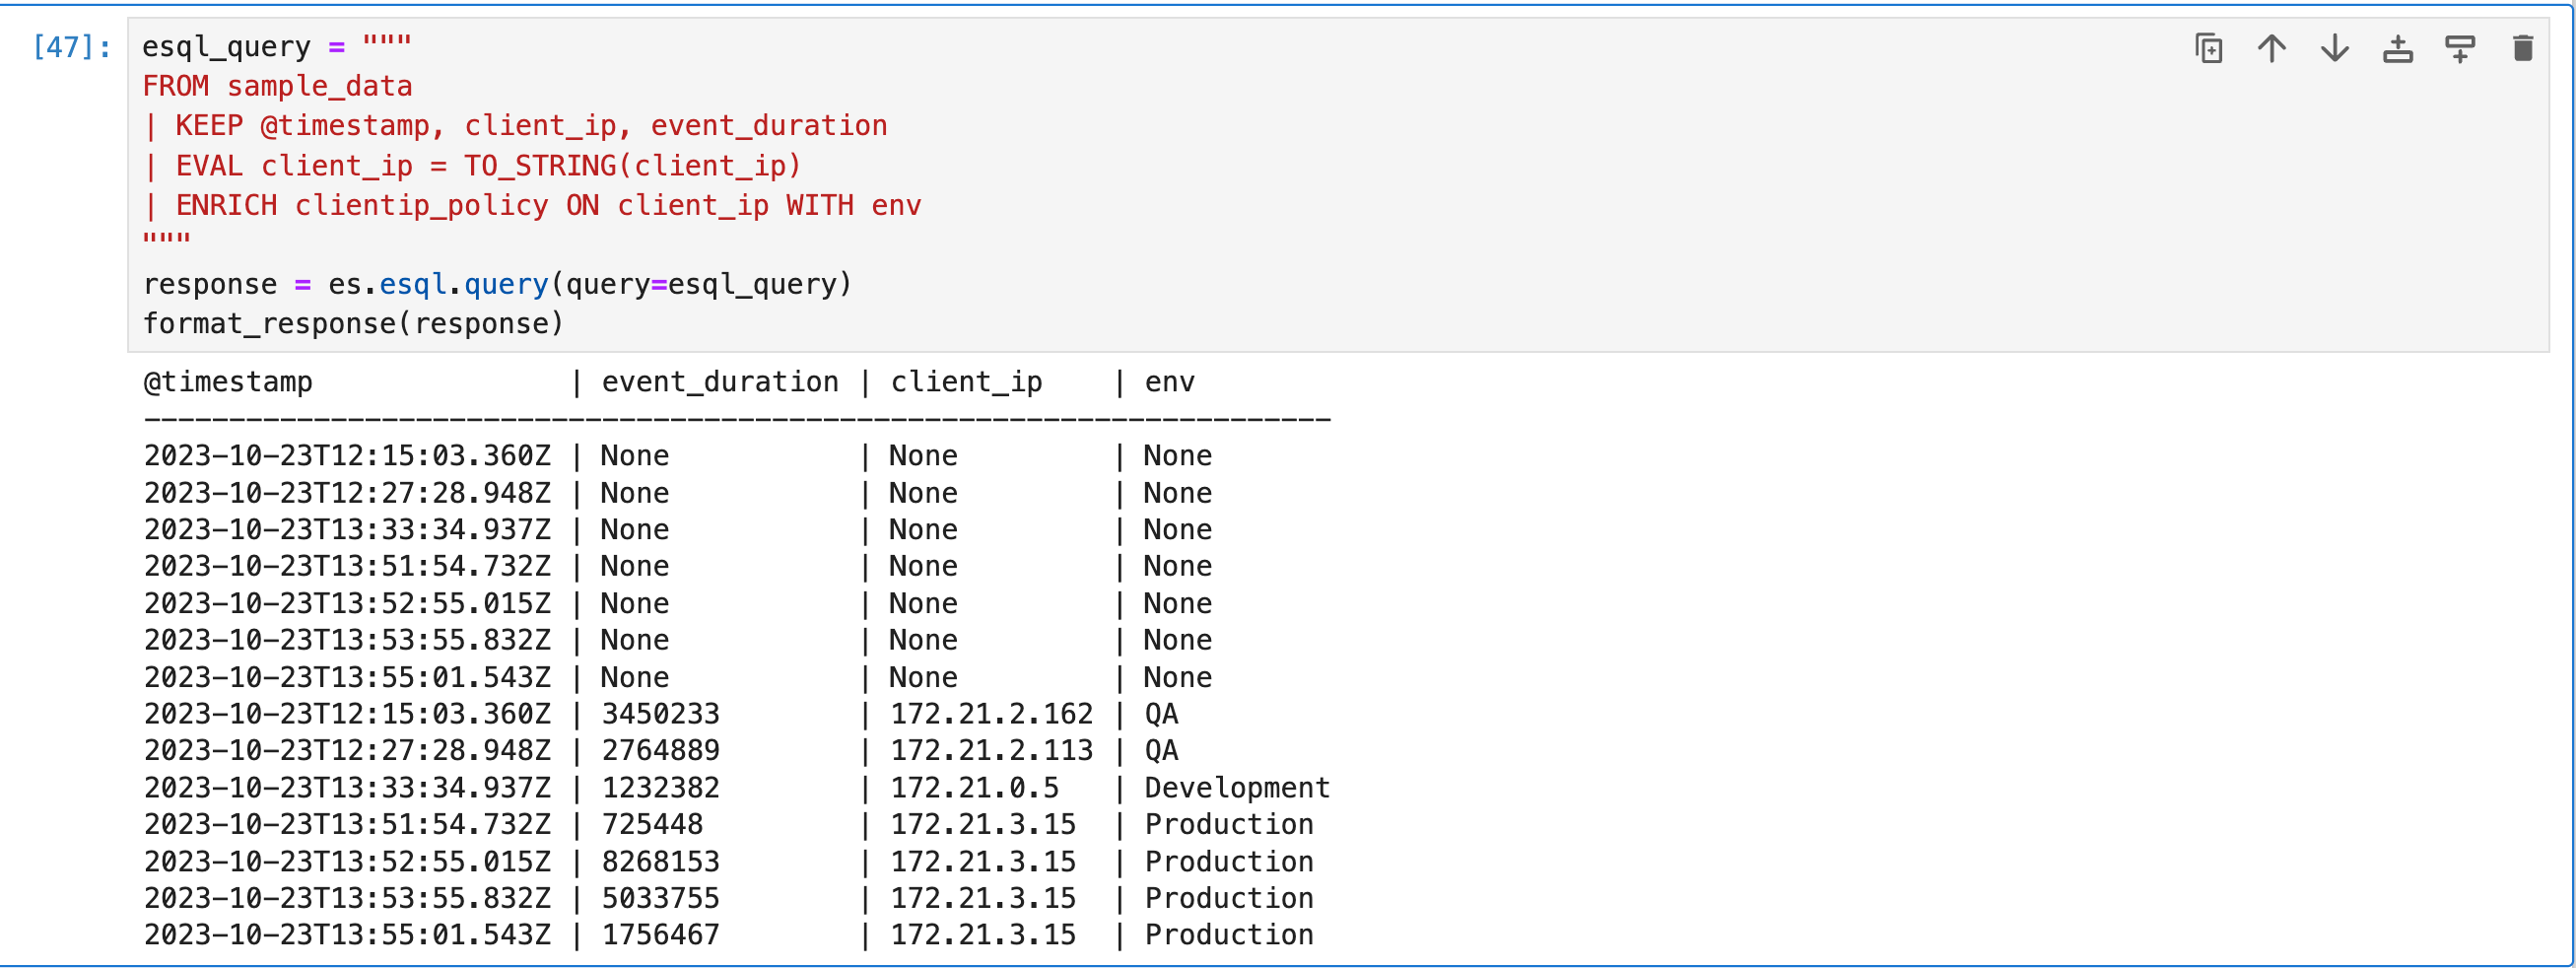
你可以在后续命令中使用 ENRICH 命令添加的新 env 列。 例如,要计算每个环境的中位持续时间:
esql_query = """
FROM sample_data
| KEEP @timestamp, client_ip, event_duration
| EVAL client_ip = TO_STRING(client_ip)
| ENRICH clientip_policy ON client_ip WITH env
| STATS median_duration = MEDIAN(event_duration) BY env
"""
response = es.esql.query(query=esql_query)
format_response(response)
有关使用 ES|QL 进行数据丰富的更多信息,请参阅数据丰富。
处理数据
你的数据可能包含非结构化字符串,你希望对其进行结构化以便更轻松地分析数据。 例如,示例数据包含如下日志消息:
Connected to 10.1.0.3通过从这些消息中提取 IP 地址,你可以确定哪个 IP 接受了最多的客户端连接。
要在查询时构建非结构化字符串,你可以使用 ES|QL DISSECT 和 GROK 命令。 DISSECT 的工作原理是使用基于分隔符的模式分解字符串。 GROK 的工作原理类似,但使用正则表达式。 这使得 GROK 更强大,但通常也更慢。
在这种情况下,不需要正则表达式,因为 message 很简单:“Connected to ”,后跟服务器 IP。 要匹配此字符串,你可以使用以下 DISSECT 命令:
esql_query = """
FROM sample_data
| DISSECT message "Connected to %{server_ip}"
"""
response = es.esql.query(query=esql_query)
format_response(response)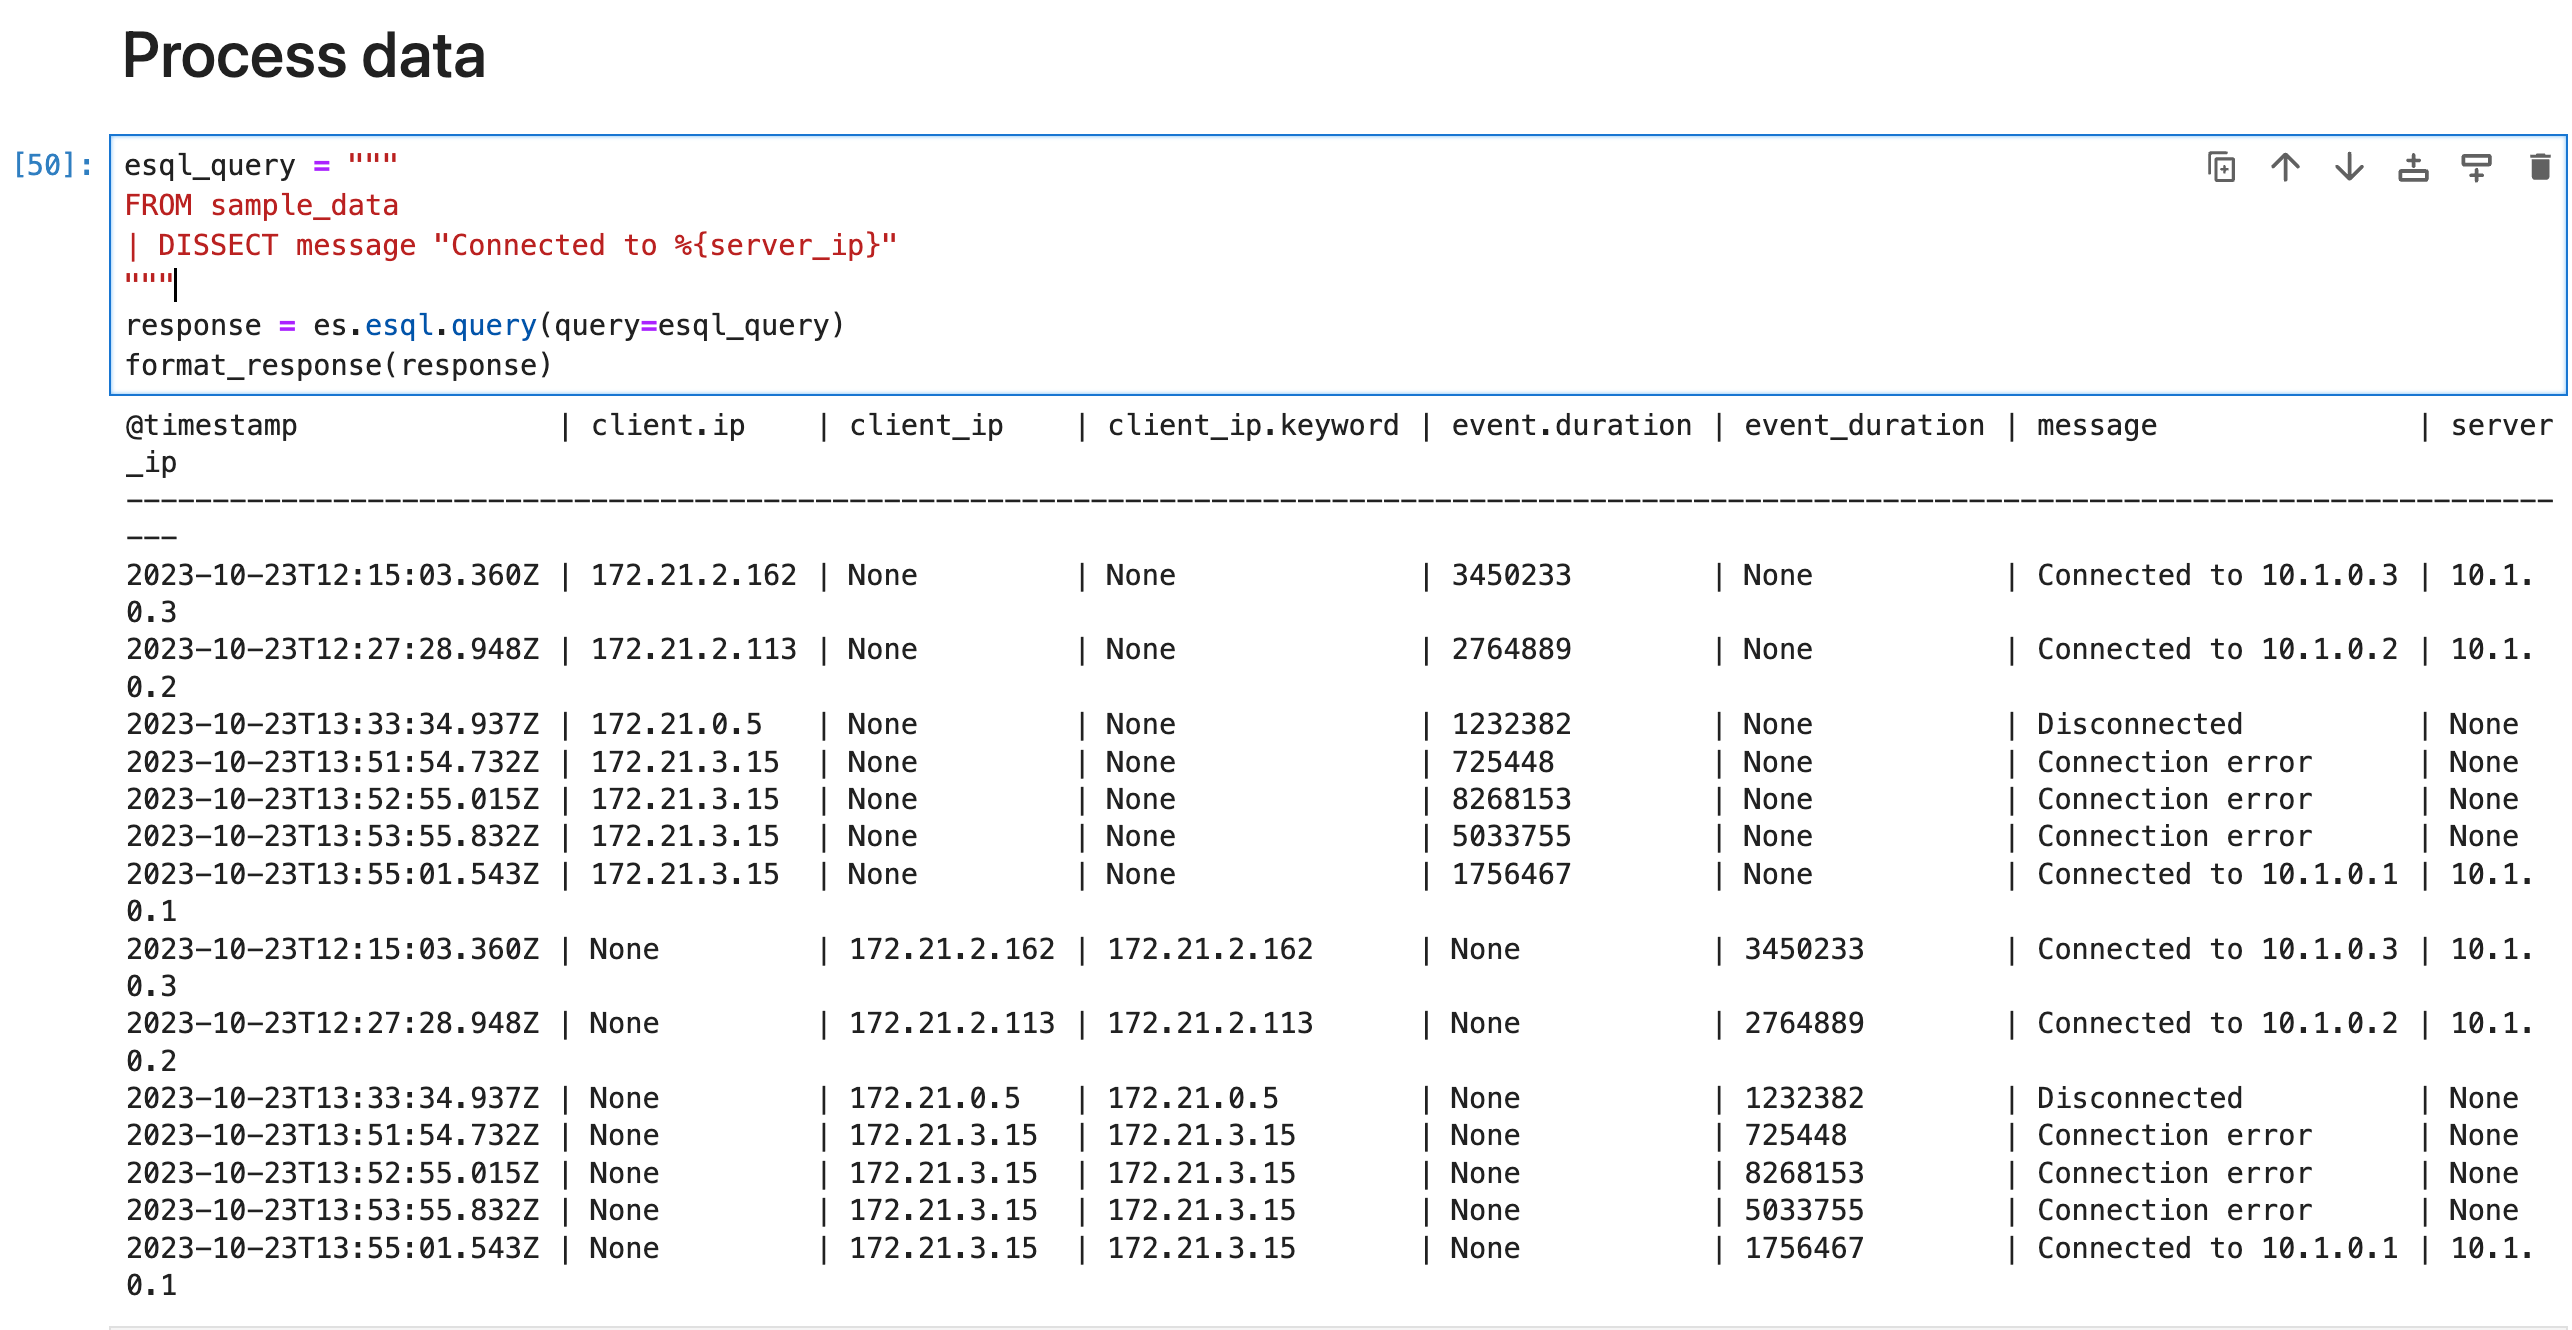
这会将 server_ip 列添加到具有与此模式匹配的 message 的那些行。 对于其他行,server_ip 的值为空。
你可以在后续命令中使用 DISSECT 命令添加的新 server_ip 列。 例如,要确定每个服务器已接受多少个连接:
esql_query = """
FROM sample_data
| WHERE STARTS_WITH(message, "Connected to")
| DISSECT message "Connected to %{server_ip}"
| STATS COUNT(*) BY server_ip
"""
response = es.esql.query(query=esql_query)
format_response(response)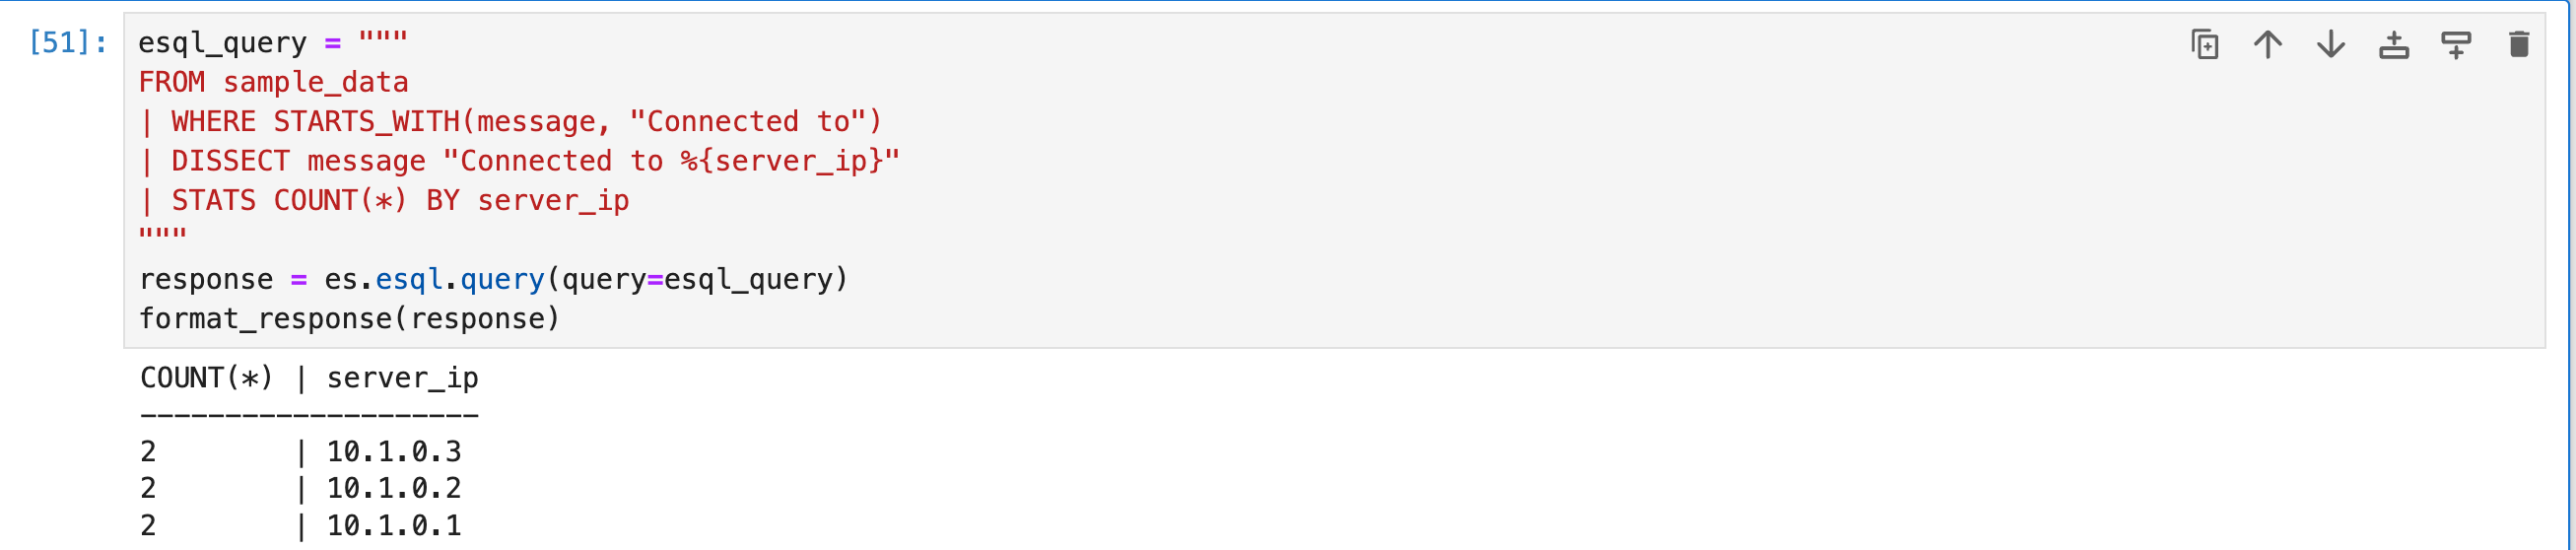
了解更多,请阅读 “Elasticsearch:ES|QL 查询展示”。
最终的 Notebook 可以在地址 https://github.com/liu-xiao-guo/esql/blob/main/esql-getting-started.ipynb 下载。


