文章目录
前言
最近在搞一个项目需要用到麦克风读取数据并分析,我的开发环境是Ubuntu-22.04,这个操作系统的声音架构是基于alsa+pulseaudio构建的,18.04和20.04一样。这里我会稍微向你展示下alsa和pulseaudio的些许差别,当然这只是这个系统的冰山一角,感兴趣的可以继续研究下去。
一、命令行
如果你只是想简单使用这个功能而不需要去开发代码,这个命令行很适合你。接下来分别基于Ubuntu和Windows来演示具体的方法,你可以感受其中的差别。
注意:alsa和pulseaudio只是其中一种多媒体架构,还有很多别的架构,只要是ffmpeg支持的都可以拿来用。
1.Ubuntu
这个操作系统上alsa和pulseaudio是有一定的差别的,看起来alsa更接近底层,更像是直接和硬件打交道;而pulseaudio是C/S架构,就是一个或多个Server(一般一个就够了,它只是支持多个)对一个或多个Client。
1.alsa
查看电脑上的声卡
cat /proc/asound/cards
 0 [PCH            ]: HDA-Intel - HDA Intel PCH
                      HDA Intel PCH at 0xb42b0000 irq 138
我的电脑只有一个内置声卡,我的内置麦克风和内置扬声器乃至耳机插孔都是接在这个声卡上的。
使用也简单符合hw:CARD[,DEV[,SUBDEV]]这个格式就行了,除了hw必带以外,CARD是第几个声卡索引,DEV是当前声卡下的设备索引,SUBDEV是当前设备下的子设备索引。
ffmpeg -f alsa -i hw:0,0,0 out1.wav
[alsa @ 0x617f08faf780] cannot open audio device hw:0,0,0 (Device or resource busy)
hw:0,0,0: Input/output error
为什么会有这个错呢,这就要讲到alsa和pulseaudio之间的差别了,如果麦克风被占用,alsa就会报错,pulseaudio则不会(可以创建多实例)。这个时候你需要找到占用的程序将它杀死,我这里是settings程序占用了,我关掉settings就行了。
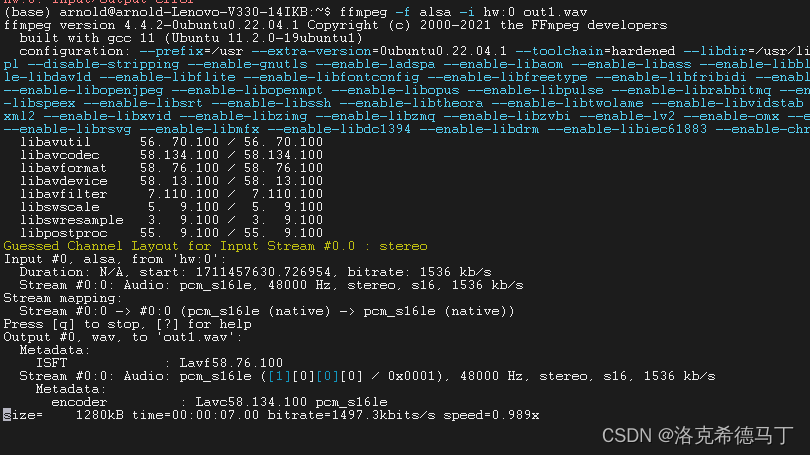
到这里还没结束,alsa还有两个参数可以使用。一个是sample_rate(采样率),一个是channels(通道数)。如果你什么参数都不加它就是默认的选项。比如,我这个配置就是48000HZ采样率,双通道。
ffmpeg -f alsa -i hw:0,0,0 -sample_rate 16000 -channels 1 out1.wav
2.pulseaudio
获取方式和alsa略有差别,参数也比alsa丰富些,唯一的问题就是由于通过网络传输,有一定的延时,感受不强烈。
default就是你的默认麦克风,如果你只有一个内置麦克风那就填default就行了

ffmpeg -f pulse -i default out1.wav
注意:和alsa不同,它可以多实例同时操作同一个麦克风而不会出现设备占用的问题。

再有就是pulseaudio的参数问题,支持的比alsa多。
server:从哪个server取数据,一般不填,使用默认即可
name:定义的程序名,默认是libavformat定义
stream_name:定义的流名字,默认是record
sample_rate:采样率,同alsa
channels:通道数,同alsa
frame_size:弃用,填了也不起效果
fragment_size:音频数据分段大小,这个参数影响延迟
wallclock:和PTS相关,默认是1
ffmpeg -f pulse -i default -sample_rate 16000 -channels 1 out1.wav
2.Windows
这里介绍一种基于dshow架构的多媒体系统,这个东西在Windows10和Windows11中已经不被巨硬建议使用了,但是仍然属于可用状态。
1.dshow
查看所有可用的声音设备

ffmpeg -list_devices true -f dshow -i dymmy

  libpostproc    55.  9.100 / 55.  9.100
[dshow @ 00000260fad9b880] DirectShow video devices (some may be both video and audio devices)
[dshow @ 00000260fad9b880]  "Integrated Webcam"
[dshow @ 00000260fad9b880]     Alternative name "@device_pnp_\\?\usb#vid_0c45&pid_671f&mi_00#6&205508db&0&0000#{65e8773d-8f56-11d0-a3b9-00a0c9223196}\global"
[dshow @ 00000260fad9b880] DirectShow audio devices
[dshow @ 00000260fad9b880]  "麦克风阵列 (英特尔® 智音技术)"
[dshow @ 00000260fad9b880]     Alternative name "@device_cm_{33D9A762-90C8-11D0-BD43-00A0C911CE86}\wave_{B6D36105-4B01-4CF8-A2A8-9AF88D902594}"
[dshow @ 00000260fad9b880]  "立体声混音 (2- Realtek(R) Audio)"
[dshow @ 00000260fad9b880]     Alternative name "@device_cm_{33D9A762-90C8-11D0-BD43-00A0C911CE86}\wave_{6FA30750-4E01-41B2-BAD1-FFC68DAFE0E3}"
从上面可以看出来我有两个设备,一个叫立体声混音,还有一个是英特尔智音技术。这里多说一句英特尔智音技术里面有些降噪算法,效果还可以;立体声混音效果就不如这个英特尔智音技术了,噪音比较明显。
ffmpeg -f dshow -i audio="@device_cm_{33D9A762-90C8-11D0-BD43-00A0C911CE86}\wave_{B6D36105-4B01-4CF8-A2A8-9AF88D902594}" out1.wav
注意:用法和Ubuntu差别较大!
同样的,也不知道是不是Windows天然自带buff,参数比Linux多很多,这里列举一部分。
sample_rate:采样率,同Linux
sample_size:采样位数
channels:通道数,同Linux
list_devices:显示可用设备,上面有,Linux该命令无效
list_options:显示设备配置,Linux该命令无效
audio_buffer_size:以毫秒计的缓存大小,和Linux的意思差不多,影响延迟因素
…
二、代码
main.cpp
#include <iostream>
#include <cstdio>
#include <fstream>

extern "C" {
#include <libavformat/avformat.h>
#include <libavdevice/avdevice.h>
}

int main() {
    av_register_all();//ffmpeg 3.x version
    avdevice_register_all();
    AVFormatContext *fmt_ctx = nullptr;
    AVInputFormat *input_fmt = av_find_input_format("pulse"); // 音频设备的输入格式,如alsa、pulse等
    const char *dev_name = "default"; // microphone device name
    AVDictionary *format_opts = nullptr;//set stream format options
    av_dict_set(&format_opts, "sample_rate", "16000", 0);//set audio sample
    av_dict_set(&format_opts, "channels", "1", 0);//set audio channel
    av_dict_set(&format_opts, "fragment_size", "25600", 0);//set audio fragment size
    // open audio device
    if (avformat_open_input(&fmt_ctx, dev_name, input_fmt, &format_opts) != 0) {
        printf("can't open input device!\n");
        if (format_opts)
            av_dict_free(&format_opts);
        return -1;
    }
    if (format_opts)
        av_dict_free(&format_opts);
    //Output Info---
    printf("---------------- File Information ---------------\n");
    av_dump_format(fmt_ctx, 0, dev_name, 0);
    printf("-------------------------------------------------\n");
    // find audio stream info
    if (avformat_find_stream_info(fmt_ctx, nullptr) < 0) {
        printf("can't get audio stream info!\n");
        return -1;
    }
    int audio_stream_idx = -1;
    // find audio stream index
    for (int i = 0; i < fmt_ctx->nb_streams; i++) {
        if (fmt_ctx->streams[i]->codecpar->codec_type == AVMEDIA_TYPE_AUDIO) {
            audio_stream_idx = i;
            break;
        }
    }
    if (audio_stream_idx == -1) {
        printf("can't find audio stream index!\n");
        return -1;
    }
    //write pcm data
    std::ofstream ofs("../audio/test.pcm");
    AVPacket packet;
    while (av_read_frame(fmt_ctx, &packet) >= 0) {
        if (packet.stream_index == audio_stream_idx) {
            std::cout << "packet size: " << packet.size << std::endl;
            std::cout << "packet duration: " << packet.duration << std::endl;
            ofs.write((char *) packet.data, packet.size);
            ofs.flush();
        }
        av_packet_unref(&packet);
    }
    avformat_close_input(&fmt_ctx);
    ofs.close();
    return 0;
}
CMakeLists.txt
cmake_minimum_required(VERSION 3.10)
project(read_microphone)

set(CMAKE_CXX_STANDARD 11)


find_package(PkgConfig REQUIRED)

pkg_check_modules(ffmpeg REQUIRED IMPORTED_TARGET  libavformat libavutil libavdevice libavcodec)

add_executable(${PROJECT_NAME} main.cpp)

target_link_libraries(${PROJECT_NAME} PkgConfig::ffmpeg)
简单源代码
总结
1、方法不止这些,还需要继续研究。


