K8S实战案例
- 一、部署wordpress+mysql(NodePort方式)
- 二、部署SpringBoot项目
- 2.1、准备Spring Boot项目
- (1)创建Spring Boot项目(springboot-demo)
- (2)启动测试项目
- (3)本地打包项目(springboot-demo)
- (4)将项目包生成镜像
- (5)为项目创建Dockerfile
- (6)根据Dockerfile创建image
- (7)使用docker run创建container
- (8)访问测试
- (9)将镜像推送到私有仓库
- (10)创建nginx ingress controller
- (11)编写Kubernetes配置文件(springboot-demo.yaml,
包含ingress规则) - (12)创建pod、service、ingress
- (13)查看pod相关
- (14)扩容测试(5个副本)
- (15)查看ingress
- (16)外部浏览器测试(通过ingress配置的域名访问)
- (17)删除测试资源
- 三、部署Nacos + Spring Cloud项目
一、部署wordpress+mysql(NodePort方式)
(1)创建命名空间:wordpress
[root@m ~]# kubectl create namespace wordpress
namespace/wordpress created
[root@m ~]#
(2)创建wordpress-db.yaml文件(mysql)
创建wordpress-db.yaml文件,这里以mysql作为wordpress的db:
[root@m ~]# vi wordpress-db.yaml
yaml内容:
apiVersion: apps/v1beta1
kind: Deployment
metadata:
  name: mysql-deploy
  namespace: wordpress
  labels:
    app: mysql
spec:
  template:
    metadata:
      labels:
        app: mysql
    spec:
      containers:
      - name: mysql
        image: mysql:5.6
        imagePullPolicy: IfNotPresent
        ports:
        - containerPort: 3306
          name: dbport
        env:
        - name: MYSQL_ROOT_PASSWORD
          value: rootPassW0rd
        - name: MYSQL_DATABASE
          value: wordpress
        - name: MYSQL_USER
          value: wordpress
        - name: MYSQL_PASSWORD
          value: wordpress
        volumeMounts:
        - name: db
          mountPath: /var/lib/mysql
      volumes:
      - name: db
        hostPath:
          path: /var/lib/mysql
---
apiVersion: v1
kind: Service
metadata:
  name: mysql
  namespace: wordpress
spec:
  selector:
    app: mysql
  ports:
  - name: mysqlport
    protocol: TCP
    port: 3306
    targetPort: dbport
(3)创建pod:mysql数据库
根据wordpress-db.yaml配置,创建资源mysql数据库:
#(1)创建pod
[root@m ~]# kubectl apply -f wordpress-db.yaml
deployment.apps/mysql-deploy created
service/mysql created
[root@m ~]#
(4)创建wordpress.yaml文件
创建wordpress.yaml文件:
[root@m ~]# vi wordpress.yaml
yaml内容(记得一定要修改其中mysql的IP地址):
apiVersion: apps/v1beta1
kind: Deployment
metadata:
  name: wordpress-deploy
  namespace: wordpress
  labels:
    app: wordpress
spec:
  template:
    metadata:
      labels:
        app: wordpress
    spec:
      containers:
      - name: wordpress
        image: wordpress
        imagePullPolicy: IfNotPresent
        ports:
        - containerPort: 80
          name: wdport
        env:
        - name: WORDPRESS_DB_HOST
          value: 192.168.190.81:3306
        - name: WORDPRESS_DB_USER
          value: wordpress
        - name: WORDPRESS_DB_PASSWORD
          value: wordpress
---
apiVersion: v1
kind: Service
metadata:
  name: wordpress
  namespace: wordpress
spec:
  type: NodePort
  selector:
    app: wordpress
  ports:
  - name: wordpressport
    protocol: TCP
    port: 80
    targetPort: wdport
(5)创建pod:wordpress
根据wordpress.yaml配置,创建wordpress资源:
#(1)创建pod
[root@m ~]# kubectl apply -f wordpress.yaml
deployment.apps/wordpress-deploy created
service/wordpress created
[root@m ~]#

#(2)查看pod
[root@m ~]# kubectl get pods -n wordpress -o wide
NAME                               READY   STATUS    RESTARTS   AGE     IP               NODE   NOMINATED NODE   READINESS GATES
mysql-deploy-78cd6964bd-zlcwb      1/1     Running   0          33m     192.168.190.81   w1     <none>           <none>
wordpress-deploy-dbd949575-nmrpg   1/1     Running   0          3m24s   192.168.80.216   w2     <none>           <none>
[root@m ~]#

#(3)查看service
[root@m ~]# kubectl get svc -n wordpress
NAME        TYPE        CLUSTER-IP      EXTERNAL-IP   PORT(S)        AGE
mysql       ClusterIP   10.103.56.247   <none>        3306/TCP       33m
wordpress   NodePort    10.109.75.209   <none>        80:30467/TCP   3m45s
[root@m ~]#
(6)浏览器访问,并继续安装
访问集群中任意宿主机节点的IP:30467:
访问URL:http://192.168.116.170:30467

进入如下界面:

(7)更换wordpress.yaml中的IP测试(这里省略)
修改wordpress.yaml中mysql的IP地址,使用service的name:3306,如改为:mysql:3306。
(8)删除测试资源
#(1)删除pod资源
[root@m ~]# kubectl delete -f wordpress.yaml
[root@m ~]# kubectl delete -f wordpress-db.yaml

#(2)删除wordpress命名空间
[root@m ~]# kubectl delete ns wordpress

#(3)删除yaml配置文件
[root@m ~]# rm wordpress.yaml
[root@m ~]# rm wordpress-db.yaml
二、部署SpringBoot项目
2.1、准备Spring Boot项目
(1)创建Spring Boot项目(springboot-demo)
创建Spring Boot项目过程等操作这里就全部省略了,主要提供下测试核心代码pom.xml、K8SController.java。
pom.xml
<?xml version="1.0" encoding="UTF-8"?>
<project xmlns="http://maven.apache.org/POM/4.0.0" xmlns:xsi="http://www.w3.org/2001/XMLSchema-instance"
         xsi:schemaLocation="http://maven.apache.org/POM/4.0.0 https://maven.apache.org/xsd/maven-4.0.0.xsd">
    <modelVersion>4.0.0</modelVersion>
    <parent>
        <groupId>org.springframework.boot</groupId>
        <artifactId>spring-boot-starter-parent</artifactId>
        <version>2.2.0.RELEASE</version>
        <relativePath/> <!-- lookup parent from repository -->
    </parent>
    <groupId>com.gupao</groupId>
    <artifactId>springboot-demo</artifactId>
    <version>0.0.1-SNAPSHOT</version>
    <name>springboot-demo</name>
    <description>Demo project for Spring Boot</description>

    <properties>
        <java.version>1.8</java.version>
    </properties>

    <dependencies>
        <dependency>
            <groupId>org.springframework.boot</groupId>
            <artifactId>spring-boot-starter-web</artifactId>
        </dependency>

        <dependency>
            <groupId>org.springframework.boot</groupId>
            <artifactId>spring-boot-starter-test</artifactId>
            <scope>test</scope>
            <exclusions>
                <exclusion>
                    <groupId>org.junit.vintage</groupId>
                    <artifactId>junit-vintage-engine</artifactId>
                </exclusion>
            </exclusions>
        </dependency>
    </dependencies>

    <build>
        <plugins>
            <plugin>
                <groupId>org.springframework.boot</groupId>
                <artifactId>spring-boot-maven-plugin</artifactId>
            </plugin>
        </plugins>
    </build>

</project>
K8SController.java
package com.gupao.springbootdemo.controller;

import org.springframework.web.bind.annotation.RequestMapping;
import org.springframework.web.bind.annotation.RestController;

/**
 * 测试Controller
 */
@RestController
public class K8SController {

    @RequestMapping("/k8s")
    public String k8s(){
        return "<h1>Hello K8S ...</h1><br/><br/>测试成功!";
    }
}
(2)启动测试项目
访问地址:http://localhost:8080/k8s

(3)本地打包项目(springboot-demo)
在项目springboot-demo的根目录,执行以下打包命令:
(4)将项目包生成镜像
上传springboot-demo-0.0.1-SNAPSHOT.jar到linux,生成镜像,运行项目容器:
#(1)创建文件夹并跳转至该文件夹(可选)
[root@m ~]# mkdir -p /user/java/test/springboot-demo
[root@m ~]# cd /user/java/test/springboot-demo

#(2)上传springboot-demo-0.0.1-SNAPSHOT.jar
[root@m springboot-demo]# ll
总用量 17140
-rw-r--r--. 1 root root 17547533 1月  10 13:40 springboot-demo-0.0.1-SNAPSHOT.jar
(5)为项目创建Dockerfile
[root@m springboot-demo]# vi Dockerfile
内容:
FROM openjdk:8-jre-alpine
COPY springboot-demo-0.0.1-SNAPSHOT.jar /springboot-demo.jar
ENTRYPOINT ["java","-jar","/springboot-demo.jar"]
(6)根据Dockerfile创建image
[root@m springboot-demo]# docker build -t springboot-demo-image .
(7)使用docker run创建container
[root@m springboot-demo]# docker run -d --name s1 springboot-demo-image
19bd517788ce64807a411e2e3b431c1d4154e6117934a743635c9a4d1783feef
[root@m springboot-demo]#
(8)访问测试
# (1)查看项目容器详情(可跳过)
[root@m springboot-demo]# docker inspect s1

#(2)访问测试(192.168.116.170为master节点ip)
[root@m springboot-demo]# curl 192.168.116.170:8080/k8s
(9)将镜像推送到私有仓库
① 标记镜像为私有仓库的镜像
使用 docker tag 命令标记镜像,将其归入某一仓库。
[root@m springboot-demo]# docker tag springboot-demo-image:latest 192.168.116.170:5000/springboot-demo-image:v1.0
[root@m springboot-demo]#
② 推送镜像到私有仓库
[root@m springboot-demo]# docker push 192.168.116.170:5000/springboot-demo-image:v1.0
The push refers to repository [192.168.116.170:5000/springboot-demo-image]
2f28b827deb4: Pushed
edd61588d126: Pushed
9b9b7f3d56a0: Pushed
f1b5933fe4b5: Pushed
v1.0: digest: sha256:ea7998365883f5ed9dedde32e85983aa47a848448827a3717b5cd4fd7329afc7 size: 1159
[root@m springboot-demo]#
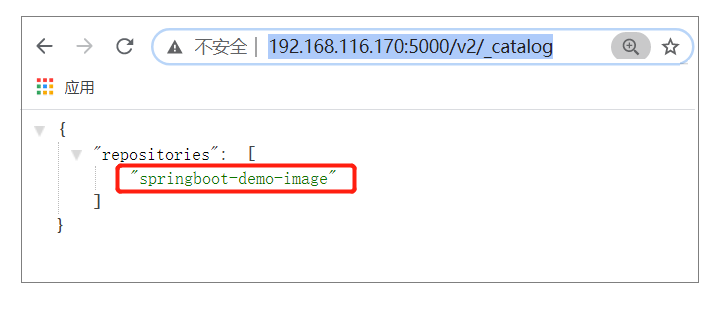
③ 浏览器查看私有仓库
访问URL:http://192.168.116.170:5000/v2/_catalog
(10)创建nginx ingress controller
① 创建并编辑mandatory.yaml文件
创建并编辑mandatory.yaml文件:
[root@m test]# vi mandatory.yaml
mandatory.yaml内容:
apiVersion: v1
kind: Namespace
metadata:
  name: ingress-nginx
  labels:
    app.kubernetes.io/name: ingress-nginx
    app.kubernetes.io/part-of: ingress-nginx

---

kind: ConfigMap
apiVersion: v1
metadata:
  name: nginx-configuration
  namespace: ingress-nginx
  labels:
    app.kubernetes.io/name: ingress-nginx
    app.kubernetes.io/part-of: ingress-nginx

---
kind: ConfigMap
apiVersion: v1
metadata:
  name: tcp-services
  namespace: ingress-nginx
  labels:
    app.kubernetes.io/name: ingress-nginx
    app.kubernetes.io/part-of: ingress-nginx

---
kind: ConfigMap
apiVersion: v1
metadata:
  name: udp-services
  namespace: ingress-nginx
  labels:
    app.kubernetes.io/name: ingress-nginx
    app.kubernetes.io/part-of: ingress-nginx

---
apiVersion: v1
kind: ServiceAccount
metadata:
  name: nginx-ingress-serviceaccount
  namespace: ingress-nginx
  labels:
    app.kubernetes.io/name: ingress-nginx
    app.kubernetes.io/part-of: ingress-nginx

---
apiVersion: rbac.authorization.k8s.io/v1beta1
kind: ClusterRole
metadata:
  name: nginx-ingress-clusterrole
  labels:
    app.kubernetes.io/name: ingress-nginx
    app.kubernetes.io/part-of: ingress-nginx
rules:
  - apiGroups:
      - ""
    resources:
      - configmaps
      - endpoints
      - nodes
      - pods
      - secrets
    verbs:
      - list
      - watch
  - apiGroups:
      - ""
    resources:
      - nodes
    verbs:
      - get
  - apiGroups:
      - ""
    resources:
      - services
    verbs:
      - get
      - list
      - watch
  - apiGroups:
      - ""
    resources:
      - events
    verbs:
      - create
      - patch
  - apiGroups:
      - "extensions"
      - "networking.k8s.io"
    resources:
      - ingresses
    verbs:
      - get
      - list
      - watch
  - apiGroups:
      - "extensions"
      - "networking.k8s.io"
    resources:
      - ingresses/status
    verbs:
      - update

---
apiVersion: rbac.authorization.k8s.io/v1beta1
kind: Role
metadata:
  name: nginx-ingress-role
  namespace: ingress-nginx
  labels:
    app.kubernetes.io/name: ingress-nginx
    app.kubernetes.io/part-of: ingress-nginx
rules:
  - apiGroups:
      - ""
    resources:
      - configmaps
      - pods
      - secrets
      - namespaces
    verbs:
      - get
  - apiGroups:
      - ""
    resources:
      - configmaps
    resourceNames:
      # Defaults to "<election-id>-<ingress-class>"
      # Here: "<ingress-controller-leader>-<nginx>"
      # This has to be adapted if you change either parameter
      # when launching the nginx-ingress-controller.
      - "ingress-controller-leader-nginx"
    verbs:
      - get
      - update
  - apiGroups:
      - ""
    resources:
      - configmaps
    verbs:
      - create
  - apiGroups:
      - ""
    resources:
      - endpoints
    verbs:
      - get

---
apiVersion: rbac.authorization.k8s.io/v1beta1
kind: RoleBinding
metadata:
  name: nginx-ingress-role-nisa-binding
  namespace: ingress-nginx
  labels:
    app.kubernetes.io/name: ingress-nginx
    app.kubernetes.io/part-of: ingress-nginx
roleRef:
  apiGroup: rbac.authorization.k8s.io
  kind: Role
  name: nginx-ingress-role
subjects:
  - kind: ServiceAccount
    name: nginx-ingress-serviceaccount
    namespace: ingress-nginx

---
apiVersion: rbac.authorization.k8s.io/v1beta1
kind: ClusterRoleBinding
metadata:
  name: nginx-ingress-clusterrole-nisa-binding
  labels:
    app.kubernetes.io/name: ingress-nginx
    app.kubernetes.io/part-of: ingress-nginx
roleRef:
  apiGroup: rbac.authorization.k8s.io
  kind: ClusterRole
  name: nginx-ingress-clusterrole
subjects:
  - kind: ServiceAccount
    name: nginx-ingress-serviceaccount
    namespace: ingress-nginx

---

apiVersion: apps/v1
kind: Deployment
metadata:
  name: nginx-ingress-controller
  namespace: ingress-nginx
  labels:
    app.kubernetes.io/name: ingress-nginx
    app.kubernetes.io/part-of: ingress-nginx
spec:
  replicas: 1
  selector:
    matchLabels:
      app.kubernetes.io/name: ingress-nginx
      app.kubernetes.io/part-of: ingress-nginx
  template:
    metadata:
      labels:
        app.kubernetes.io/name: ingress-nginx
        app.kubernetes.io/part-of: ingress-nginx
      annotations:
        prometheus.io/port: "10254"
        prometheus.io/scrape: "true"
    spec:
      # wait up to five minutes for the drain of connections
      terminationGracePeriodSeconds: 300
      serviceAccountName: nginx-ingress-serviceaccount
      hostNetwork: true
      nodeSelector:
        name: ingress
        kubernetes.io/os: linux
      containers:
        - name: nginx-ingress-controller
          image: quay.io/kubernetes-ingress-controller/nginx-ingress-controller:0.26.1
          args:
            - /nginx-ingress-controller
            - --configmap=$(POD_NAMESPACE)/nginx-configuration
            - --tcp-services-configmap=$(POD_NAMESPACE)/tcp-services
            - --udp-services-configmap=$(POD_NAMESPACE)/udp-services
            - --publish-service=$(POD_NAMESPACE)/ingress-nginx
            - --annotations-prefix=nginx.ingress.kubernetes.io
          securityContext:
            allowPrivilegeEscalation: true
            capabilities:
              drop:
                - ALL
              add:
                - NET_BIND_SERVICE
            # www-data -> 33
            runAsUser: 33
          env:
            - name: POD_NAME
              valueFrom:
                fieldRef:
                  fieldPath: metadata.name
            - name: POD_NAMESPACE
              valueFrom:
                fieldRef:
                  fieldPath: metadata.namespace
          ports:
            - name: http
              containerPort: 80
            - name: https
              containerPort: 443
          livenessProbe:
            failureThreshold: 3
            httpGet:
              path: /healthz
              port: 10254
              scheme: HTTP
            initialDelaySeconds: 10
            periodSeconds: 10
            successThreshold: 1
            timeoutSeconds: 10
          readinessProbe:
            failureThreshold: 3
            httpGet:
              path: /healthz
              port: 10254
              scheme: HTTP
            periodSeconds: 10
            successThreshold: 1
            timeoutSeconds: 10
          lifecycle:
            preStop:
              exec:
                command:
                  - /wait-shutdown
---
② 给worker01节点打lable
在master节点,给worker01节点打lable,确保nginx-controller运行到w1节点上:
[root@m test]# kubectl label node w1 name=ingress
node/w1 labeled
[root@m test]#
③ 应用mandatory.yaml
[root@m test]# kubectl apply -f mandatory.yaml
namespace/ingress-nginx created
configmap/nginx-configuration created
configmap/tcp-services created
configmap/udp-services created
serviceaccount/nginx-ingress-serviceaccount created
clusterrole.rbac.authorization.k8s.io/nginx-ingress-clusterrole created
role.rbac.authorization.k8s.io/nginx-ingress-role created
rolebinding.rbac.authorization.k8s.io/nginx-ingress-role-nisa-binding created
clusterrolebinding.rbac.authorization.k8s.io/nginx-ingress-clusterrole-nisa-binding created
deployment.apps/nginx-ingress-controller created
[root@m test]#
④ 查看所有资源/pod
# (1)查看指定命名空间下的pod(确实分配到了worker01节点)
[root@m test]# kubectl get pod -o wide -n ingress-nginx
NAME                                        READY   STATUS    RESTARTS   AGE   IP                NODE   NOMINATED NODE   READINESS GATES
nginx-ingress-controller-7c66dcdd6c-nttzp   1/1     Running   0          37m   192.168.116.171   w1     <none>           <none>
[root@m test]#

# (2)查看所有资源或对象
[root@m test]# kubectl get all -n ingress-nginx
NAME                                            READY   STATUS    RESTARTS   AGE
pod/nginx-ingress-controller-7c66dcdd6c-nttzp   1/1     Running   0          36m

NAME                                       READY   UP-TO-DATE   AVAILABLE   AGE
deployment.apps/nginx-ingress-controller   1/1     1            1           36m

NAME                                                  DESIRED   CURRENT   READY   AGE
replicaset.apps/nginx-ingress-controller-7c66dcdd6c   1         1         1       36m
[root@m test]#
⑤ 查看worker01节点的80和443端口
在worker01节点,查看80和443端口使用情况(可看到nginx占用):
[root@w1 ~]# lsof -i tcp:80

[root@w1 ~]# lsof -i tcp:443
(11)编写Kubernetes配置文件(springboot-demo.yaml,包含ingress规则)
[root@m springboot-demo]# vi springboot-demo.yaml
yaml内容:
# 以Deployment部署Pod
apiVersion: apps/v1
kind: Deployment
metadata:
  name: springboot-demo
spec:
  selector:
    matchLabels:
      app: springboot-demo
  replicas: 1
  template:
    metadata:
      labels:
        app: springboot-demo
    spec:
      containers:
      - name: springboot-demo
      # 这里使用私有仓库镜像
        image: 192.168.116.170:5000/springboot-demo-image:v1.0

        ports:
        - containerPort: 8080
---
# 创建Pod的Service
apiVersion: v1
kind: Service
metadata:
  name: springboot-demo
spec:
  ports:
  - port: 80
    protocol: TCP
    targetPort: 8080
  selector:
    app: springboot-demo
---
# 创建Ingress,定义访问规则,一定要记得提前创建好nginx ingress controller
apiVersion: extensions/v1beta1
kind: Ingress
metadata:
  name: springboot-demo
spec:
  rules:
  - host: k8s.demo.gper.club
    http:
      paths:
      - path: /
        backend:
          serviceName: springboot-demo
          servicePort: 80
(12)创建pod、service、ingress
[root@m springboot-demo]# kubectl apply -f springboot-demo.yaml
deployment.apps/springboot-demo created
service/springboot-demo created
ingress.extensions/springboot-demo created
[root@m springboot-demo]#
(13)查看pod相关
① 查看pod
[root@m springboot-demo]# kubectl get pods -o wide
NAME                              READY   STATUS    RESTARTS   AGE     IP               NODE   NOMINATED NODE   READINESS GATES
springboot-demo-76c9685f5-4d2m5   1/1     Running   0          7m32s   192.168.190.84   w1     <none>           <none>
① 集群内测试访问springboot-demo的pod
[root@m springboot-demo]# curl 192.168.190.86:8080/k8s
<h1>Hello K8S ...</h1><br/><br/>测试成功!
[root@m springboot-demo]#
① 查看service
[root@m springboot-demo]# kubectl get svc
NAME              TYPE        CLUSTER-IP       EXTERNAL-IP   PORT(S)   AGE
kubernetes        ClusterIP   10.96.0.1        <none>        443/TCP   3d15h
springboot-demo   ClusterIP   10.100.135.47    <none>        80/TCP    44m
tomcat-service    ClusterIP   10.110.130.134   <none>        80/TCP    74m
[root@m springboot-demo]#
(14)扩容测试(5个副本)
[root@m springboot-demo]# kubectl scale deploy springboot-demo --replicas=5
(15)查看ingress
[root@m springboot-demo]# kubectl get ingress
NAME              HOSTS                ADDRESS   PORTS   AGE
nginx-ingress     tomcat.jack.com                80      66m
springboot-demo   k8s.demo.gper.club             80      37m
[root@m springboot-demo]#
(16)外部浏览器测试(通过ingress配置的域名访问)
① 修改hosts文件,配置域名解析
修改windows系统的hosts文件(C:\Windows\System32\drivers\etc\hosts),添加dns解析:

②浏览器访问
访问URL:http://k8s.demo.gper.club/k8s

(17)删除测试资源
#(1)删除pod和service等资源
[root@m test]# cd springboot-demo
[root@m test]# kubectl delete -f mandatory.yaml
[root@m test]# kubectl delete -f springboot-demo.yaml

#(2)删除nginx ingress controller(也可保留)
[root@m test]# kubectl delete -f mandatory.yaml

#(3)删除yaml配置文件
[root@m test]# rm mandatory.yaml
[root@m test]# rm springboot-demo.yaml
三、部署Nacos + Spring Cloud项目
3.1、安装nacos
参见博文:Linux(Centos7.0)安装nacos服务器
3.2、准备测试资源
准备两个Spring Boot项目,工程名为user和order,表示两个服务。
3.2.1、user工程
以下只提供核心代码资源:
(1)pom.xml
<?xml version="1.0" encoding="UTF-8"?>
<project xmlns="http://maven.apache.org/POM/4.0.0" xmlns:xsi="http://www.w3.org/2001/XMLSchema-instance"
         xsi:schemaLocation="http://maven.apache.org/POM/4.0.0 https://maven.apache.org/xsd/maven-4.0.0.xsd">
    <modelVersion>4.0.0</modelVersion>
    <parent>
        <groupId>org.springframework.boot</groupId>
        <artifactId>spring-boot-starter-parent</artifactId>
        <version>2.2.1.RELEASE</version>
        <relativePath/> <!-- lookup parent from repository -->
    </parent>
    <groupId>com.gupao</groupId>
    <artifactId>user</artifactId>
    <version>0.0.1-SNAPSHOT</version>
    <name>user</name>
    <description>Demo project for Spring Boot</description>

    <properties>
        <java.version>1.8</java.version>
    </properties>

    <dependencies>
        <dependency>
            <groupId>org.springframework.boot</groupId>
            <artifactId>spring-boot-starter-web</artifactId>
        </dependency>

        <dependency>
            <groupId>org.springframework.boot</groupId>
            <artifactId>spring-boot-starter-test</artifactId>
            <scope>test</scope>
            <exclusions>
                <exclusion>
                    <groupId>org.junit.vintage</groupId>
                    <artifactId>junit-vintage-engine</artifactId>
                </exclusion>
            </exclusions>
        </dependency>

        <!--引入nacos client依赖-->
        <dependency>
            <groupId>org.springframework.cloud</groupId>
            <artifactId>spring-cloud-starter-alibaba-nacos-discovery</artifactId>
        </dependency>
    </dependencies>

    <dependencyManagement>
        <dependencies>
            <!--加入Spring Cloud依赖-->
            <dependency>
                <groupId>org.springframework.cloud</groupId>
                <artifactId>spring-cloud-dependencies</artifactId>
                <version>Greenwich.SR1</version>
                <type>pom</type>
                <scope>import</scope>
            </dependency>

            <!--加入Spring Cloud Alibaba依赖-->
            <dependency>
                <groupId>org.springframework.cloud</groupId>
                <artifactId>spring-cloud-alibaba-dependencies</artifactId>
                <version>0.9.0.RELEASE</version>
                <type>pom</type>
                <scope>import</scope>
            </dependency>
        </dependencies>
    </dependencyManagement>

    <build>
        <plugins>
            <plugin>
                <groupId>org.springframework.boot</groupId>
                <artifactId>spring-boot-maven-plugin</artifactId>
            </plugin>
        </plugins>
    </build>

</project>
(2)application.yml
spring:
  cloud:
    nacos:
      discovery:
        # nacos server 地址
        server-addr: 192.168.116.170:8848
  application:
    name: user

server:
  port: 8080
(3)TestController.java
package net.xiaof.user.controller;

import org.springframework.beans.factory.annotation.Autowired;
import org.springframework.cloud.client.ServiceInstance;
import org.springframework.cloud.client.discovery.DiscoveryClient;
import org.springframework.web.bind.annotation.RequestMapping;
import org.springframework.web.bind.annotation.RestController;

import java.net.URI;
import java.net.URL;
import java.net.URLConnection;
import java.util.List;

/**
 * 测试Controller
 * @author XIAO
 */
@RestController
@RequestMapping("/user")
public class TestController {

    @Autowired
    private DiscoveryClient discoveryClient;

    /**
     * 访问测试
     * @return
     * @throws Exception
     */
    @RequestMapping("/test")
    public List<ServiceInstance> findServiceInstance() throws Exception{
        //查询指定服务名称下的所有实例的信息
        List<ServiceInstance> list=this.discoveryClient.getInstances("order");
        ServiceInstance serviceInstance=list.get(0);
        URI uri = serviceInstance.getUri();
        System.out.println(uri.toString());//打印
        this.testUrl(uri.toString());
        return list;
    }

    /**
     * 测试url是否可用
     * @param urlString
     */
    private void testUrl(String urlString){
        URL url;
        try {
            url = new URL(urlString);
            URLConnection co =  url.openConnection();
            co.connect();
            System.out.println("连接可用");
        } catch (Exception e1) {
            System.out.println("连接打不开!");
            url = null;
        }
    }
}
(4)启动类:UserApplication
package net.xiaof.user;

import org.springframework.boot.SpringApplication;
import org.springframework.boot.autoconfigure.SpringBootApplication;

@SpringBootApplication
public class UserApplication {

    public static void main(String[] args) {
        SpringApplication.run(UserApplication.class, args);
    }

}
3.2.2、order工程
以下只提供核心代码资源:
(1)pom.xml
<?xml version="1.0" encoding="UTF-8"?>
<project xmlns="http://maven.apache.org/POM/4.0.0" xmlns:xsi="http://www.w3.org/2001/XMLSchema-instance"
         xsi:schemaLocation="http://maven.apache.org/POM/4.0.0 https://maven.apache.org/xsd/maven-4.0.0.xsd">
    <modelVersion>4.0.0</modelVersion>
    <parent>
        <groupId>org.springframework.boot</groupId>
        <artifactId>spring-boot-starter-parent</artifactId>
        <version>2.2.1.RELEASE</version>
        <relativePath/> <!-- lookup parent from repository -->
    </parent>
    <groupId>com.gupao</groupId>
    <artifactId>order</artifactId>
    <version>0.0.1-SNAPSHOT</version>
    <name>order</name>
    <description>Demo project for Spring Boot</description>

    <properties>
        <java.version>1.8</java.version>
    </properties>

    <dependencies>
        <dependency>
            <groupId>org.springframework.boot</groupId>
            <artifactId>spring-boot-starter-web</artifactId>
        </dependency>

        <dependency>
            <groupId>org.springframework.boot</groupId>
            <artifactId>spring-boot-starter-test</artifactId>
            <scope>test</scope>
            <exclusions>
                <exclusion>
                    <groupId>org.junit.vintage</groupId>
                    <artifactId>junit-vintage-engine</artifactId>
                </exclusion>
            </exclusions>
        </dependency>

        <!--引入nacos client依赖-->
        <dependency>
            <groupId>org.springframework.cloud</groupId>
            <artifactId>spring-cloud-starter-alibaba-nacos-discovery</artifactId>
        </dependency>
    </dependencies>

    <dependencyManagement>
        <dependencies>
            <!--加入Spring Cloud依赖-->
            <dependency>
                <groupId>org.springframework.cloud</groupId>
                <artifactId>spring-cloud-dependencies</artifactId>
                <version>Greenwich.SR1</version>
                <type>pom</type>
                <scope>import</scope>
            </dependency>

            <!--加入Spring Cloud Alibaba依赖-->
            <dependency>
                <groupId>org.springframework.cloud</groupId>
                <artifactId>spring-cloud-alibaba-dependencies</artifactId>
                <version>0.9.0.RELEASE</version>
                <type>pom</type>
                <scope>import</scope>
            </dependency>
        </dependencies>
    </dependencyManagement>

    <build>
        <plugins>
            <plugin>
                <groupId>org.springframework.boot</groupId>
                <artifactId>spring-boot-maven-plugin</artifactId>
            </plugin>
        </plugins>
    </build>

</project>
(2)application.yml
spring:
  cloud:
    nacos:
      discovery:
        # nacos server 地址
        server-addr: 192.168.116.170:8848
  application:
    name: order

server:
  port: 9090
(3)启动类:OrderApplication.java
order工程核心只有启动类,目的是注册到nacos。
package net.xiaof.order;

import org.springframework.boot.SpringApplication;
import org.springframework.boot.autoconfigure.SpringBootApplication;

@SpringBootApplication
public class OrderApplication {

    public static void main(String[] args) {
        SpringApplication.run(OrderApplication.class, args);
    }

}
3.3、传统方式部署
本地测试user和order工程,和上传至linux服务器测试基本一样(这里省略上传至linux测试)。
(1)分别启动测试user和order工程(不分顺序)
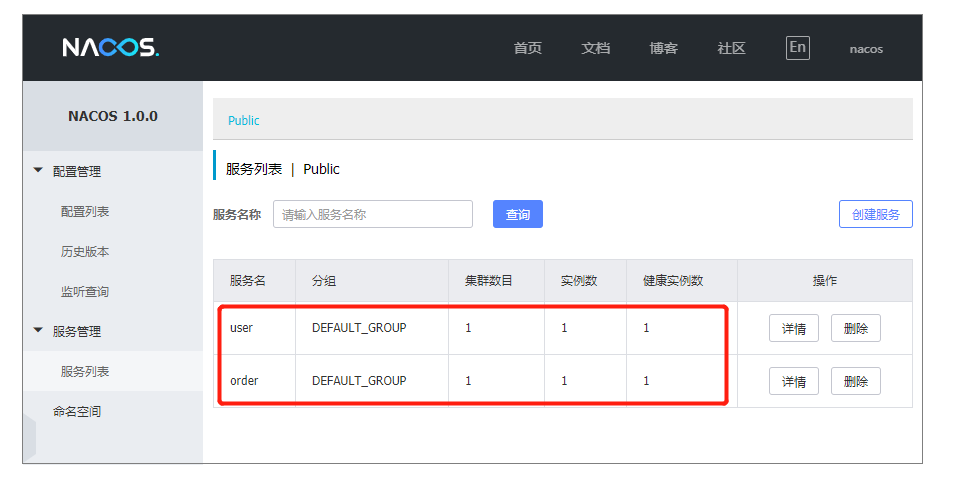
(2)查看nacos服务列表

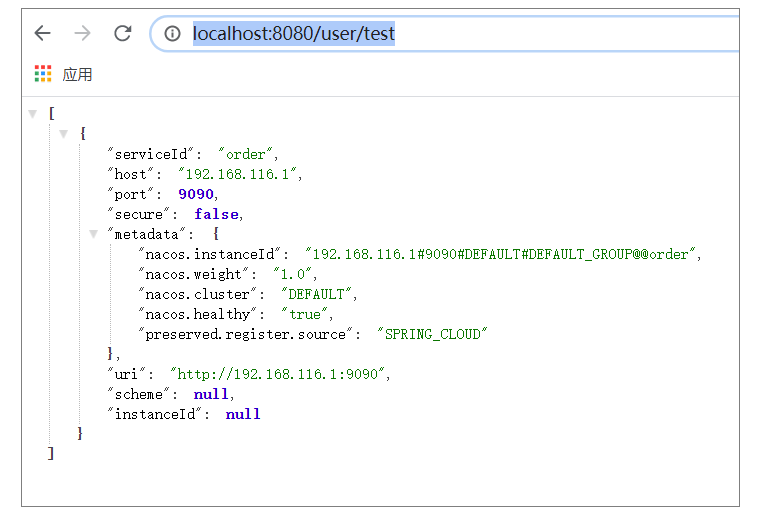
(3)浏览器访问测试(成功)
访问user服务,user服务会从nacos中找到order服务。
请求地址: http://localhost:8080/user/test
3.4、K8s方式部署
3.4.1、项目生成jar,并上传至linux
(1)项目生成jar
在user工程和order工程根目录,分别执行命令:
mvn clean pakcage
(2)上传jar至对应目录
①上传user-0.0.1-SNAPSHOT.jar至user目录:
[root@w1 test]# mkdir user
[root@w1 test]# cd user
[root@w1 user]# rz

[root@w1 user]# ll
总用量 32552
-rw-r--r--. 1 root root 33330501 1月  11 23:12 user-0.0.1-SNAPSHOT.jar
[root@w1 user]#
② 上传order-0.0.1-SNAPSHOT.jar至order目录:
[root@w1 test]# mkdir order
[root@w1 test]# cd order
[root@w1 order]# rz

[root@w1 order]# ll
总用量 32552
-rw-r--r--. 1 root root 33330501 1月  11 23:12 order-0.0.1-SNAPSHOT.jar
[root@w1 order]#
3.4.2、分别创建Dockerfile,并将jar打成镜像
分别在对应的目录,编写Dockerfile。
(1)在user目录创建Dockerfile
① 创建Dockerfile
[root@m user]# vi Dockerfile
内容:
FROM openjdk:8-jre-alpine
COPY user-0.0.1-SNAPSHOT.jar /user.jar
ENTRYPOINT ["java","-jar","/user.jar"]
② 根据Dockerfile创建image:
#(0)如果存在,请删除镜像
[root@m order]# docker rmi user-image:v1.0

# (1)创建镜像
[root@m user]# docker build -t user-image:v1.0 .

# (2)查看镜像
[root@m user]# docker images | grep user
user-image    v1.0   a4509b9e6a69   20 seconds ago    118MB
[root@m user]#
(2)在order目录创建Dockerfile:
① 创建Dockerfile
[root@m order]# vi Dockerfile
内容:
FROM openjdk:8-jre-alpine
COPY order-0.0.1-SNAPSHOT.jar /order.jar
ENTRYPOINT ["java","-jar","/order.jar"]
3.4.3、启动docker私有仓库
[root@m ~]# docker start registry
registry
[root@m ~]#
[root@m ~]# docker ps | grep registry
029261e06978        registry:latest        "/entrypoint.sh /etc…"   34 hours ago        Up 57 seconds       0.0.0.0:5000->5000/tcp   registry
[root@m ~]#
3.4.4、上传镜像至docker私有仓库
(1)上传user镜像至私有仓库
[root@m test]# docker tag user-image:v1.0 192.168.116.170:5000/user-image:v1.0
[root@m test]#
[root@m test]# docker push 192.168.116.170:5000/user-image:v1.0
The push refers to repository [192.168.116.170:5000/user-image]
ad9d37a5f027: Pushed
edd61588d126: Mounted from springboot-demo-image
9b9b7f3d56a0: Mounted from springboot-demo-image
f1b5933fe4b5: Mounted from springboot-demo-image
v1.0: digest: sha256:5c45150f4d0e5ab115c598d8e86d400bd680389480145c0cd6fcf74c4257b511 size: 1159
[root@m test]#
(2)上传order镜像至私有仓库
#(1)打tag
[root@m test]# docker tag order-image:v1.0 192.168.116.170:5000/order-image:v1.0

#(2)push
[root@m test]# docker push 192.168.116.170:5000/order-image:v1.0
3.4.5、创建nginx ingress controller
(1)创建并编辑mandatory.yaml文件
创建并编辑mandatory.yaml文件:
[root@m test]# vi mandatory.yaml
mandatory.yaml内容:
apiVersion: v1
kind: Namespace
metadata:
  name: ingress-nginx
  labels:
    app.kubernetes.io/name: ingress-nginx
    app.kubernetes.io/part-of: ingress-nginx

---

kind: ConfigMap
apiVersion: v1
metadata:
  name: nginx-configuration
  namespace: ingress-nginx
  labels:
    app.kubernetes.io/name: ingress-nginx
    app.kubernetes.io/part-of: ingress-nginx

---
kind: ConfigMap
apiVersion: v1
metadata:
  name: tcp-services
  namespace: ingress-nginx
  labels:
    app.kubernetes.io/name: ingress-nginx
    app.kubernetes.io/part-of: ingress-nginx

---
kind: ConfigMap
apiVersion: v1
metadata:
  name: udp-services
  namespace: ingress-nginx
  labels:
    app.kubernetes.io/name: ingress-nginx
    app.kubernetes.io/part-of: ingress-nginx

---
apiVersion: v1
kind: ServiceAccount
metadata:
  name: nginx-ingress-serviceaccount
  namespace: ingress-nginx
  labels:
    app.kubernetes.io/name: ingress-nginx
    app.kubernetes.io/part-of: ingress-nginx

---
apiVersion: rbac.authorization.k8s.io/v1beta1
kind: ClusterRole
metadata:
  name: nginx-ingress-clusterrole
  labels:
    app.kubernetes.io/name: ingress-nginx
    app.kubernetes.io/part-of: ingress-nginx
rules:
  - apiGroups:
      - ""
    resources:
      - configmaps
      - endpoints
      - nodes
      - pods
      - secrets
    verbs:
      - list
      - watch
  - apiGroups:
      - ""
    resources:
      - nodes
    verbs:
      - get
  - apiGroups:
      - ""
    resources:
      - services
    verbs:
      - get
      - list
      - watch
  - apiGroups:
      - ""
    resources:
      - events
    verbs:
      - create
      - patch
  - apiGroups:
      - "extensions"
      - "networking.k8s.io"
    resources:
      - ingresses
    verbs:
      - get
      - list
      - watch
  - apiGroups:
      - "extensions"
      - "networking.k8s.io"
    resources:
      - ingresses/status
    verbs:
      - update

---
apiVersion: rbac.authorization.k8s.io/v1beta1
kind: Role
metadata:
  name: nginx-ingress-role
  namespace: ingress-nginx
  labels:
    app.kubernetes.io/name: ingress-nginx
    app.kubernetes.io/part-of: ingress-nginx
rules:
  - apiGroups:
      - ""
    resources:
      - configmaps
      - pods
      - secrets
      - namespaces
    verbs:
      - get
  - apiGroups:
      - ""
    resources:
      - configmaps
    resourceNames:
      # Defaults to "<election-id>-<ingress-class>"
      # Here: "<ingress-controller-leader>-<nginx>"
      # This has to be adapted if you change either parameter
      # when launching the nginx-ingress-controller.
      - "ingress-controller-leader-nginx"
    verbs:
      - get
      - update
  - apiGroups:
      - ""
    resources:
      - configmaps
    verbs:
      - create
  - apiGroups:
      - ""
    resources:
      - endpoints
    verbs:
      - get

---
apiVersion: rbac.authorization.k8s.io/v1beta1
kind: RoleBinding
metadata:
  name: nginx-ingress-role-nisa-binding
  namespace: ingress-nginx
  labels:
    app.kubernetes.io/name: ingress-nginx
    app.kubernetes.io/part-of: ingress-nginx
roleRef:
  apiGroup: rbac.authorization.k8s.io
  kind: Role
  name: nginx-ingress-role
subjects:
  - kind: ServiceAccount
    name: nginx-ingress-serviceaccount
    namespace: ingress-nginx

---
apiVersion: rbac.authorization.k8s.io/v1beta1
kind: ClusterRoleBinding
metadata:
  name: nginx-ingress-clusterrole-nisa-binding
  labels:
    app.kubernetes.io/name: ingress-nginx
    app.kubernetes.io/part-of: ingress-nginx
roleRef:
  apiGroup: rbac.authorization.k8s.io
  kind: ClusterRole
  name: nginx-ingress-clusterrole
subjects:
  - kind: ServiceAccount
    name: nginx-ingress-serviceaccount
    namespace: ingress-nginx

---

apiVersion: apps/v1
kind: Deployment
metadata:
  name: nginx-ingress-controller
  namespace: ingress-nginx
  labels:
    app.kubernetes.io/name: ingress-nginx
    app.kubernetes.io/part-of: ingress-nginx
spec:
  replicas: 1
  selector:
    matchLabels:
      app.kubernetes.io/name: ingress-nginx
      app.kubernetes.io/part-of: ingress-nginx
  template:
    metadata:
      labels:
        app.kubernetes.io/name: ingress-nginx
        app.kubernetes.io/part-of: ingress-nginx
      annotations:
        prometheus.io/port: "10254"
        prometheus.io/scrape: "true"
    spec:
      # wait up to five minutes for the drain of connections
      terminationGracePeriodSeconds: 300
      serviceAccountName: nginx-ingress-serviceaccount
      hostNetwork: true
      nodeSelector:
        name: ingress
        kubernetes.io/os: linux
      containers:
        - name: nginx-ingress-controller
          image: quay.io/kubernetes-ingress-controller/nginx-ingress-controller:0.26.1
          args:
            - /nginx-ingress-controller
            - --configmap=$(POD_NAMESPACE)/nginx-configuration
            - --tcp-services-configmap=$(POD_NAMESPACE)/tcp-services
            - --udp-services-configmap=$(POD_NAMESPACE)/udp-services
            - --publish-service=$(POD_NAMESPACE)/ingress-nginx
            - --annotations-prefix=nginx.ingress.kubernetes.io
          securityContext:
            allowPrivilegeEscalation: true
            capabilities:
              drop:
                - ALL
              add:
                - NET_BIND_SERVICE
            # www-data -> 33
            runAsUser: 33
          env:
            - name: POD_NAME
              valueFrom:
                fieldRef:
                  fieldPath: metadata.name
            - name: POD_NAMESPACE
              valueFrom:
                fieldRef:
                  fieldPath: metadata.namespace
          ports:
            - name: http
              containerPort: 80
            - name: https
              containerPort: 443
          livenessProbe:
            failureThreshold: 3
            httpGet:
              path: /healthz
              port: 10254
              scheme: HTTP
            initialDelaySeconds: 10
            periodSeconds: 10
            successThreshold: 1
            timeoutSeconds: 10
          readinessProbe:
            failureThreshold: 3
            httpGet:
              path: /healthz
              port: 10254
              scheme: HTTP
            periodSeconds: 10
            successThreshold: 1
            timeoutSeconds: 10
          lifecycle:
            preStop:
              exec:
                command:
                  - /wait-shutdown
---
(2)给worker01节点打lable
[root@m test]# kubectl label node w1 name=ingress
node/w1 labeled
[root@m test]#
(3)应用mandatory.yaml
[root@m test]# kubectl apply -f mandatory.yaml
namespace/ingress-nginx created
configmap/nginx-configuration created
configmap/tcp-services created
configmap/udp-services created
serviceaccount/nginx-ingress-serviceaccount created
clusterrole.rbac.authorization.k8s.io/nginx-ingress-clusterrole created
role.rbac.authorization.k8s.io/nginx-ingress-role created
rolebinding.rbac.authorization.k8s.io/nginx-ingress-role-nisa-binding created
clusterrolebinding.rbac.authorization.k8s.io/nginx-ingress-clusterrole-nisa-binding created
deployment.apps/nginx-ingress-controller created
[root@m test]#
(4)查看所有资源/pod
# (1)查看指定命名空间下的pod(确实分配到了worker01节点)
[root@m test]# kubectl get pod -o wide -n ingress-nginx
NAME                                        READY   STATUS    RESTARTS   AGE   IP                NODE   NOMINATED NODE   READINESS GATES
nginx-ingress-controller-7c66dcdd6c-nttzp   1/1     Running   0          37m   192.168.116.171   w1     <none>           <none>
[root@m test]#

# (2)查看所有资源或对象
[root@m test]# kubectl get all -n ingress-nginx
NAME                                            READY   STATUS    RESTARTS   AGE
pod/nginx-ingress-controller-7c66dcdd6c-nttzp   1/1     Running   0          36m

NAME                                       READY   UP-TO-DATE   AVAILABLE   AGE
deployment.apps/nginx-ingress-controller   1/1     1            1           36m

NAME                                                  DESIRED   CURRENT   READY   AGE
replicaset.apps/nginx-ingress-controller-7c66dcdd6c   1         1         1       36m
[root@m test]#
(5)查看worker01节点的80和443端口
在worker01节点,查看80和443端口使用情况(可看到nginx占用):
[root@w1 ~]# lsof -i tcp:80

[root@w1 ~]# lsof -i tcp:443
3.4.6、创建Kubernetes配置文件
(1)为user创建yaml文件
[root@m test]# vi user.yaml
内容:
# 以Deployment部署Pod
apiVersion: apps/v1
kind: Deployment
metadata:
  name: user
spec:
  selector:
    matchLabels:
      app: user
  replicas: 1
  template:
    metadata:
      labels:
        app: user
    spec:
      containers:
      - name: user
        image: 192.168.116.170:5000/user-image:v1.0
        ports:
        - containerPort: 8080
---
# 创建Pod的Service
apiVersion: v1
kind: Service
metadata:
  name: user
spec:
  ports:
  - port: 80
    protocol: TCP
    targetPort: 8080
  selector:
    app: user
---
# 创建Ingress,定义访问规则,一定要记得提前创建好nginx ingress controller
apiVersion: extensions/v1beta1
kind: Ingress
metadata:
  name: user
spec:
  rules:
  - host: k8s.demo.gper.club
    http:
      paths:
      - path: /
        backend:
          serviceName: user
          servicePort: 80
(2)为order创建yaml文件
[root@m test]# vi order.yaml
内容:
# 以Deployment部署Pod
apiVersion: apps/v1
kind: Deployment
metadata:
  name: order
spec:
  selector:
    matchLabels:
      app: order
  replicas: 1
  template:
    metadata:
      labels:
        app: order
    spec:
      containers:
      - name: order
        image: 192.168.116.170:5000/order-image:v1.0
        ports:
        - containerPort: 9090
---
# 创建Pod的Service
apiVersion: v1
kind: Service
metadata:
  name: order
spec:
  ports:
  - port: 80
    protocol: TCP
    targetPort: 9090
  selector:
    app: order
3.4.7、创建并查看pod
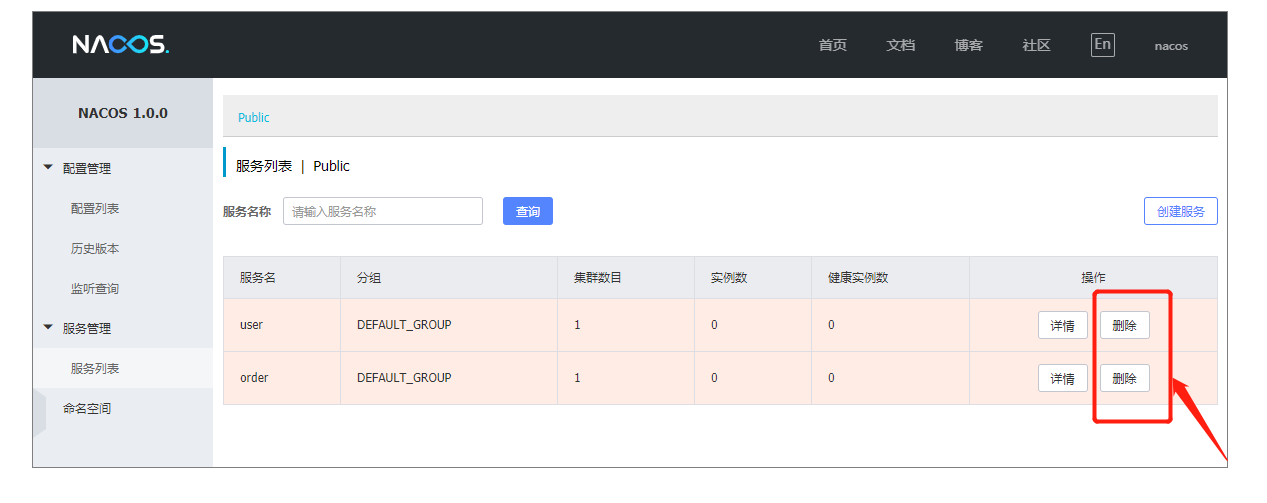
(0)删除nacos上之前本地测试的服务
由于nacos服务没有重启,所以服务还在,需要手动删除服务,或者重启nacos服务器也可以。
(1)创建pod
[root@m test]# kubectl apply -f user.yaml
deployment.apps/user created
service/user created
ingress.extensions/user created
[root@m test]#

[root@m test]# kubectl apply -f order.yaml
deployment.apps/order created
service/order created
[root@m test]#
(2)查看pod相关
#(1)查看pod
[root@m order]# kubectl get pod -o wide
NAME                    READY   STATUS    RESTARTS   AGE    IP                NODE   NOMINATED NODE   READINESS GATES
order-b9c986677-5rms2   1/1     Running   0          75m    192.168.190.101   w1     <none>           <none>
user-6ffb6cb6b4-5ctrl   1/1     Running   0          140m   192.168.190.100   w1     <none>           <none>
[root@m order]#

#(2)查看service
[root@m order]# kubectl get svc
NAME         TYPE        CLUSTER-IP      EXTERNAL-IP   PORT(S)   AGE
kubernetes   ClusterIP   10.96.0.1       <none>        443/TCP   5d13h
order        ClusterIP   10.98.28.100    <none>        80/TCP    69m
user         ClusterIP   10.107.38.198   <none>        80/TCP    135m
[root@m order]#

#(3)查看ingress
[root@m user]# kubectl get ingress
NAME   HOSTS                ADDRESS   PORTS   AGE
user   k8s.demo.gper.club             80      4m49s
[root@m user]#
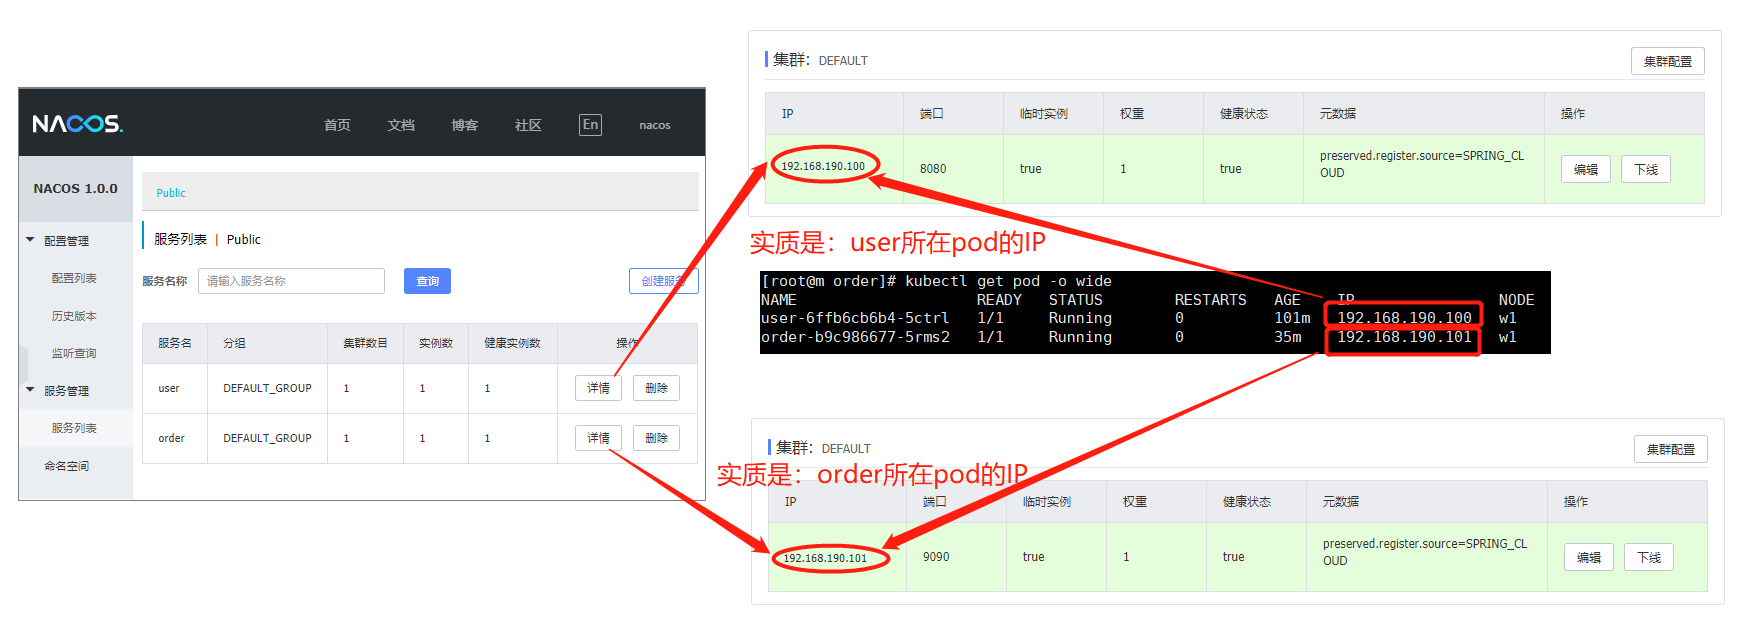
(3)查看nacos上的服务
nacos上的服务(这里的nacos和user、order的pod在k8s集群的同一节点):
(4)k8s集群内访问测试
#(1)查看pod的IP
[root@m order]# kubectl get pod -o wide
NAME READY STATUS RESTARTS AGE IP NODE NOMINATED NODE READINESS GATES
order-b9c986677-5rms2 1/1 Running 0 75m 192.168.190.101 w1 <none> <none>
user-6ffb6cb6b4-5ctrl 1/1 Running 0 140m 192.168.190.100 w1 <none> <none>
[root@m order]#
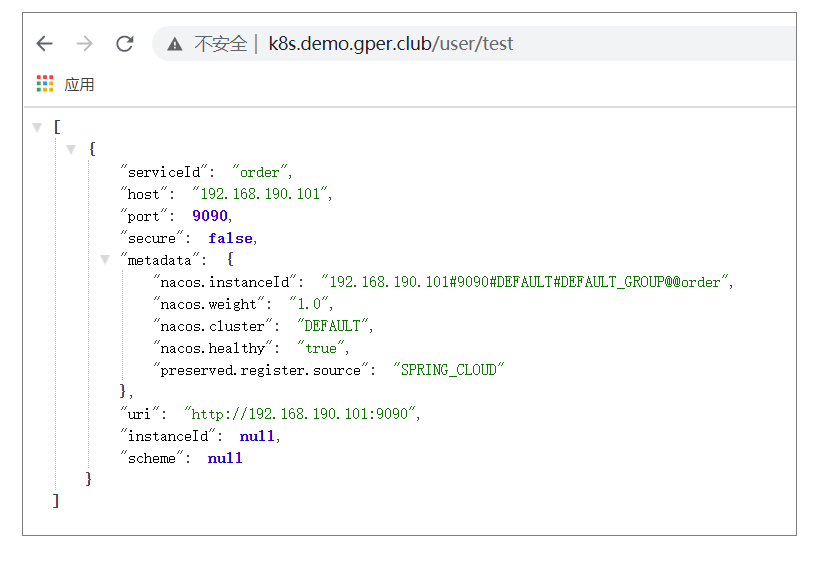
#(1)curl访问测试
[root@m order]# curl 192.168.190.100:8080/user/test
[{"serviceId":"order","host":"192.168.190.101","port":9090,"secure":false,"metadata":{"nacos.instanceId":"192.168.190.101#9090#DEFAULT#DEFAULT_GROUP@@order","nacos.weight":"1.0","nacos.cluster":"DEFAULT","nacos.healthy":"true","preserved.register.source":"SPRING_CLOUD"},"uri":"http://192.168.190.101:9090","instanceId":null,"scheme":null}]
[root@m order]#
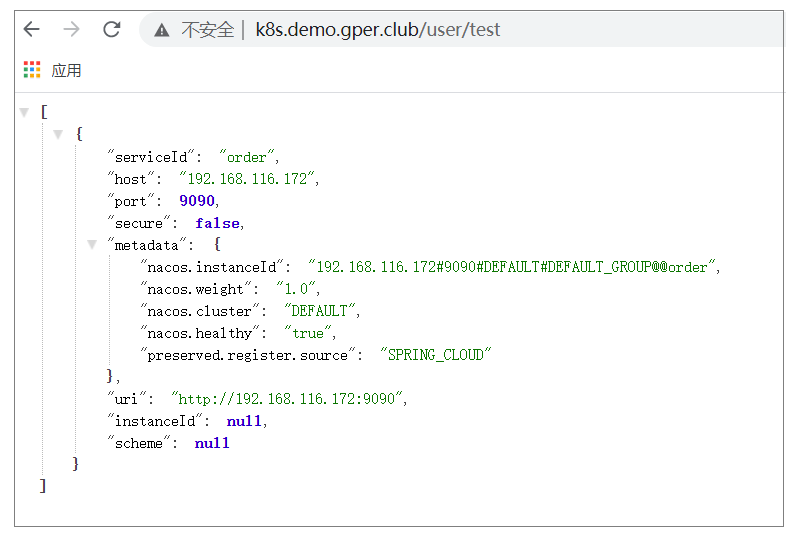
3.4.8、外部浏览器测试(通过ingress配置的域名访问)
① 修改hosts文件,配置域名解析
修改windows系统的hosts文件(C:\Windows\System32\drivers\etc\hosts),添加dns解析:
②浏览器访问(通过ingress规则里配置的域名访问)
访问URL:http://k8s.demo.gper.club/user/test
3.4.9、测试hostNetwork模式
(1)删除user、order的pod及相关
#(1)删除pod和service等资源
[root@m test]# cd user
[root@m test]# kubectl delete -f user.yaml
[root@m test]# cd order
[root@m test]# kubectl delete -f order.yaml
(2)修改user.yaml、order.yaml
在user.yaml、order.yaml中,分别添加如下配置:
spec.template.metadata.spec.hostNetwork=true
(3)再次依次执行3.4.7~3.4.8测试(成功)
3.4.10、删除测试资源
#(1)删除pod和service等资源
[root@m test]# cd user
[root@m test]# kubectl delete -f user.yaml
[root@m test]# cd order
[root@m test]# kubectl delete -f order.yaml

#(2)删除nginx ingress controller(也可保留)
[root@m test]# kubectl delete -f mandatory.yaml

#(3)删除yaml配置文件
[root@m test]# rm mandatory.yaml
[root@m test]# rm user.yaml
[root@m test]# rm order.yaml


