SpringBoot整合腾讯云邮箱服务
1、pom配置
<!--       腾讯云邮箱服务-->
       <dependency>
          <groupId>com.tencentcloudapi</groupId>
          <artifactId>tencentcloud-sdk-java</artifactId>
          <!-- go to https://search.maven.org/search?q=tencentcloud-sdk-java and get the latest version. -->
          <!-- 请到https://search.maven.org/search?q=tencentcloud-sdk-java查询所有版本,最新版本如下 -->
          <version>3.1.830</version>
       </dependency>
2、yaml配置
tenxun:
#  secretId和secretKey来自于:https://console.cloud.tencent.com/cam/capi
  secretId: ""
  secretKey: ""
#  使用腾讯云的接口
  httpProfile: "ses.tencentcloudapi.com"
# 使用的服务器
  sesClient: "ap-hongkong"
# 发送邮箱的一些配置就是昵称,和发送域名
  fromEmailAddress : "云图柜 <kzzby@mail.kzzby.cn>"
# 配置的模板 id 按道理说这里是自定义的,但是由于本系统只能
  templateID : 120897
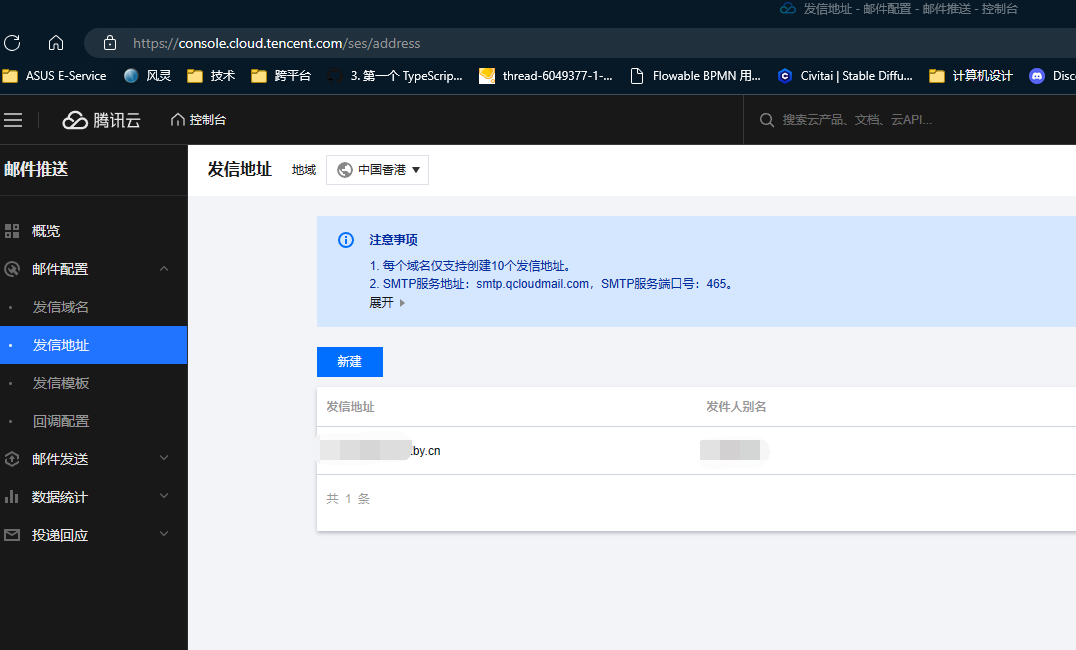
3、邮箱服务的模板配置
fromEmailAddress来自发信地址 - 邮件配置 - 邮件推送 - 控制台 (tencent.com)
templateID来自
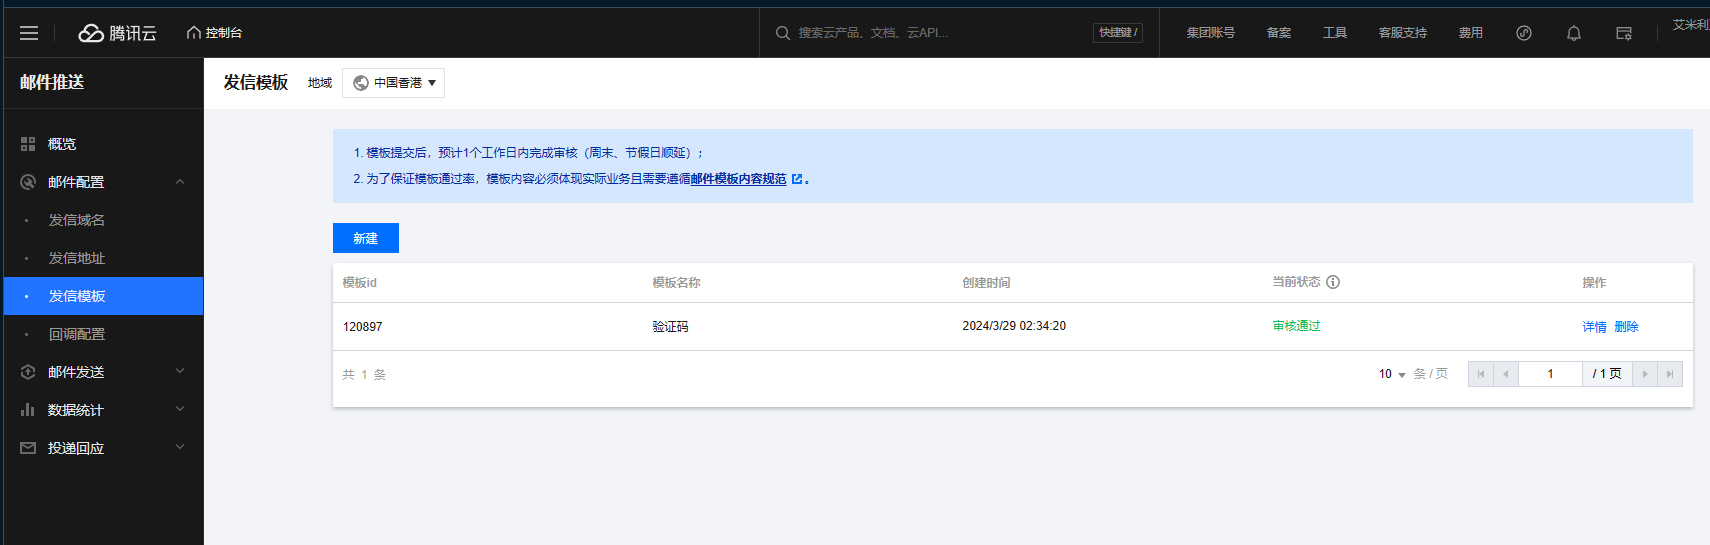
模板配置:

这里使用的模板是
html代码
<!DOCTYPE html>
<html lang="en">
<head>
<meta charset="UTF-8">
<meta name="viewport" content="width=device-width, initial-scale=1.0">
<title>验证码模板</title>
<style>
body, html {
height: 100%;
margin: 0;
display: flex;
justify-content: center;
align-items: center;
background-color: #f0f0f0;
font-family: Arial, sans-serif;
}
.verify-container {
max-width: 600px;
padding: 20px;
border-radius: 10px;
background-color: #ffffff;
box-shadow: 0 4px 8px rgba(0, 0, 0, 0.1);
display: flex;
flex-direction: column;
align-items: center;
text-align: center;
gap: 10px;
}
.verify-description {
font-size: 14px;
color: #666;
padding: 0 20px;
}
.verify-code {
font-size: 24px;
font-weight: bold;
letter-spacing: 3px;
color: #333;
margin: 10px 0;
padding: 10px 20px;
border: 1px solid #ddd;
border-radius: 5px;
}
.warning {
font-size: 12px;
color: #999;
}
</style>
</head>
<body>
<div class="verify-container">
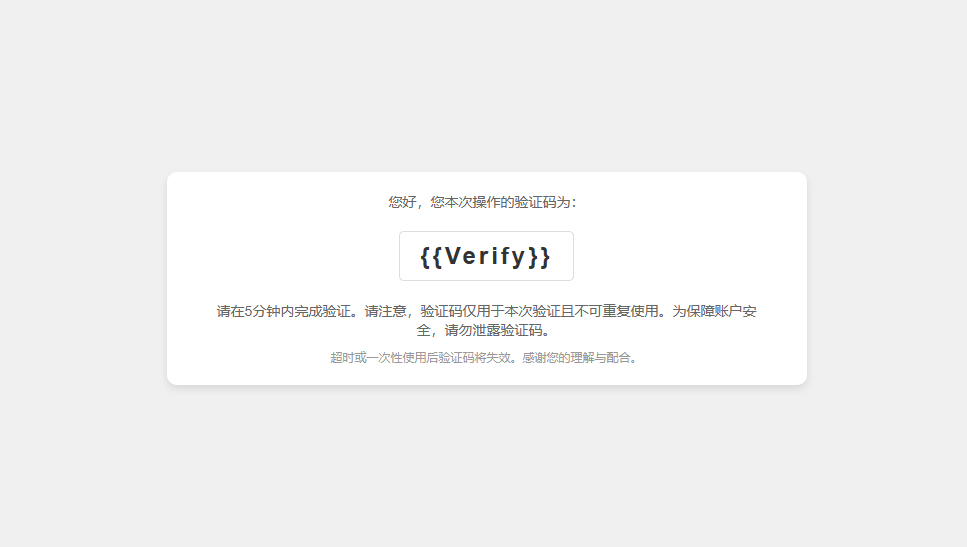
<div class="verify-description">您好,您本次操作的验证码为:</div>
<span class="verify-code">{{Verify}}</span>
<div class="verify-description">请在5分钟内完成验证。请注意,验证码仅用于本次验证且不可重复使用。为保障账户安全,请勿泄露验证码。</div>
<div class="warning">超时或一次性使用后验证码将失效。感谢您的理解与配合。</div>
</div>
</body>
</html>
模板等待审核通过后即可使用
需要注意的是变量要变成这样{{Verify}}
<span class="verify-code">{{Verify}}</span>
4、设置基础配置的bean
package com.hj.imgadmin.tenEml;

import lombok.Data;
import org.springframework.beans.factory.annotation.Value;
import org.springframework.boot.context.properties.ConfigurationProperties;
import org.springframework.context.annotation.Configuration;

@Configuration
@Data
public class TencentCloudConfig {

    @Value("${tenxun.secretId}")
    private String secretId;

    @Value("${tenxun.secretKey}")
    private String secretKey;

    @Value("${tenxun.httpProfile}")
    private String httpProfile;

    @Value("${tenxun.sesClient}")
    private String sesClient;

    @Value("${tenxun.fromEmailAddress}")
    private String fromEmailAddress;

    @Value("${tenxun.templateID}")
    private Long templateID;

    // 省略getter和setter方法
}
5、写服务方法
package com.hj.imgadmin.tenEml;

import com.tencentcloudapi.common.Credential;
import com.tencentcloudapi.common.exception.TencentCloudSDKException;
import com.tencentcloudapi.common.profile.ClientProfile;
import com.tencentcloudapi.common.profile.HttpProfile;
import com.tencentcloudapi.ses.v20201002.SesClient;
import com.tencentcloudapi.ses.v20201002.models.SendEmailRequest;
import com.tencentcloudapi.ses.v20201002.models.SendEmailResponse;
import com.tencentcloudapi.ses.v20201002.models.Template;
import org.springframework.stereotype.Service;

import javax.annotation.Resource;

@Service
public class EmailService {
    @Resource
    private  TencentCloudConfig config;


    /**
     * 发送验证码邮箱
     * @param subject 主题
     * @param receiverEml 接收者邮箱
     * @param verifyCode 验证码
     * @param templateID 这个自主修改,若采用更自由的配置方法那么就将这个变量加入其中
     */
    public void sendVerifyCodeToEmail(String subject,String receiverEml, String verifyCode) {
        try {
            Credential cred = new Credential(config.getSecretId(), config.getSecretKey());
            HttpProfile httpProfile = new HttpProfile();
            httpProfile.setEndpoint(config.getHttpProfile());
            ClientProfile clientProfile = new ClientProfile();
            clientProfile.setHttpProfile(httpProfile);
            SesClient client = new SesClient(cred, config.getSesClient(), clientProfile);

            SendEmailRequest req = new SendEmailRequest();
            req.setFromEmailAddress(config.getFromEmailAddress());

            req.setSubject(subject);
            String[] destination = {receiverEml};
            req.setDestination(destination);

            Template template = new Template();
            template.setTemplateID(120897L); // 替换为您的模板ID
            template.setTemplateData("{\"Verify\":\""+verifyCode+"\"}");
            req.setTemplate(template);

            SendEmailResponse resp = client.SendEmail(req);
            System.out.println(resp);
        } catch (TencentCloudSDKException e) {
            System.out.println(e.toString());
        }
    }
}
6、测试
@Resource
private EmailService emailService;
@Test
void t34(){
    emailService.sendVerifyCodeToEmail("验证码","1245713658@qq.com","FcsRW");
}
控制台输出
com.tencentcloudapi.ses.v20201002.models.SendEmailResponse@4ba88ab5
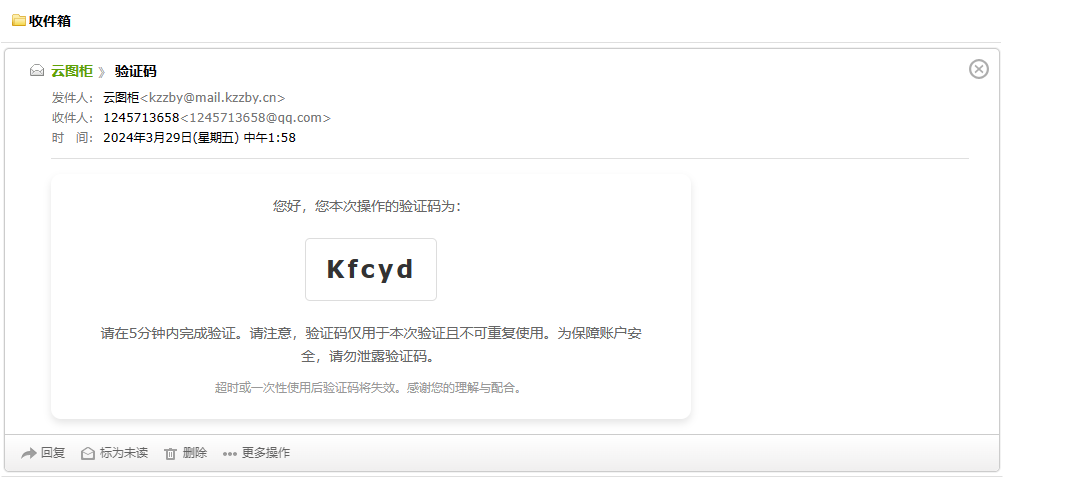
邮箱显示