介绍
本示例使用滑动手势监听,实时调整左右两侧内容显示区域大小和效果。通过绑定gesture事件中的PanGesture平移手势,实时获取拖动距离。当拖动时,实时地调节左右两个Image组件的宽度,从而成功实现左右拖动切换图片效果的功能。
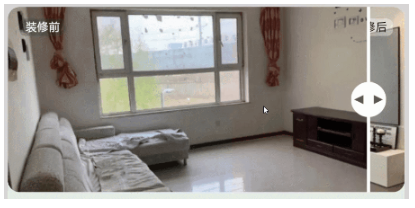
效果图预览
使用说明
- 点击中间按钮进行左右拖动切换图片。
实现思路
本例涉及的关键特性和实现方案如下:
- 创建两个Stack组件,用来展示装修前后对比图,左右两个Stack分别存放装修前的图片和装修后的图片,zIndex设置为1。中间Column组件存放按钮的图片,zIndex设置为2,这样按钮的图片就会覆盖在两张装修图片之上。
Row() {
  Stack() {...}
  .zIndex(CONFIGURATION.ZINDEX1)
  .width(this.leftImageWidth) // z序设为1,为了使按钮图片浮在装修图片上。
  .clip(true)
  .alignContent(Alignment.TopStart)

  Column() {...}
  .width($r('app.integer.dragtoswitchpictures_drag_button_stack_width'))
  .zIndex(CONFIGURATION.ZINDEX2) // z序设为2,为了使按钮图片浮在装修图片上。

  Stack() {...}
  .zIndex(CONFIGURATION.ZINDEX1) // z序设为1,为了使按钮图片浮在装修图片上。
  .clip(true)
  .width(this.rightImageWidth)
  .alignContent(Alignment.TopEnd)
}
.justifyContent(FlexAlign.Center)
.width($r('app.string.dragtoswitchpictures_full_size'))
2.将Image组件放在Row容器里,将Row容器的宽度设置为状态变量,再利用clip属性对于Row容器进行裁剪。
Row() {
  Image($r('app.media.dragtoswitchpictures_before_decoration'))
    .width($r('app.integer.dragtoswitchpictures_decoration_width'))// Image的width固定,Row的宽度变化,通过裁剪实现布局效果。
    .height($r('app.integer.dragtoswitchpictures_decoration_height'))
    .draggable(false) // 设置Image不能拖动,不然长按Image会被拖动。
  }
  .width(this.leftImageWidth) // 将左侧Row的width设置为leftImageWidth,这样左侧Row的width随leftImageWidth的变化而变化。
  .clip(true) // clip属性设置为true,裁剪超出Row宽度的图片。
  .zIndex(CONFIGURATION.ZINDEX1) // z序设为1,为了使水印浮在装修图片上。
  .borderRadius({
    topLeft: $r('app.integer.dragtoswitchpictures_borderradius'),
    bottomLeft: $r('app.integer.dragtoswitchpictures_borderradius')
}) // 将Row的左上角和左下角弧度设为10实现效果。- 右边的Image组件与左边同样的操作,但是新增了一个direction属性,使元素从右至左进行布局,为的是让Row从左侧开始裁剪。
Row() {
 Image($r('app.media.dragtoswitchpictures_after_decoration'))
   .width($r('app.integer.dragtoswitchpictures_decoration_width'))
   .height($r('app.integer.dragtoswitchpictures_decoration_height'))
   .draggable(false)
}
.width(this.rightImageWidth)
.clip(true)
.zIndex(CONFIGURATION.ZINDEX1) // z序设为1,为了使水印浮在装修图片上。
// TODO: 知识点:左边Row使用clip时从右边开始裁剪,加了Direction.Rtl后,元素从右到左布局,右边Row使用clip时从左边开始裁剪,这是实现滑动改变视图内容大小的关键。
.direction(Direction.Rtl)
.borderRadius({
 topRight: $r('app.integer.dragtoswitchpictures_borderradius'),
 bottomRight: $r('app.integer.dragtoswitchpictures_borderradius')
}) // 将Row的右上角和右下角弧度设为10实现效果。- 中间的Image组件通过手势事件中的滑动手势对Image组件滑动进行监听,对左右Image组件的宽度进行计算从而重新布局渲染。
Image($r('app.media.dragtoswitchpictures_drag_button'))
  .width($r('app.integer.dragtoswitchpictures_drag_button_image_width'))
  .height($r('app.integer.dragtoswitchpictures_decoration_height'))
  .draggable(false)
  .gesture( // TODO: 知识点:拖动手势事件设置一个手指,滑动的最小距离设置为1vp,实现滑动时按钮跟手动效。
    PanGesture({ fingers: CONFIGURATION.PANGESTURE_FINGERS, distance: CONFIGURATION.PANGESTURE_DISTANCE })
      .onActionStart(() => {
        this.dragRefOffset = CONFIGURATION.INIT_VALUE; // 每次拖动开始时将图标拖动的距离初始化。
      })
      // TODO: 性能知识点: 该函数是系统高频回调函数,避免在函数中进行冗余或耗时操作,例如应该减少或避免在函数打印日志,会有较大的性能损耗。
      .onActionUpdate((event: GestureEvent) => {
        // 通过监听GestureEvent事件,实时监听图标拖动距离
        this.dragRefOffset = event.offsetX;
        this.leftImageWidth = this.imageWidth + this.dragRefOffset;
        this.rightImageWidth = CONFIGURATION.IMAGE_FULL_SIZE - this.leftImageWidth;
        if (this.leftImageWidth >= CONFIGURATION.LEFT_IMAGE_RIGHT_LIMIT_SIZE) { // 当leftImageWidth大于等于310vp时,设置左右Image为固定值,实现停止滑动效果。
          this.leftImageWidth = CONFIGURATION.LEFT_IMAGE_RIGHT_LIMIT_SIZE;
          this.rightImageWidth = CONFIGURATION.RIGHT_IMAGE_RIGHT_LIMIT_SIZE;
        } else if (this.leftImageWidth <= CONFIGURATION.LEFT_IMAGE_LEFT_LIMIT_SIZE) { // 当leftImageWidth小于等于30vp时,设置左右Image为固定值,实现停止滑动效果。
          this.leftImageWidth = CONFIGURATION.LEFT_IMAGE_LEFT_LIMIT_SIZE;
          this.rightImageWidth = CONFIGURATION.RIGHT_IMAGE_LEFT_LIMIT_SIZE;
        }
      })
      .onActionEnd((event: GestureEvent) => {
        if (this.leftImageWidth <= CONFIGURATION.LEFT_IMAGE_LEFT_LIMIT_SIZE) {
          this.leftImageWidth = CONFIGURATION.LEFT_IMAGE_LEFT_LIMIT_SIZE;
          this.rightImageWidth = CONFIGURATION.RIGHT_IMAGE_LEFT_LIMIT_SIZE;
          this.imageWidth = CONFIGURATION.LEFT_IMAGE_LEFT_LIMIT_SIZE;
        } else if (this.leftImageWidth >= CONFIGURATION.LEFT_IMAGE_RIGHT_LIMIT_SIZE) {
          this.leftImageWidth = CONFIGURATION.LEFT_IMAGE_RIGHT_LIMIT_SIZE;
          this.rightImageWidth = CONFIGURATION.RIGHT_IMAGE_RIGHT_LIMIT_SIZE;
          this.imageWidth = CONFIGURATION.LEFT_IMAGE_RIGHT_LIMIT_SIZE;
        } else {
          this.leftImageWidth = this.imageWidth + this.dragRefOffset; // 滑动结束时leftImageWidth等于左边原有Width+拖动距离。
          this.rightImageWidth = CONFIGURATION.IMAGE_FULL_SIZE - this.leftImageWidth; // 滑动结束时rightImageWidth等于340-leftImageWidth。
          this.imageWidth = this.leftImageWidth; // 滑动结束时ImageWidth等于leftImageWidth。
        }
      })
  )
工程结构&模块类型
dragtoswitchpictures                             // har包
   |---common
   |   |---Constants.ets                            // 常量类
   |---data
   |   |---DragToSwitchPicturesData.ets             // 生成模拟数据
   |---datasource
   |   |---BasicDataSource.ets                      // Basic数据控制器
   |   |---DragToSwitchPicturesDataSource.ets       // 左右拖动切换图片数据控制器
   |---mainpage
   |   |---DragToSwitchPictures.ets                 // 主页面
   |---model
   |   |---DragToSwitchPicturesModule.ets           // 左右拖动切换图片数据模型
   |---view
   |   |---DragToSwitchPicturesView.ets             // 左右拖动切换图片视图
   |   |---DesignCattleView.ets                     // AI设计视图
   |   |---TabsWaterFlowView.ets                    // 瀑布流嵌套Tabs视图
模块依赖
routermodule
高性能知识点
本例使用了onActionUpdate函数。该函数是系统高频回调函数,避免在函数中进行冗余或耗时操作,例如应该减少或避免在函数打印日志,会有较大的性能损耗。
本示例使用了LazyForEach进行数据懒加载,WaterFlow布局时会根据可视区域按需创建FlowItem组件,并在FlowItem滑出可视区域外时销毁以降低内存占用。
本示例使用了cachedCount设置预加载的FlowItem的数量,只在LazyForEach中生效,设置该属性后会缓存cachedCount个FlowItem,LazyForEach超出显示和缓存范围的FlowItem会被释放。


