bert中文文本摘要代码
- 写在最前面
- 关于BERT
- 使用transformers库进行微调
- model.py
- 自定义参数
- 激活函数
- gelu
- swish
- 定义激活函数字典
- BertConfig类
- 参数配置
- vocab_size_or_config_json_file
- from_dict方法(from_json_file时调用)
- from_json_file方法
- 一系列方法
- BertEmbeddings类:embeddings层
- 构造函数(重点之一、bert表征由三部分组成:对应的token,分割和位置 embeddings)
- forward方法(三个表征相加)
- BertSelfAttention类:自注意力
- 构造函数
- transpose_for_scores方法(forward中调用)
- forward方法
- 自注意力机制
- 第一步 对编码器的每个输入向量都算一个query、key、value向量
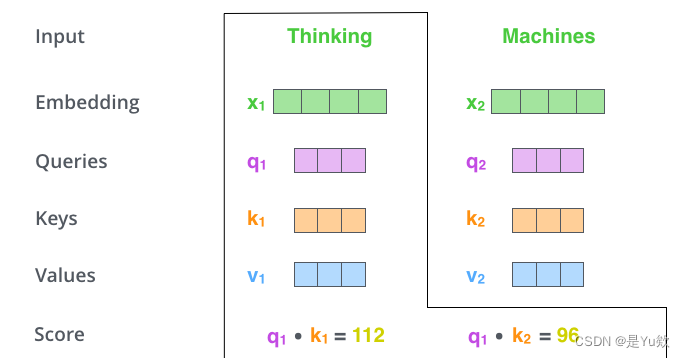
- 第二步 计算注意力得分
- 第三步 将计算获得的注意力分数除以8
- 第四步 将结果扔进softmax计算,使结果归一化
- 第五步 将每个value向量乘以注意力分数
- 第六步 将上一步的结果相加,输出本位置的注意力结果
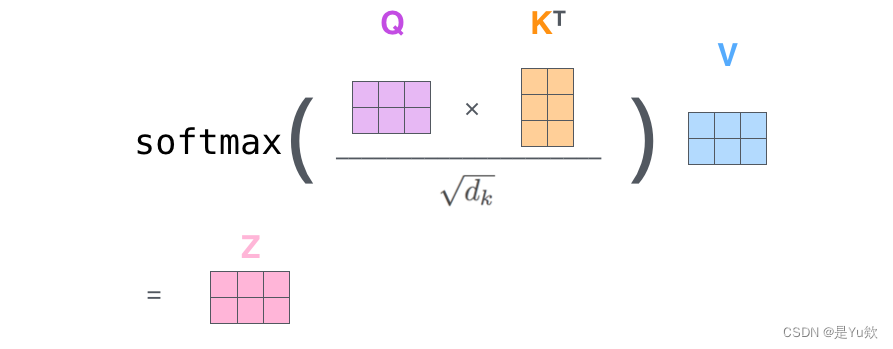
- 用矩阵计算self-attention
- 代码
- BertSelfOutput类:BertSelfAttention层的输出处理部分
- 构造函数
- forward方法
- BertAttention类:注意力层
- BertIntermediate类:中间层
- BertOutput类:输出层
- BertLayer类(顺序组合BertAttention、BertIntermediate和BertOutput模块)
- 代码
- BertEncoder类:多层Transformer编码器
- BertPooler类:池化层
- BertPredictionHeadTransform类:对最后一个隐藏状态进行变换,以准备进行下游任务
- BertLMPredictionHead类:生成语言模型预测的输出
- BertOnlyMLMHead类:MLM任务
- BertOnlyNSPHead类:NSP任务
- BertPreTrainingHeads类:MLM和NSP
- BertPreTrainedModel类:加载预训练的BERT模型
- 构造函数
- 初始化权重
- from_pretrained方法:从预训练模型加载权重和配置文件,并实例化BERT模型
- BertModel类:BERT模型
- 构造函数
- forward方法
- BertForPreTraining类
- 构造函数
- forward方法
- BertForSeq2Seq类:BERT模型进行文本编码+下游序列到序列的任务
- 构造函数
- forward方法
- 笔记
- BERT训练任务
- P5 RNN理论及相关变体讲解
- P6 seq2seq理论讲解 + P7 seq2seq存在的问题
- P8 注意力机制理论讲解 + P9 注意力机制数学公式讲解
- P10 引出self-attention的两个问题
- P11 self-attention理论讲解
- P12 self-attention数学理论讲解
- P13 Multi-head-self-attention理论讲解
- P14 Transformer理论讲解

🌈你好呀!我是 是Yu欸
🌌 2024每日百字篆刻时光,感谢你的陪伴与支持 ~
🚀 欢迎一起踏上探险之旅,挖掘无限可能,共同成长!
写在最前面
熟悉bert+文本摘要的下游任务微调的代码,方便后续增加组件实现idea
代码来自:
https://github.com/jasoncao11/nlp-notebook/tree/master
已跑通,略有修改
感谢大家的支持和关注。
最近好多人咨询之前博客【bert中文文本摘要代码】的相关代码报错问题,由于报错有一定的相似性,因此这里统一进行答复
笔记中的Bert公式解读参考:(好喜欢up主的讲解,一路追到网易云课堂,可惜后面没更新了)
https://www.bilibili.com/video/BV1vE411M7bD/?p=14&spm_id_from=333.880.my_history.page.click&vd_source=9dab0a438b20dcc2a5c1a3c14c0d7c6d
关于BERT
BERT模型参数的数量取决于具体实现,在Google发布的BERT模型中,大概有1.1亿个模型参数。
通常情况下,BERT的参数是在训练期间自动优化调整的,因此在使用预训练模型时不需要手动调节模型参数。
如果想微调BERT模型以适应特定任务,可以通过改变学习率、正则化参数和其他超参数来调整模型参数。在这种情况下,需要进行一些实验以找到最佳的参数配置。
论文地址:https://arxiv.org/pdf/1810.04805.pdf
使用transformers库进行微调
主要包括:
- Tokenizer:使用提供好的Tokenizer对原始文本处理,得到Token序列;
- 构建模型:在提供好的模型结构上,增加下游任务所需预测接口,构建所需模型;
- 微调:将Token序列送入构建的模型,进行训练。
第一part:
【bert中文文本摘要代码(1)】
本文主要为第二part,如有不对的地方请指正(* ^▽ ^ *)
注意:全文近5w字,知识量较大
model.py
自定义参数
只用修改device
from __future__ import absolute_import, division, print_function, unicode_literals
import copy
import json
import logging
import math
from io import open
import os
import torch
from torch import nn
from torch.nn import CrossEntropyLoss

logger = logging.getLogger(__name__)

CONFIG_NAME = 'config.json'
WEIGHTS_NAME = 'pytorch_model.bin'
device = "cuda" if torch.cuda.is_available() else 'cpu'
# device = torch.device('cuda:5')
激活函数
gelu
Gelu函数是一种激活函数,常用于神经网络的隐藏层中,旨在增强神经元的非线性表达能力。
它具有sigmoid函数和ReLU函数的特性,既可以提供平滑的非线性响应,又可以在激活函数的零点改善梯度问题。
def gelu(x):
    """ gelu激活函数
        在GPT架构中,使用的是gelu函数的近似版本,公式如下:
            0.5 * x * (1 + torch.tanh(math.sqrt(2 / math.pi) * (x + 0.044715 * torch.pow(x, 3))))
        参考:https://kexue.fm/archives/7309
        这里是直接求的解析解,就是原始论文给出的公式
        论文 https://arxiv.org/abs/1606.08415
    """
    return x * 0.5 * (1.0 + torch.erf(x / math.sqrt(2.0)))
swish
swish函数是一种激活函数,它是由Google在2017年提出的一种新型激活函数。
公式为: f(x) = x * sigmoid(x),其中sigmoid(x)是sigmoid函数。
swish函数可以被看做是ReLU函数和sigmoid函数的结合体,它在x>0时表现类似于ReLU函数,并且在x<0时表现类似于sigmoid函数。在许多深度学习任务中,swish函数比ReLU函数表现得更好。
def swish(x):
    """swish激活函数
    """
    return x * torch.sigmoid(x)
定义激活函数字典
定义字典ACT2FN,包含三个激活函数:gelu、relu和swish。这些激活函数将用于神经网络中的不同层。
目的:为了方便在代码中选择不同的激活函数,而不必在每个层中写出完整的函数名。
ACT2FN = {"gelu": gelu, "relu": torch.nn.functional.relu, "swish": swish}BertConfig类
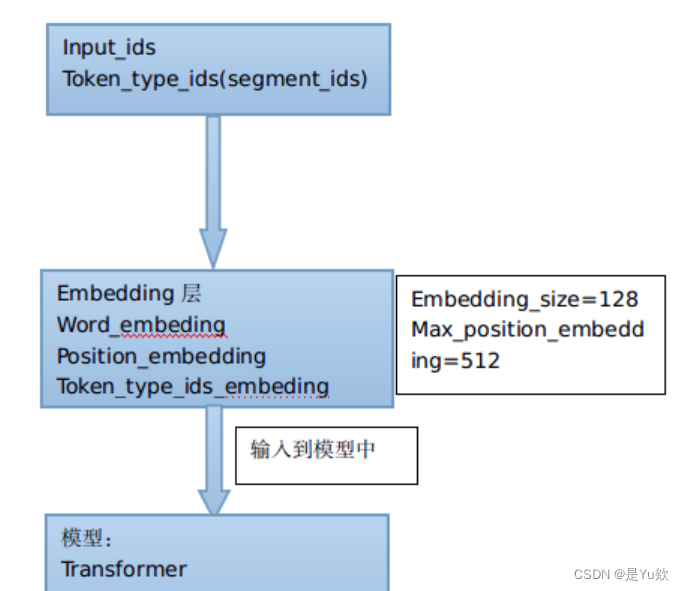
首先对input_ids和token_type_ids进行embedding操作,将embedding结果送入Transformer训练,最后得到编码结果。
参数配置
- vocab_size_or_config_json_file:可直接传入vocab的尺寸,来使用默认的配置,默认是中文vocab的词典大小21128;也可直接指定配置文件(json格式)的路径
- hidden_size:encoder层和pooler层的尺寸,一般为768
- num_hidden_layers:Transformer架构中encoder的层数,一般为12层
- num_attention_heads:Transformer架构中encoder的每一个attention layer的attention heads的个数,一般为12个
- intermediate_size:Transformer架构中encoder的中间层的尺寸,也就是feed-forward的尺寸,3072
- hidden_act:encoder和pooler层的非线性激活函数,目前支持gelu、swish。gelu
- hidden_dropout_prob: 在embeddings, encode和pooler层的所有全连接层的dropout概率。0.1
- attention_probs_dropout_prob:attention probabilities 的dropout概率。0.1
- max_position_embeddings:模型的最大序列长度。512
- type_vocab_size:token_type_ids的类型。segment_ids类别 [0,1]。2
- initializer_range:模型权重norm初始化的方差。0.02
- pad_token_id:填充字符。
- layer_norm_eps:Layer normalization层中epsilon的值。Layer normalization是一种归一化方法,使得每个样本在每个特征维度上的均值为0,方差为1,对于神经网络的训练非常有用。其中epsilon是一个小的常数,用于确保分母不为0,在计算均值和方差时,epsilon会被加到方差上。layer_norm_eps就是这个小常数epsilon的值。在Bert模型中,Layer normalization的实现是在每个Attention和FFN的中间层后都执行了Layer normalization操作。
class BertConfig(object):
    """bert的参数配置
    """
    def __init__(self,
                 vocab_size_or_config_json_file=21128,
                 hidden_size=768,
                 num_hidden_layers=12,
                 num_attention_heads=12,
                 intermediate_size=3072,
                 hidden_act="gelu",
                 hidden_dropout_prob=0.1,
                 attention_probs_dropout_prob=0.1,
                 max_position_embeddings=512,
                 type_vocab_size=2,
                 initializer_range=0.02,
                 pad_token_id=0,
                 layer_norm_eps=1e-12):
vocab_size_or_config_json_file
- vocab_size_or_config_json_file:可以是一个整数(表示词汇表大小),或一个字符串(表示预训练模型的配置文件的路径)。
如果vocab_size_or_config_json_file是一个字符串,代码会打开该路径下的文件,并将其读取为一个JSON格式的配置信息(json_config)。然后,代码使用json_config中的键值对来设置类的属性。具体来说,将键值对中的键作为属性名,将对应的值赋给类的属性。
如果vocab_size_or_config_json_file是一个整数,代码会根据提供的参数来设置类的属性。具体来说,将提供的整数赋给vocab_size属性,将其他参数(如hidden_size、num_hidden_layers等)赋给对应的属性。
如果vocab_size_or_config_json_file既不是字符串也不是整数,则会抛出ValueError异常,提示第一个参数必须是词汇表大小(整数)或预训练模型配置文件的路径(字符串)。
if isinstance(vocab_size_or_config_json_file, str):
            with open(vocab_size_or_config_json_file, "r", encoding='utf-8') as reader:
                json_config = json.loads(reader.read())
            for key, value in json_config.items():
                self.__dict__[key] = value
        elif isinstance(vocab_size_or_config_json_file, int):
            self.vocab_size = vocab_size_or_config_json_file
            self.hidden_size = hidden_size
            self.num_hidden_layers = num_hidden_layers
            self.num_attention_heads = num_attention_heads
            self.hidden_act = hidden_act
            self.intermediate_size = intermediate_size
            self.hidden_dropout_prob = hidden_dropout_prob
            self.attention_probs_dropout_prob = attention_probs_dropout_prob
            self.max_position_embeddings = max_position_embeddings
            self.type_vocab_size = type_vocab_size
            self.initializer_range = initializer_range
            self.pad_token_id = pad_token_id
            self.layer_norm_eps = layer_norm_eps
        else:
            raise ValueError("First argument must be either a vocabulary size (int)"
                             "or the path to a pretrained model config file (str)")
from_dict方法(from_json_file时调用)
从一个字典对象构造一个BertConfig实例(Bert配置的实例)。
从一个字典对象中构造一个BertConfig实例,以便后续使用该实例来配置BERT模型的参数。
- 方法接受一个名为json_object的字典对象作为输入参数。
- 创建一个BertConfig实例,将提供的整数赋值给实例的vocab_size属性,设置为-1。意味着:在构建Bert模型时,将不会使用预先定义的词汇表大小,而是需要通过其他方式指定实际的词汇表大小。这样的配置可以在后续的操作中进一步修改和调整,以适应具体的任务需求。
- 遍历json_object字典的键值对,对于每个键值对,将键作为属性名,将对应的值赋给config实例的属性。具体来说,通过config.dict[key]的方式来设置实例的属性。
- 返回构造好的config实例。
@classmethod
    def from_dict(cls, json_object):
        """从dict构造一个BertConfig实例"""
        config = BertConfig(vocab_size_or_config_json_file=-1)
        for key, value in json_object.items():
            config.__dict__[key] = value
        return config
from_json_file方法
从一个JSON文件中构造一个BertConfig实例(Bert配置的实例)。
json_file:JSON文件的路径。
-
open函数打开指定路径的JSON文件,并以指定的编码方式(utf-8)读取文件内容,将其存储在变量text中。 - 调用
json.loads(text)将text内容解析为JSON格式的字典对象。 - 调用
cls.from_dict(json.loads(text)),使用从JSON文件中解析得到的字典对象,调用类方法from_dict来构造一个BertConfig实例。
4.返回构造好的BertConfig实例。
@classmethod
    def from_json_file(cls, json_file):
        """从json文件中构造一个BertConfig实例,推荐使用"""
        with open(json_file, "r", encoding='utf-8') as reader:
            text = reader.read()
        return cls.from_dict(json.loads(text))
一系列方法
用于序列化和保存BertConfig实例为JSON字符串或JSON文件。
将BertConfig实例序列化为JSON字符串或保存为JSON文件,以便后续读取和使用。这样的序列化和保存操作可以用于配置的持久化和传递。
-
__repr__(self): 返回实例的字符串表示形式,即调用to_json_string()将实例转换为JSON字符串后转换为字符串类型。 -
to_dict(self): 将BertConfig实例序列化为一个Python字典对象。首先使用copy.deepcopy()复制实例的__dict__属性,然后返回复制后的字典对象。 -
to_json_string(self): 序列化BertConfig实例,并将实例保存为JSON字符串。首先调用to_dict()将实例转换为字典对象,然后使用json.dumps()将字典对象转换为JSON字符串。indent=2表示以2个空格缩进格式化输出,sort_keys=True表示按键的字母顺序排序键值对。最后返回JSON字符串,并在末尾添加换行符。 -
to_json_file(self, json_file_path): 序列化BertConfig实例,并将实例保存为JSON文件。首先调用to_json_string()将实例转换为JSON字符串,然后使用open函数创建指定路径的JSON文件,并以写入模式打开。最后,将JSON字符串写入文件。
def __repr__(self):
        return str(self.to_json_string())

    def to_dict(self):
        """Serializes this instance to a Python dictionary."""
        output = copy.deepcopy(self.__dict__)
        return output

    def to_json_string(self):
        """序列化实例,并保存实例为json字符串"""
        return json.dumps(self.to_dict(), indent=2, sort_keys=True) + "\n"

    def to_json_file(self, json_file_path):
        """序列化实例,并保存实例到json文件"""
        with open(json_file_path, "w", encoding='utf-8') as writer:
            writer.write(self.to_json_string())
BertEmbeddings类:embeddings层
定义BertEmbeddings类,继承自nn.Module类,用于构建BERT模型的embeddings层。
构造函数(重点之一、bert表征由三部分组成:对应的token,分割和位置 embeddings)
在类的初始化方法__init__中,它接受一个名为config的参数,表示BERT的配置信息。
用于构造BERT模型的embeddings层。将词汇、位置和token类型索引转换为嵌入表示,并对其进行层归一化和dropout操作,以供后续的BERT模型层使用。
BERT的输入为每一个token对应的表征,实际上该表征是由三部分组成的,分别是对应的token,分割和位置 embeddings。
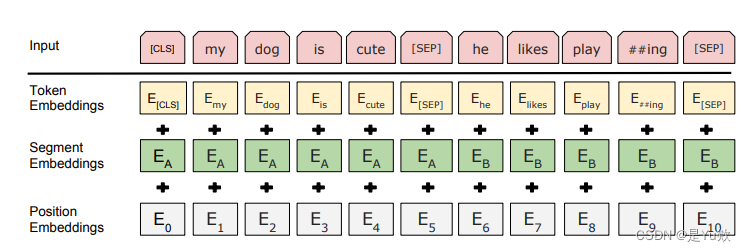
在初始化方法中,创建了几个子模块:
-
self.word_embeddings:一个nn.Embedding模块,用于将输入的词汇索引映射为词嵌入表示。它的输入维度为config.vocab_size(词汇表大小),输出维度为config.hidden_size(隐藏层大小),并使用config.pad_token_id指定的索引作为填充的标记。 -
self.position_embeddings:一个nn.Embedding模块,用于将输入的位置索引映射为位置嵌入表示。它的输入维度为config.max_position_embeddings(最大位置编码数),输出维度为config.hidden_size。 -
self.token_type_embeddings:一个nn.Embedding模块,用于将输入的token类型索引映射为token类型嵌入表示。它的输入维度为config.type_vocab_size(token类型数),输出维度为config.hidden_size。 -
self.LayerNorm:一个nn.LayerNorm模块,用于对嵌入表示进行层归一化。它的输入维度为config.hidden_size,eps参数为config.layer_norm_eps。 -
self.dropout:一个nn.Dropout模块,用于进行dropout操作。它的dropout概率为config.hidden_dropout_prob。
class BertEmbeddings(nn.Module):
    """
        embeddings层
        构造word, position and token_type embeddings.
    """
    def __init__(self, config):
        super(BertEmbeddings, self).__init__()
        self.word_embeddings = nn.Embedding(config.vocab_size, config.hidden_size, padding_idx=config.pad_token_id)
        self.position_embeddings = nn.Embedding(config.max_position_embeddings, config.hidden_size)
        self.token_type_embeddings = nn.Embedding(config.type_vocab_size, config.hidden_size)
        self.LayerNorm = nn.LayerNorm(config.hidden_size, eps=config.layer_norm_eps)
        self.dropout = nn.Dropout(config.hidden_dropout_prob)
forward方法(三个表征相加)
定义BertEmbeddings类的前向传播方法(forward)。
方法接受两个参数:
-
input_ids:输入的词汇索引序列,形状为[batch_size, seq_len]。 -
token_type_ids:输入的token类型索引序列,形状为[batch_size, seq_len],默认为None。
在前向传播过程中:
- 根据
input_ids的形状获取序列长度seq_length,然后使用torch.arange函数创建位置索引position_ids,其值为从0到seq_length-1,数据类型为torch.long,gpu设备与input_ids相同。 - 将
position_ids进行扩展,使其形状与input_ids相同,得到position_ids的形状为[batch_size, seq_len],并将其移动到与input_ids相同的设备上。
如果token_type_ids为None,则创建一个与input_ids相同形状的张量,值全为0,设备与input_ids相同,作为token_type_ids。 - 分别通过词嵌入层(
self.word_embeddings)、位置嵌入层(self.position_embeddings)和token类型嵌入层(self.token_type_embeddings)将input_ids、position_ids和token_type_ids转换为对应的嵌入表示。 - 将词嵌入、位置嵌入和token类型嵌入相加得到总的嵌入表示,即
embeddings = words_embeddings + position_embeddings + token_type_embeddings。 - 通过层归一化层(
self.LayerNorm)对嵌入表示进行层归一化操作。 - 通过dropout层(
self.dropout)对层归一化后的嵌入表示进行dropout操作。 - 返回dropout后的嵌入表示
embeddings作为BertEmbeddings类的前向传播结果。
def forward(self, input_ids, token_type_ids=None):
        #构造position_ids,shape:[batch size, seq len]
        seq_length = input_ids.size(1)
        position_ids = torch.arange(seq_length, dtype=torch.long, device=input_ids.device).to(device)
        position_ids = position_ids.unsqueeze(0).expand_as(input_ids).to(device)
        #构造token_type_ids,shape:[batch size, seq len]
        if token_type_ids is None:
            token_type_ids = torch.zeros_like(input_ids).to(device)
        #构造word, position and token_type embeddings
        words_embeddings = self.word_embeddings(input_ids)
        position_embeddings = self.position_embeddings(position_ids)
        token_type_embeddings = self.token_type_embeddings(token_type_ids)
        #embeddings相加
        embeddings = words_embeddings + position_embeddings + token_type_embeddings
        embeddings = self.LayerNorm(embeddings)
        embeddings = self.dropout(embeddings)
        return embeddings
BertSelfAttention类:自注意力
定义BertSelfAttention类,继承自nn.Module类,用于构建BERT模型的self-attention层。
构造函数
在类的初始化方法__init__中,它接受一个名为config的参数,表示BERT的配置信息。
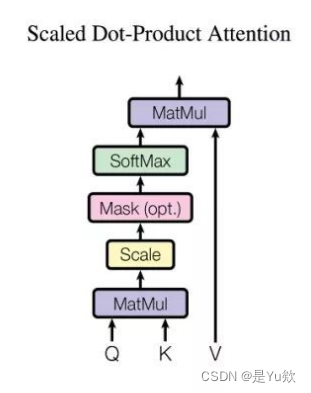
用于实现BERT模型的self-attention层。self-attention层接收输入的隐藏表示,并通过query、key、value向量的映射,计算出attention权重并对值进行加权求和。这样可以捕捉输入序列内部的关系和重要信息。
在初始化方法中:
- 进行了检查,确保config.hidden_size(隐藏层大小)能够被config.num_attention_heads(注意力头的数量)整除。如果不能整除,会抛出一个ValueError异常。
- 代码根据配置信息计算了一些相关的尺寸和维度:
self.num_attention_heads:注意力头的数量,即config.num_attention_heads。self.attention_head_size:每个注意力头的大小,即隐藏层大小除以注意力头的数量。self.all_head_size:所有注意力头的总大小,即注意力头的数量乘以每个注意力头的大小。 - 创建了几个线性层(nn.Linear模块):
self.query:将输入映射为查询向量。它接受输入的隐藏表示(大小为config.hidden_size)并输出大小为self.all_head_size。self.key:将输入映射为键向量。它接受输入的隐藏表示并输出大小为self.all_head_size。self.value:将输入映射为值向量。它接受输入的隐藏表示并输出大小为self.all_head_size。 - 代码创建了一个dropout层(nn.Dropout模块),用于在self-attention计算过程中进行dropout操作。dropout的概率为config.attention_probs_dropout_prob。
class BertSelfAttention(nn.Module):
    """
        self attention层
        原理可看这篇博客: http://jalammar.github.io/illustrated-transformer/
    """
    def __init__(self, config):
        super(BertSelfAttention, self).__init__()
        if config.hidden_size % config.num_attention_heads != 0:
            raise ValueError(
                "The hidden size (%d) is not a multiple of the number of attention "
                "heads (%d)" % (config.hidden_size, config.num_attention_heads))
        self.num_attention_heads = config.num_attention_heads
        self.attention_head_size = int(config.hidden_size / config.num_attention_heads)
        self.all_head_size = self.num_attention_heads * self.attention_head_size
        self.query = nn.Linear(config.hidden_size, self.all_head_size)
        self.key = nn.Linear(config.hidden_size, self.all_head_size)
        self.value = nn.Linear(config.hidden_size, self.all_head_size)
        self.dropout = nn.Dropout(config.attention_probs_dropout_prob)
transpose_for_scores方法(forward中调用)
定义BertSelfAttention类的辅助方法transpose_for_scores。
该方法用于将输入张量x进行维度转换,以便在self-attention计算中进行操作。
- 输入张量x的形状为
[batch_size, seq_len, hidden_size],其中:
batch_size:批量大小
seq_len:序列长度
hidden_size:隐藏层大小 - 首先根据当前x的形状计算了新的形状
new_x_shape,取除了最后一个维度之外的所有维度(即去除了hidden_size维度),然后将在原始形状的基础上增加了注意力头维度和注意力头大小维度。变为[batch_size, seq_len, num_attention_heads, attention_head_size],其中:
num_attention_heads:注意力头的数量
attention_head_size:每个注意力头的大小 - 使用view函数将x的形状调整为new_x_shape,得到的张量x形状变为
[batch_size, seq_len, num_attention_heads, attention_head_size]。 - 使用permute函数对x的维度进行重排,变为
[batch_size, num_attention_heads, seq_len, attention_head_size]。 - 返回转换后的张量x,用于后续的self-attention计算。
def transpose_for_scores(self, x):
        #x: [batch size, seq len, hidden_size]
        new_x_shape = x.size()[:-1] + (self.num_attention_heads, self.attention_head_size)
        x = x.view(*new_x_shape) #x: [batch size, seq len, num_attention_heads, attention_head_size]
        return x.permute(0, 2, 1, 3) #x: [batch size, num_attention_heads, seq l
forward方法
自注意力机制

第一步 对编码器的每个输入向量都算一个query、key、value向量
Q1:怎么算的?
A1:把输入的词嵌入向量与三个权重矩阵相乘。权重矩阵是模型训练阶段训练出来的。

注意,这三个向量维度是64,比嵌入向量的维度小,嵌入向量、编码器的输入输出维度都是512。这三个向量不是必须比编码器输入输出的维数小,这样做主要是为了让多头注意力的计算更稳定。
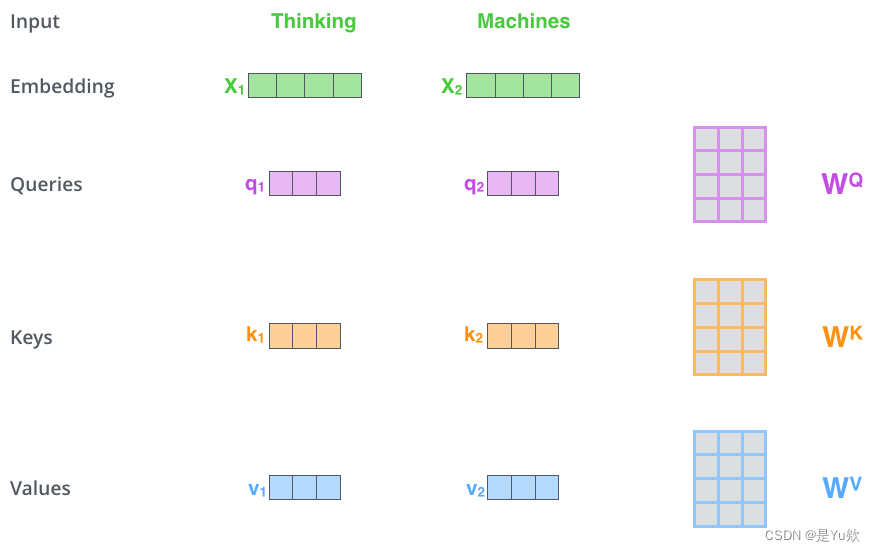

Q2:什么是 “query”、“key”、“value” 向量?
A2:这三个向量是计算注意力时的抽象概念。
第二步 计算注意力得分
假设我们现在在计算输入中第一个单词Thinking的自注意力。我们需要使用自注意力给输入句子中的每个单词打分,这个分数决定当我们编码某个位置的单词的时候,应该对其他位置上的单词给予多少关注度。
这个得分是query和key的点乘积得出来的。
例如,要算第一个位置的注意力得分的时候,就要将第一个单词的query和其他的key依次相乘,这里是q1·k1,q2·k2
第三步 将计算获得的注意力分数除以8
Q3:为什么选8?
A3:key向量的维度是64,取其平方根,这样让梯度计算的时候更稳定。默认是这么设置的,当然也可以用其他值。
第四步 将结果扔进softmax计算,使结果归一化
softmax之后注意力分数相加等于1,并且都是正数
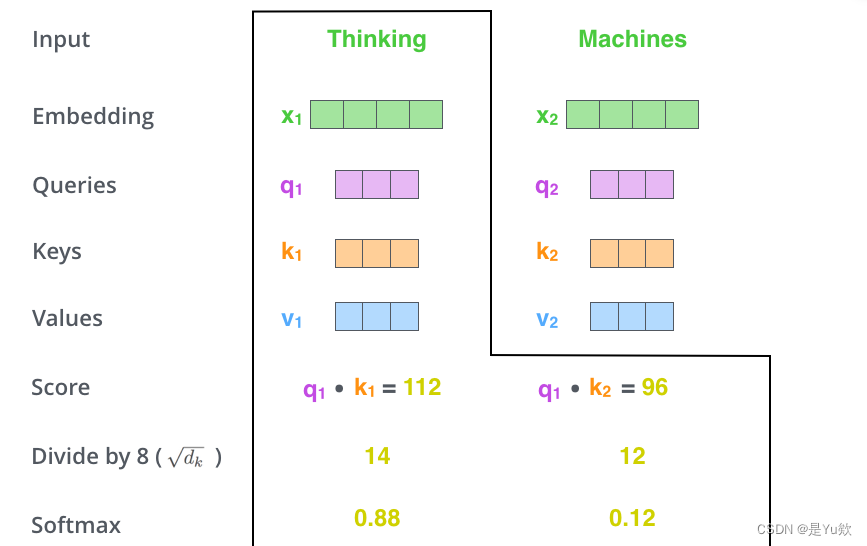
这个softmax之后的注意力分数表示 在计算当前位置的时候,其他单词受到的关注度的大小。显然在当前位置的单词肯定有一个高分,但是有时候也会注意到与当前单词相关的其他词汇。
第五步 将每个value向量乘以注意力分数
这是为了留下想要关注的单词的value,并把其他不相关的单词丢掉。
注意:不是真的”丢掉“,而是通过乘以一个较小的占比值(也就是softmax的结果)来弱化”不相关“单词的value。
在第一个单词位置得到新的v1。
第六步 将上一步的结果相加,输出本位置的注意力结果
例如,第一个单词的注意力结果就是z1
这就是自注意力的计算。计算得到的向量直接传递给前馈神经网络。但是为了处理的更迅速,实际是用矩阵进行计算的。接下来我们看一下怎么用矩阵计算。
用矩阵计算self-attention


因为现在用矩阵处理,所以可以直接将之前的第二步到第六步压缩到一个公式中一步到位获得最终的注意力结果Z

代码
- 该方法接收两个输入参数:
hidden_states:形状为[batch_size, seq_len, hidden_size]的张量,表示输入的隐藏状态。
attention_mask:形状为[batch_size, seq_len, seq_len]的张量,表示注意力掩码,用于屏蔽无效的位置。 - 在方法的实现中,首先对输入的隐藏状态进行线性变换,得到mixed_query_layer、mixed_key_layer和mixed_value_layer。这些线性变换通过self.query、self.key和self.value完成,输出的形状都是[batch_size, seq_len, hidden_size]。
- 然后,通过调用
transpose_for_scores方法,对mixed_query_layer、mixed_key_layer和mixed_value_layer进行形状转换,将其转换为适合进行注意力计算的形状。转换后的query_layer、key_layer和value_layer的形状为[batch_size, num_attention_heads, seq_len, attention_head_size]。 - 对query_layer和key_layer执行点积操作,得到attention_scores。注意,这里的点积操作是在最后两个维度上进行的,即将key_layer进行转置后与query_layer相乘。得到的attention_scores形状为[batch_size, num_attention_heads, seq_len, seq_len]。
- 对attention_scores进行归一化处理,通过除以math.sqrt(self.attention_head_size)和应用softmax函数得到attention_probs。归一化操作是为了控制注意力的范围和分布。
- 进行dropout操作,对attention_probs进行随机丢弃一部分信息,以减少过拟合。
- 通过对attention_probs与value_layer执行矩阵相乘,得到上下文向量context_layer。注意,这里的矩阵相乘是在最后两个维度上进行的。context_layer的形状为[batch_size, num_attention_heads, seq_len, attention_head_size]。
- 对context_layer进行维度重排,通过调用
permute函数将num_attention_heads维度移动到第二个维度,并使用contiguous函数保证张量的内存连续性。重排后的context_layer形状为[batch_size, seq_len, num_attention_heads, attention_head_size]。 - 最后将context_layer的形状调整为[batch_size, seq_len, hidden_size],并返回作为self-attention层的输出。
def forward(self, hidden_states, attention_mask):
        #hidden_states = [batch size, seq len, hidden_size]

        mixed_query_layer = self.query(hidden_states)
        mixed_key_layer = self.key(hidden_states)
        mixed_value_layer = self.value(hidden_states)
        #mixed_query_layer = [batch size, seq len, hidden_size]
        #mixed_key_layer = [batch size, seq len, hidden_size]
        #mixed_value_layer = [batch size, seq len, hidden_size]

        query_layer = self.transpose_for_scores(mixed_query_layer)
        key_layer = self.transpose_for_scores(mixed_key_layer)
        value_layer = self.transpose_for_scores(mixed_value_layer)
        #query_layer = [batch size, num_attention_heads, seq len, attention_head_size]
        #key_layer = [batch size, num_attention_heads, seq len, attention_head_size]
        #value_layer = [batch size, num_attention_heads, seq len, attention_head_size]

        # q和k执行点积, 获得attention score
        attention_scores = torch.matmul(query_layer, key_layer.transpose(-1, -2))
        attention_scores = attention_scores / math.sqrt(self.attention_head_size)
        #attention_scores = [batch size, num_attention_heads, seq len, seq len]

        # 执行attention mask,对于padding部分的attention mask,
        # 值为-1000*(1-0),经过softmax后,attention_probs几乎为0,所以不会attention到padding部分
        attention_scores = attention_scores + attention_mask

        # 将attention score 归一化到0-1
        attention_probs = nn.Softmax(dim=-1)(attention_scores)

        attention_probs = self.dropout(attention_probs)

        context_layer = torch.matmul(attention_probs, value_layer)
        #context_layer = [batch size, num_attention_heads, seq len, attention_head_size]
        context_layer = context_layer.permute(0, 2, 1, 3).contiguous()
        #context_layer = [batch size, seq len, num_attention_heads, attention_head_size]
        new_context_layer_shape = context_layer.size()[:-2] + (self.all_head_size,)
        context_layer = context_layer.view(*new_context_layer_shape)
        #context_layer = [batch size, seq len, hidden_size]
        return context_layer
BertSelfOutput类:BertSelfAttention层的输出处理部分
定义了BertSelfOutput类,它是BertSelfAttention层的输出处理部分。
构造函数
在初始化方法中,定义了三个模块:
- self.dense:线性变换模块,将输入的hidden_states的维度从config.hidden_size转换为相同的config.hidden_size。
- self.dropout:dropout模块,用于随机丢弃hidden_states的一部分信息,以减少过拟合。
- self.LayerNorm:LayerNorm模块,用于对hidden_states进行归一化处理。
class BertSelfOutput(nn.Module):
    def __init__(self, config):
        super(BertSelfOutput, self).__init__()
        self.dense = nn.Linear(config.hidden_size, config.hidden_size)
        self.dropout = nn.Dropout(config.hidden_dropout_prob)
        self.LayerNorm = nn.LayerNorm(config.hidden_size, eps=config.layer_norm_eps)
forward方法
在前向传播方法forward中,输入包括两个参数:
- hidden_states:BertSelfAttention层的输出,形状为[batch_size, seq_len, hidden_size]。
- input_tensor:BertSelfAttention层的输入,也就是经过BertEmbeddings和BertSelfAttention层前向传播后的hidden_states,形状也为[batch_size, seq_len, hidden_size]。
- 在方法的实现上,首先将hidden_states输入到self.dense模块中进行线性变换,得到新的hidden_states。
- 通过self.dropout模块对新的hidden_states进行随机丢弃一部分信息,以减少过拟合。
- 将原始的输入tensor input_tensor与经过线性变换和dropout后的hidden_states相加。这里的相加操作是指逐元素相加,即对应位置的元素相加。
- 对相加结果进行LayerNorm归一化处理,得到输出的hidden_states。
- 最终,将归一化后的hidden_states作为BertSelfOutput层的输出返回。
def forward(self, hidden_states, input_tensor):
        hidden_states = self.dense(hidden_states)
        hidden_states = self.dropout(hidden_states)
        # Add & Norm
        hidden_states = self.LayerNorm(hidden_states + input_tensor)
        return hidden_states
BertAttention类:注意力层
定义了BertAttention类,它是Bert模型中的注意力层。
BertAttention层实现了自注意力机制,并通过Add & Norm操作对自注意力的输出进行处理和归一化,得到最终的注意力输出。
在初始化方法中,定义了两个模块:
- self.self:一个BertSelfAttention模块,用于进行自注意力计算。
- self.output:一个BertSelfOutput模块,用于对自注意力的输出进行处理。
在前向传播方法forward中,输入包括两个参数:
- input_tensor:经过BertEmbeddings后的输入张量,形状为[batch_size, seq_len, hidden_size]。
- attention_mask:用于掩盖无效位置的注意力掩码张量,形状为[batch_size, seq_len, seq_len]。
- 在方法的实现上,首先将input_tensor传入self.self模块,得到self_attention层的输出self_output。
- 然后,将self_output和input_tensor作为输入传入self.output模块,进行自注意力的输出处理,得到attention_output。
- 最后,将attention_output作为BertAttention层的输出返回。
class BertAttention(nn.Module):
    """
        实现 self attention + Add & Norm
    """
    def __init__(self, config):
        super(BertAttention, self).__init__()
        self.self = BertSelfAttention(config)
        self.output = BertSelfOutput(config)

    def forward(self, input_tensor, attention_mask):
        self_output = self.self(input_tensor, attention_mask)
        attention_output = self.output(self_output, input_tensor)
        return attention_output
BertIntermediate类:中间层
定义了BertIntermediate类,它是Bert模型中的中间层。
BertIntermediate层负责对输入进行线性映射和非线性变换,将输入从hidden_size维度映射到intermediate_size维度,并应用激活函数。它在Bert模型中起到了引入非线性的作用。
在初始化方法中,定义了两个模块:
- self.dense:一个线性层,将输入的hidden_states从config.hidden_size维度映射到config.intermediate_size维度。
- self.intermediate_act_fn:中间层的激活函数,根据config.hidden_act的取值确定,可以是预定义的激活函数字符串,也可以是自定义的激活函数。
在前向传播方法forward中:
- 输入为hidden_states,形状为[batch_size, seq_len, hidden_size]。
- 首先,将hidden_states传入self.dense模块,经过线性映射得到形状为[batch_size, seq_len, intermediate_size]的输出。
- 然后,将输出通过self.intermediate_act_fn激活函数进行非线性变换。
- 最后,将变换后的hidden_states作为BertIntermediate层的输出返回。
class BertIntermediate(nn.Module):
    def __init__(self, config):
        super(BertIntermediate, self).__init__()
        self.dense = nn.Linear(config.hidden_size, config.intermediate_size)
        if isinstance(config.hidden_act, str):
            self.intermediate_act_fn = ACT2FN[config.hidden_act]
        else:
            self.intermediate_act_fn = config.hidden_act

    def forward(self, hidden_states):
        hidden_states = self.dense(hidden_states)
        #hidden_states = [batch size, seq len, intermediate_size]
        hidden_states = self.intermediate_act_fn(hidden_states)
        return hidden_states
BertOutput类:输出层
这段代码定义了BertOutput类,它是Bert模型中的输出层。
BertOutput层的作用是对中间层的输出进行线性映射、dropout操作和层归一化,以获得最终的模型输出。
在初始化方法中,定义了三个模块:
- self.dense:一个线性层,将输入的hidden_states从config.intermediate_size维度映射回config.hidden_size维度。
- self.dropout:一个Dropout层,用于在训练过程中进行随机失活,防止过拟合。
- self.LayerNorm:一个LayerNorm层,对hidden_states进行层归一化操作,将其进行归一化和标准化。
在前向传播方法forward中
- 输入包括hidden_states和input_tensor,它们的形状都是[batch_size, seq_len, hidden_size]。
- 首先,将hidden_states传入self.dense模块,经过线性映射得到形状为[batch_size, seq_len, hidden_size]的输出。
- 然后,对输出进行dropout操作,随机将部分元素置为0,以防止过拟合。
- 最后,将dropout后的hidden_states与input_tensor相加,然后通过self.LayerNorm进行层归一化操作,得到最终的输出。
class BertOutput(nn.Module):
    def __init__(self, config):
        super(BertOutput, self).__init__()
        self.dense = nn.Linear(config.intermediate_size, config.hidden_size)
        self.dropout = nn.Dropout(config.hidden_dropout_prob)
        self.LayerNorm = nn.LayerNorm(config.hidden_size, eps=config.layer_norm_eps)

    def forward(self, hidden_states, input_tensor):
        hidden_states = self.dense(hidden_states)
        #hidden_states = [batch size, seq len, hidden_size]
        hidden_states = self.dropout(hidden_states)
        # Add & Norm
        hidden_states = self.LayerNorm(hidden_states + input_tensor)
        return hidden_states
BertLayer类(顺序组合BertAttention、BertIntermediate和BertOutput模块)
BertLayer类顺序组合了BertAttention、BertIntermediate和BertOutput模块,实现了Bert模型的一层计算。
每一层都包含了self-attention、feed-forward和Add & Norm等操作,用于对输入进行多头自注意力计算和特征映射。在多层BertLayer的堆叠下,可以构建出深层的Bert模型。
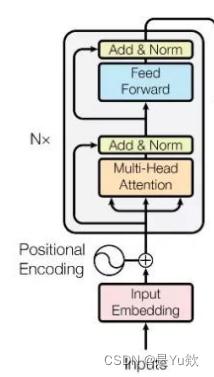
顺序为: Self Attention --> Add --> LayerNorm --> Feed Forward --> Add --> LayerNorm
其中:
①Attention + Add + LayerNorm 构成了BertAttention
②Feed Forward的第一层linear 构成了BertIntermediate
③Feed Forward的第二层linear + Add + LayerNorm 构成了BertOutput
代码
在初始化方法中,定义了三个模块:
- self.attention:一个BertAttention层,包含了self-attention操作和Add & Norm步骤。
- self.intermediate:一个BertIntermediate层,包含了feed-forward操作的第一层线性映射。
- self.output:一个BertOutput层,包含了feed-forward操作的第二层线性映射、Add & Norm步骤。
在前向传播方法forward中,输入包括hidden_states和attention_mask,它们的形状都是[batch_size, seq_len, hidden_size]。
在forward方法中:
- 首先,将hidden_states和attention_mask传入self.attention模块,进行self-attention操作和Add & Norm步骤,得到attention_output。
- 然后,将attention_output传入self.intermediate模块,进行feed-forward操作的第一层线性映射,得到intermediate_output。
- 最后,将intermediate_output传入self.output模块,进行feed-forward操作的第二层线性映射、Add & Norm步骤,得到layer_output。
class BertLayer(nn.Module):
    def __init__(self, config):
        super(BertLayer, self).__init__()
        self.attention = BertAttention(config)
        self.intermediate = BertIntermediate(config)
        self.output = BertOutput(config)

    def forward(self, hidden_states, attention_mask):
        attention_output = self.attention(hidden_states, attention_mask)
        intermediate_output = self.intermediate(attention_output)
        layer_output = self.output(intermediate_output, attention_output)
        return layer_output
BertEncoder类:多层Transformer编码器
定义了BertEncoder类,它是Bert模型中的多层Transformer编码器。
即上图中*N的操作
BertEncoder是Bert模型的核心部分,它通过堆叠多个BertLayer层实现了多层Transformer的编码器结构。每一层都对输入进行自注意力计算和特征映射,使得模型能够学习到输入序列的上下文表示。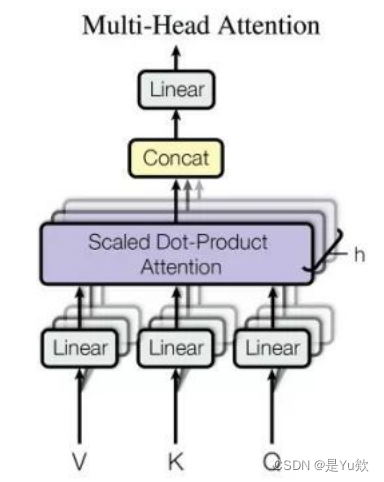
在初始化方法中,通过复制BertLayer来创建config.num_hidden_layers个层,并将它们存储在self.layer中。
在前向传播方法forward中:
- 输入包括hidden_states和attention_mask,形状都为[batch_size, seq_len, hidden_size]。
- 通过迭代self.layer中的每一层,将hidden_states和attention_mask传入层进行计算。每一层的计算包括self-attention、feed-forward和Add & Norm等步骤,由BertLayer完成。
- 如果output_all_encoded_layers为True,则将每一层的输出hidden_states添加到all_encoder_layers列表中。
- 最后,根据output_all_encoded_layers的取值,返回all_encoder_layers列表,其中包含了所有层的输出hidden_states,或者只返回最后一层的输出hidden_states。
class BertEncoder(nn.Module):
    """
        多层Transformer, base版本12层, large版本24层
    """
    def __init__(self, config):
        super(BertEncoder, self).__init__()
        layer = BertLayer(config)
        self.layer = nn.ModuleList([copy.deepcopy(layer) for _ in range(config.num_hidden_layers)])

    def forward(self, hidden_states, attention_mask, output_all_encoded_layers=True):
        all_encoder_layers = []
        for layer_module in self.layer:
            hidden_states = layer_module(hidden_states, attention_mask)
            if output_all_encoded_layers:
                all_encoder_layers.append(hidden_states)
        if not output_all_encoded_layers:
            all_encoder_layers.append(hidden_states)
        return all_encoder_layers
BertPooler类:池化层
这段代码定义了BertPooler类,它是Bert模型中的池化层。
BertPooler层用于将整个句子序列的表示缩减为单个向量,作为句子的池化表示。这个池化表示通常用于下游任务,如分类任务的输入。
在初始化方法中,通过一个线性变换self.dense将输入的hidden_states的特征维度映射为config.hidden_size,并使用激活函数nn.Tanh()对结果进行激活。
在前向传播方法forward中:
- 输入为hidden_states,形状为[batch_size, seq_len, hidden_size]。
- BertPooler将hidden_states中的第一个位置(通常是[CLS]标记)的特征向量提取出来,表示为first_token_tensor。
- 然后,通过self.dense对first_token_tensor进行线性变换,将其特征维度映射为config.hidden_size。
- 最后,对映射后的向量进行激活函数nn.Tanh()的操作,得到池化后的输出pooled_output,形状为[batch_size, hidden_size]。
注意:这里取了最后一层的CLS位置的tensor作为pooler层的输入。但理论上说,怎么取都行。有些任务上, 取最后一层所有位置的平均值、最大值更好, 或者取倒数n层,再做concat等等,这由你决定
class BertPooler(nn.Module):
    """
        得到pooler output, size = [batch size, hidden_size]
    """
    def __init__(self, config):
        super(BertPooler, self).__init__()
        self.dense = nn.Linear(config.hidden_size, config.hidden_size)
        self.activation = nn.Tanh()

    def forward(self, hidden_states):
        first_token_tensor = hidden_states[:, 0]
        pooled_output = self.dense(first_token_tensor)
        #pooled_output = [batch size, hidden_size]
        pooled_output = self.activation(pooled_output)
        return pooled_output
BertPredictionHeadTransform类:对最后一个隐藏状态进行变换,以准备进行下游任务
定义了BertPredictionHeadTransform类。
BertPredictionHeadTransform层用于对Bert模型的最后一个隐藏状态进行变换,以准备进行下游任务。
在初始化方法中:
- 通过一个线性变换self.dense将输入的hidden_states的特征维度映射为config.hidden_size。
- 然后,根据配置中的激活函数config.hidden_act,选择相应的激活函数ACT2FN[config.hidden_act]或者直接使用config.hidden_act作为变换函数。
- 通过nn.LayerNorm对hidden_states进行层归一化,以减少内部协变量偏移。
在前向传播方法forward中:
- 输入为hidden_states,形状为[batch_size, seq_len, hidden_size]。
- BertPredictionHeadTransform将hidden_states经过线性变换、激活函数和层归一化处理后得到输出hidden_states,形状与输入相同。
- last hidden state 在经过 BertLMPredictionHead 处理前进行线性变换, size = [batch size, seq len, hidden_size]
class BertPredictionHeadTransform(nn.Module):
    def __init__(self, config):
        super(BertPredictionHeadTransform, self).__init__()
        self.dense = nn.Linear(config.hidden_size, config.hidden_size)
        if isinstance(config.hidden_act, str):
            self.transform_act_fn = ACT2FN[config.hidden_act]
        else:
            self.transform_act_fn = config.hidden_act
        self.LayerNorm = nn.LayerNorm(config.hidden_size, eps=config.layer_norm_eps)

    def forward(self, hidden_states):
        hidden_states = self.dense(hidden_states)
        hidden_states = self.transform_act_fn(hidden_states)
        hidden_states = self.LayerNorm(hidden_states)
        return hidden_states
BertLMPredictionHead类:生成语言模型预测的输出
定义了BertLMPredictionHead类,用于生成语言模型预测的输出。
BertLMPredictionHead类用于:在Bert模型的基础上添加一个语言模型预测头,用于生成下一个词的预测结果。
在初始化方法中:
- 首先创建一个BertPredictionHeadTransform实例self.transform,用于对隐藏状态进行线性变换。
- 然后,创建一个线性层self.decoder,将变换后的隐藏状态映射到词汇表大小的向量空间。这里的输出维度为config.vocab_size,即词汇表的大小。
- 最后,创建一个偏置项self.bias,作为输出层的偏置。
在前向传播方法forward中:
- 输入为hidden_states,形状为[batch_size, seq_len, hidden_size]。
- 将hidden_states经过BertPredictionHeadTransform进行线性变换和层归一化处理,得到变换后的hidden_states。
- 将变换后的hidden_states通过self.decoder进行线性映射,得到预测结果。这里的输出维度为[batch_size, seq_len, vocab_size],表示对每个位置上的词进行预测的概率分布。
- 最后,返回预测结果hidden_states作为语言模型的输出。
class BertLMPredictionHead(nn.Module):
    """
        得到 language model prediction head, 输出[batch size, seq len, vocab_size]
    """
    def __init__(self, config):
        super(BertLMPredictionHead, self).__init__()
        self.transform = BertPredictionHeadTransform(config)

        # The output weights are the same as the input embeddings, but there is
        # an output-only bias for each token.
        self.decoder = nn.Linear(config.hidden_size, config.vocab_size, bias=False)

        self.bias = nn.Parameter(torch.zeros(config.vocab_size))

        # Need a link between the two variables so that the bias is correctly resized with `resize_token_embeddings`
        self.decoder.bias = self.bias

    def forward(self, hidden_states):
        hidden_states = self.transform(hidden_states)
        hidden_states = self.decoder(hidden_states)
        return hidden_states
BertOnlyMLMHead类:MLM任务
定义了BertOnlyMLMHead类,用于执行仅包含MLM(Masked Language Modeling)任务的预测。
BertOnlyMLMHead类专门用于执行仅包含MLM任务的预测,它可以与Bert模型结合使用,生成MLM任务的预测结果。
在初始化方法中,创建了一个BertLMPredictionHead实例self.predictions,用于生成MLM任务的预测结果。
在前向传播方法forward中:
- 输入为sequence_output,它是Bert模型的输出,形状为[batch_size, seq_len, hidden_size]。
- 将sequence_output作为输入传递给self.predictions,得到预测结果prediction_scores。prediction_scores的形状为[batch_size, seq_len, vocab_size],表示对每个位置上的词进行预测的概率分布。
- 最后,返回预测结果prediction_scores作为MLM任务的输出。
class BertOnlyMLMHead(nn.Module):
    def __init__(self, config):
        super(BertOnlyMLMHead, self).__init__()
        self.predictions = BertLMPredictionHead(config)

    def forward(self, sequence_output):
        prediction_scores = self.predictions(sequence_output)
        #prediction_scores = [batch size, seq len, vocab_size]
        return prediction_scores
BertOnlyNSPHead类:NSP任务
定义了BertOnlyNSPHead类,用于执行仅包含NSP(Next Sentence Prediction)任务的预测。
BertOnlyNSPHead类专门用于执行仅包含NSP任务的预测,它可以与Bert模型结合使用,生成NSP任务的预测结果。
在初始化方法中,创建了一个线性层self.seq_relationship,将Bert模型的输出维度config.hidden_size转换为2,用于预测两个句子之间是否为连续的。
在前向传播方法forward中:
- 输入为pooled_output,它是Bert模型中的pooler output,形状为[batch_size, hidden_size]。
- 将pooled_output作为输入传递给self.seq_relationship,得到预测结果seq_relationship_score。seq_relationship_score的形状为[batch_size, 2],表示两个句子之间为连续的概率分布。
- 最后,返回预测结果seq_relationship_score作为NSP任务的输出。
class BertOnlyNSPHead(nn.Module):
    def __init__(self, config):
        super(BertOnlyNSPHead, self).__init__()
        self.seq_relationship = nn.Linear(config.hidden_size, 2)

    def forward(self, pooled_output):
        seq_relationship_score = self.seq_relationship(pooled_output)
        #seq_relationship_score = [batch size, 2]
        return seq_relationship_score
BertPreTrainingHeads类:MLM和NSP
这段代码定义了BertPreTrainingHeads类,用于执行预训练任务中的MLM(Masked Language Modeling)和NSP(Next Sentence Prediction)任务的预测。
在初始化方法中,创建了两个子模块:
- self.predictions用于执行MLM任务的预测,
- self.seq_relationship用于执行NSP任务的预测。
其中,self.predictions是一个BertLMPredictionHead实例,self.seq_relationship是一个线性层,将Bert模型的输出维度config.hidden_size转换为2,用于预测两个句子之间是否为连续的。
在前向传播方法forward中:
- 输入包括sequence_output和pooled_output。sequence_output是Bert模型的输出,形状为[batch_size, seq_len, hidden_size],表示每个位置的隐藏状态。pooled_output是Bert模型的pooler output,形状为[batch_size, hidden_size],表示整个句子的池化表示。
- 将sequence_output作为输入传递给self.predictions,得到预测结果prediction_scores,它表示每个位置的词汇预测分布,形状为[batch_size, seq_len, vocab_size]。将pooled_output作为输入传递给self.seq_relationship,得到预测结果seq_relationship_score,它表示两个句子之间为连续的概率分布,形状为[batch_size, 2]。
- 最后,返回预测结果prediction_scores和seq_relationship_score作为MLM和NSP任务的输出。
class BertPreTrainingHeads(nn.Module):
    """
        MLM + NSP Heads
    """
    def __init__(self, config):
        super(BertPreTrainingHeads, self).__init__()
        self.predictions = BertLMPredictionHead(config)
        self.seq_relationship = nn.Linear(config.hidden_size, 2)

    def forward(self, sequence_output, pooled_output):
        prediction_scores = self.predictions(sequence_output)
        seq_relationship_score = self.seq_relationship(pooled_output)
        return prediction_scores, seq_relationship_score
BertPreTrainedModel类:加载预训练的BERT模型
这段代码定义了BertPreTrainedModel类,用于加载预训练的BERT模型。它是一个基类,其他具体的BERT模型会继承自该类。
注意:加载预训练模型类, 只支持指定模型路径,所以必须先下载好需要的模型文件
构造函数
在初始化方法中,接受一个config参数,用于传入BertConfig的实例,表示BERT模型的配置。如果config不是BertConfig的实例,则会抛出ValueError。
该类保存了传入的config作为成员变量self.config。
该类的作用是提供一个共享的基类,用于加载和管理预训练的BERT模型的配置。具体的BERT模型会在其子类中定义和加载不同层级的模型结构和参数。
class BertPreTrainedModel(nn.Module):
    def __init__(self, config, *inputs, **kwargs):
        super(BertPreTrainedModel, self).__init__()
        if not isinstance(config, BertConfig):
            raise ValueError(
                "Parameter config in `{}(config)` should be an instance of class `BertConfig`. "
                "To create a model from a Google pretrained model use "
                "`model = {}.from_pretrained(PRETRAINED_MODEL_NAME)`".format(
                    self.__class__.__name__, self.__class__.__name__
                ))
        self.config = config
初始化权重
init_bert_weights是BertPreTrainedModel类中的一个辅助方法,用于初始化BERT模型的权重。
这个方法的目的是保持与原始BERT模型的权重初始化一致,并确保在加载预训练模型后进行微调时,权重不会受到意外的影响。
在BERT模型中,线性层(nn.Linear)和嵌入层(nn.Embedding)的权重需要被初始化。对于线性层和嵌入层,该方法使用截断正态分布来初始化权重,均值为0,标准差为self.config.initializer_range。
对于层归一化层(nn.LayerNorm),方法将偏置项初始化为0,将权重初始化为1。
对于线性层的偏置项(bias),方法将其初始化为0。
def init_bert_weights(self, module):
        if isinstance(module, (nn.Linear, nn.Embedding)):
            # bert参数初始化, tf版本在linear和Embedding层使用的是截断正态分布, pytorch没有实现该函数
            # 此种初始化对于加载预训练模型后进行finetune没有任何影响
            # cf https://github.com/pytorch/pytorch/pull/5617
            module.weight.data.normal_(mean=0.0, std=self.config.initializer_range)
        elif isinstance(module, nn.LayerNorm):
            module.bias.data.zero_()
            module.weight.data.fill_(1.0)
        if isinstance(module, nn.Linear) and module.bias is not None:
            module.bias.data.zero_()
from_pretrained方法:从预训练模型加载权重和配置文件,并实例化BERT模型
from_pretrained是BertPreTrainedModel类的类方法,用于从预训练模型加载权重和配置文件,并实例化BERT模型。
方法的参数包括:
-
pretrained_model_path:预训练模型权重和配置文件的路径。 -
*inputs和**kwargs:传递给模型初始化方法的额外参数。
- 方法首先从预训练模型路径中加载配置文件(
CONFIG_NAME),使用BertConfig.from_json_file方法将其转换为BertConfig实例。 - 然后,从预训练模型路径中加载权重文件(
WEIGHTS_NAME)。加载的权重存储在state_dict中。 - 通过调用
cls(config, *inputs, **kwargs)来实例化模型。cls表示调用该方法的类本身,即BertPreTrainedModel类。 - 将加载的权重(
state_dict)应用于实例化的模型。此过程包括将旧键映射到新键,以确保权重正确加载到模型中。
@classmethod
    def from_pretrained(cls, pretrained_model_path, *inputs, **kwargs):
        """
            参数
                pretrained_model_path:预训练模型权重以及配置文件的路径
                config:BertConfig实例
        """
        config_file = os.path.join(pretrained_model_path, CONFIG_NAME)
        config = BertConfig.from_json_file(config_file)
        print("Load Model config from file: {}".format(config_file))
        weights_path = os.path.join(pretrained_model_path, WEIGHTS_NAME)
        print("Load Model weights from file: {}".format(weights_path))
        # 实例化模型
        model = cls(config, *inputs, **kwargs)
        state_dict = torch.load(weights_path)
        # 加载state_dict到pytorch模型当中
        old_keys = []
        new_keys = []
在加载预训练模型的权重时,存在一些键与模型中的键不匹配的情况。这段代码用于替换这些不匹配的键,以确保权重正确地加载到模型中。
代码遍历state_dict中的所有键,如果键中包含’gamma’,则将其替换为’weight’;如果键中包含’beta’,则将其替换为’bias’。替换后的新键将添加到new_keys列表中,原始键将添加到old_keys列表中。
这样做是为了解决加载预训练模型权重时键名不匹配的问题。通过将权重文件中的键名映射到模型中对应的键名,可以正确地加载权重。
然后,更新state_dict字典的键。
这段代码使用zip函数将old_keys和new_keys列表中的对应元素进行配对,并逐个更新state_dict字典的键。对于每个键值对,将旧键(old_key)替换为新键(new_key),并将其存储回state_dict字典中。
通过这个步骤,预训练模型权重字典中的键将与模型的键一一对应,确保了权重的正确加载。
# 替换掉预训练模型的dict中的key与模型名称不匹配的问题
        for key in state_dict.keys():
            new_key = None
            if 'gamma' in key:
                new_key = key.replace('gamma', 'weight')
            if 'beta' in key:
                new_key = key.replace('beta', 'bias')
            if new_key:
                old_keys.append(key)
                new_keys.append(new_key)
        # 更新state_dict的key
        for old_key, new_key in zip(old_keys, new_keys):
state_dict[new_key] = state_dict.pop(old_key)这段代码用于加载预训练模型的权重到模型中。它与module中的load_state_dict方法功能完全等价,但由于预训练模型的权重字典中的key带有前缀"bert.",因此自行实现了类似的加载逻辑。
- 根据模型是否具有"bert"前缀,设置加载权重时使用的前缀。如果模型具有"bert"前缀,则前缀为空字符串,否则前缀为"bert"。
- 获取模型当前的状态字典
model_state_dict以及预训练模型的权重字典state_dict的键列表。 - 根据前缀对预期的键列表进行修改。如果存在前缀,则将前缀与每个键连接起来,以匹配预训练模型的权重字典中的键的格式。
- 获取加载的权重字典的键列表。
- 通过比较预期的键列表和加载的键列表,找出缺失的键(在预期中但未加载)和意外的键(在加载的键列表中但不在预期中)。
这样可以确保加载的权重与模型的参数一一对应,并检查是否有任何未加载或意外的参数键。
prefix = '' if hasattr(model, 'bert') else 'bert'

        model_state_dict = model.state_dict()
        expected_keys = list(model_state_dict.keys())
        if prefix:
            expected_keys = [".".join([prefix, s]) for s in expected_keys]

        loaded_keys = list(state_dict.keys())

        missing_keys = list(set(expected_keys) - set(loaded_keys))
unexpected_keys = list(set(loaded_keys) - set(expected_keys))在这段代码中,通过调用_load_from_state_dict方法,将预训练模型的权重加载到模型中。
这样就完成了预训练模型权重的加载过程,并将其应用于模型的各个模块中。同时,会记录加载过程中的错误消息,并存储在error_msgs列表中。
- 复制预训练模型的权重字典
state_dict,并保存其元数据信息。 - 定义
load的递归函数,用于逐层加载权重。该函数接受一个模块module和一个前缀prefix作为参数。在加载过程中,还会传递本地的元数据信息local_metadata、错误消息列表error_msgs以及一些空列表。load函数首先根据前缀获取本地的元数据信息。 - 调用模块的
_load_from_state_dict方法,将权重加载到模块中。该方法在模块类中实现,并根据预训练模型的权重字典state_dict、前缀、本地元数据信息、是否严格匹配参数大小以及一些空列表来加载权重。 - 对模块的子模块进行递归调用,将权重加载到子模块中。通过迭代模块的
_modules属性,获取子模块的名称和实例,并递归调用load函数。 - 通过调用
load函数,从根模块开始加载权重。根据模型是否具有"bert"前缀,确定加载时使用的前缀。
error_msgs = []
        # 复制state_dict, 为了_load_from_state_dict能修改它
        metadata = getattr(state_dict, '_metadata', None)
        state_dict = state_dict.copy()

        if metadata is not None:
            state_dict._metadata = metadata

        def load(module, prefix=''):
            local_metadata = {} if metadata is None else metadata.get(prefix[:-1], {})
            module._load_from_state_dict(
                state_dict, prefix, local_metadata, True, [], [], error_msgs)
            for name, child in module._modules.items():
                if child is not None:
                    load(child, prefix + name + '.')
        load(model, prefix='' if hasattr(model, 'bert') else 'bert.')
在这段代码中,检查是否存在未加载的权重和未使用的权重,并打印相应的提示信息。
- 如果存在未加载的权重,会打印模型类名、权重文件路径以及未加载的权重列表。
- 如果存在未使用的权重,会打印权重文件路径、模型类名以及未使用的权重列表。
最后,如果存在加载过程中的错误消息,会引发RuntimeError并打印模型类名以及错误消息列表。
如果加载过程中没有出现问题,就返回加载后的模型对象。
if len(missing_keys) > 0:
            print(f"Some weights of {model.__class__.__name__} were not initialized from the model checkpoint at {weights_path} and are newly initialized: {missing_keys}")
        if len(unexpected_keys) > 0:
            print(f"Some weights of the model checkpoint at {weights_path} were not used when initializing {model.__class__.__name__}: {unexpected_keys}")
        if len(error_msgs) > 0:
            raise RuntimeError(f"Error(s) in loading state_dict for {model.__class__.__name__}:{' '.join(error_msgs)}")
        return model
BertModel类:BERT模型
BertModel是BERT模型的主要组件,它继承自BertPreTrainedModel,并实现了BERT模型的各个模块。
BertModel是BERT模型的主要实现,包括了嵌入层、编码器和池化层,并提供了加载预训练权重的方法。
构造函数
在BertModel的构造函数中
- 调用
super()方法初始化父类(即BertPreTrainedModel) - 然后依次构建BERT模型的各个组件,包括
BertEmbeddings、BertEncoder和BertPooler。 - 最后,通过
self.apply(self.init_bert_weights)将BERT模型的权重进行初始化。
这里的init_bert_weights方法用来初始化BERT模型权重,它会遍历模型的各个模块,对线性层和LayerNorm层进行初始化。
继承自BertPreTrainedModel的好处是:可以方便地加载预训练的BERT模型,并通过from_pretrained方法实现从预训练模型的权重文件加载权重的功能。
class BertModel(BertPreTrainedModel):
    """BERT 模型 ("Bidirectional Embedding Representations from a Transformer")
    """
    def __init__(self, config):
        super(BertModel, self).__init__(config)
        self.embeddings = BertEmbeddings(config)
        self.encoder = BertEncoder(config)
        self.pooler = BertPooler(config)
        self.apply(self.init_bert_weights)
forward方法
forward方法是PyTorch中定义在模型类中的一个方法,用于定义模型的前向传播逻辑。当调用模型对象的forward方法时,会执行该方法中的代码。
在BERT模型的forward方法中,接受输入的参数包括input_ids、token_type_ids和attention_mask,这些参数用于表示输入的文本序列。然后,根据这些输入进行以下操作:
- 根据
attention_mask生成注意力掩码,将其中的0替换为一个较大的负数(-10000.0),以便在计算注意力时屏蔽掉padding的部分。 - 将输入的
input_ids和token_type_ids传递给self.embeddings进行嵌入层的处理,得到嵌入向量embedding_output。 - 将嵌入向量
embedding_output传递给编码器self.encoder进行多层Transformer的编码操作。如果output_all_encoded_layers为True,则返回所有隐藏层的输出;否则,只返回最后一层的输出。注意,这里将嵌入向量embedding_output插入到返回的编码层列表的第一个位置。 - 从编码层列表中取出最后一层的输出作为序列输出
sequence_output。 - 将序列输出
sequence_output传递给池化层self.pooler,得到池化输出pooled_output,它是一个对整个句子进行汇总的表示。 - 如果
output_all_encoded_layers为False,则将编码层列表中的最后一层作为最终输出;否则,返回所有编码层的列表。
最终,forward方法返回编码层的输出和池化输出作为模型的输出结果。
def forward(self, input_ids, token_type_ids, attention_mask, output_all_encoded_layers=False):
        # input_ids: 一连串token在vocab中对应的id
        # token_type_id: 就是token对应的句子id,值为0或1(0表示对应的token属于第一句,1表示属于第二句)
        # attention_mask:各元素的值为0或1,避免在padding的token上计算attention, 1不进行masked, 0则masked

        attention_mask = (1.0 - attention_mask) * -10000.0

        embedding_output = self.embeddings(input_ids, token_type_ids)
        encoded_layers = self.encoder(embedding_output, attention_mask, output_all_encoded_layers=output_all_encoded_layers)
        # 如果需要返回所有隐藏层的输出,返回的encoded_layers包含了embedding_output,所以一共是13层
        encoded_layers.insert(0, embedding_output)
        sequence_output = encoded_layers[-1]
        pooled_output = self.pooler(sequence_output)
        if not output_all_encoded_layers:
            encoded_layers = encoded_layers[-1]
        return encoded_layers, pooled_output
BertForPreTraining类
BertForPreTraining是一个预训练任务的BERT模型,继承自BertPreTrainedModel。
构造函数
通过继承BertPreTrainedModel并添加额外的层,BertForPreTraining实现了用于预训练任务的BERT模型,并提供了相应的预测操作。
在BertForPreTraining的构造函数__init__中,进行了以下操作:
- 调用父类
BertPreTrainedModel的构造函数,初始化模型。 - 创建一个
BertModel的实例self.bert,用于进行BERT模型的编码操作。 - 创建一个
BertPreTrainingHeads的实例self.cls,用于进行预训练任务的预测操作,包括Masked Language Modeling(MLM)和Next Sentence Prediction(NSP)。 - 调用
self.apply(self.init_bert_weights),应用init_bert_weights方法来初始化模型的权重。
class BertForPreTraining(BertPreTrainedModel):
    def __init__(self, config):
        super(BertForPreTraining, self).__init__(config)
        self.bert = BertModel(config)
        self.cls = BertPreTrainingHeads(config)
        self.apply(self.init_bert_weights)
forward方法
BertForPreTraining的forward方法根据输入进行BERT模型的编码和预测操作,并返回相应的损失或预测结果。
forward方法定义了BertForPreTraining模型的前向传播过程。具体操作如下:
- 调用
self.bert(即BertModel)进行BERT模型的编码操作,得到sequence_output和pooled_output。sequence_output是编码后的序列输出,pooled_output是经过池化后的句子级别表示。 - 调用
self.cls(即BertPreTrainingHeads)进行预训练任务的预测操作,得到prediction_scores和seq_relationship_score。prediction_scores是对应于MLM任务的预测分数,seq_relationship_score是对应于NSP任务的预测分数。 - 如果提供了
masked_lm_labels和next_sentence_label,则计算损失。使用CrossEntropyLoss作为损失函数,计算MLM任务和NSP任务的损失,并将两者相加得到总损失total_loss。 - 如果没有提供
masked_lm_labels和next_sentence_label,则返回prediction_scores和seq_relationship_score作为预测结果。
def forward(self, input_ids, token_type_ids=None, attention_mask=None, masked_lm_labels=None, next_sentence_label=None):
        sequence_output, pooled_output = self.bert(input_ids, token_type_ids, attention_mask, output_all_encoded_layers=False)
        prediction_scores, seq_relationship_score = self.cls(sequence_output, pooled_output)

        if masked_lm_labels is not None and next_sentence_label is not None:
            loss_fct = CrossEntropyLoss() #Tokens with indices set to ``-100`` are ignored
            masked_lm_loss = loss_fct(prediction_scores.view(-1, self.config.vocab_size), masked_lm_labels.view(-1))
            next_sentence_loss = loss_fct(seq_relationship_score.view(-1, 2), next_sentence_label.view(-1))
            total_loss = masked_lm_loss + next_sentence_loss
            return total_loss
        else:
            return prediction_scores, seq_relationship_score
BertForSeq2Seq类:BERT模型进行文本编码+下游序列到序列的任务
BertForSeq2Seq适用于序列到序列的任务,如机器翻译或文本摘要生成。
它使用BERT模型进行文本编码,并通过MLM任务头进行下游任务的预测。
构造函数
BertForSeq2Seq用于序列到序列(Seq2Seq)任务,继承自BertPreTrainedModel。具体结构如下:
- 在
__init__方法中,首先调用父类的__init__方法进行初始化。然后创建一个BertModel实例作为BERT模型的编码器,创建一个BertOnlyMLMHead实例作为MLM任务的预测头。 - 在模型的前向传播过程中,调用
self.bert进行BERT模型的编码操作,得到编码后的输出。 - 将编码后的输出作为输入传递给
self.cls进行MLM任务的预测操作,得到预测分数。 - 返回预测分数作为模型的输出。
class BertForSeq2Seq(BertPreTrainedModel):
    def __init__(self, config):
        super(BertForSeq2Seq, self).__init__(config)
        self.bert = BertModel(config)
        self.cls = BertOnlyMLMHead(config)
        self.apply(self.init_bert_weights)
forward方法
forward方法的输入参数包括input_ids、token_type_ids、token_type_ids_for_mask和labels。
- 首先,根据
input_ids的形状获取序列长度seq_len。 - 构建一个特殊的掩码(mask),用于控制注意力机制。通过调用
torch.ones创建一个全1的张量,并通过.tril()方法将上三角部分置为0,得到一个下三角矩阵。然后使用to(device)将其移动到指定的设备上。 - 使用
token_type_ids_for_mask创建两个张量t1和t2,用于构建注意力掩码。其中,t1是将token_type_ids_for_mask进行维度扩展,t2是通过将token_type_ids_for_mask中不等于-1的位置设为1,其余位置设为0进行维度扩展。 - 将
t1与掩码相加,再与t2相乘,得到最终的注意力掩码attention_mask。注意力掩码的元素值为0或1,用于指定哪些位置需要计算注意力,哪些位置需要屏蔽。 - 将输入序列
input_ids、token_type_ids和注意力掩码attention_mask传递给self.bert进行BERT模型的编码操作,得到编码后的序列输出sequence_output和池化后的输出pooled_output。 - 将
sequence_output作为输入传递给self.cls进行预测操作,得到预测分数prediction_scores,形状为[batch size, seq len, vocab size],表示每个位置上每个词的预测概率。 - 如果
labels不为None,则计算损失。首先将prediction_scores切片为[:, :-1],将labels切片为[:, 1:],这是因为预测序列和标签序列的长度是对齐的,但需要将第一个标签去掉,因为它对应的输入是[PAD]。然后使用交叉熵损失函数CrossEntropyLoss()计算预测分数和标签之间的损失。 - 返回预测分数
prediction_scores和损失loss,或者只返回预测分数prediction_scores。
def forward(self, input_ids, token_type_ids, token_type_ids_for_mask, labels=None):

        seq_len = input_ids.shape[1]
        ## 构建特殊的mask
        mask = torch.ones((1, 1, seq_len, seq_len), dtype=torch.float32).tril().to(device)
        t1 = token_type_ids_for_mask.unsqueeze(1).unsqueeze(2).float().to(device)
        t2 = (token_type_ids_for_mask != -1).unsqueeze(1).unsqueeze(3).float().to(device)
        attention_mask = ((mask+t1)*t2 > 0).float()

        sequence_output, pooled_output = self.bert(input_ids, token_type_ids, attention_mask, output_all_encoded_layers=False)

        prediction_scores = self.cls(sequence_output) #[batch size, seq len, vocab size]

        if labels is not None:
            ## 计算loss
            prediction_scores = prediction_scores[:, :-1].contiguous()
            labels = labels[:, 1:].contiguous()
            loss_fct = CrossEntropyLoss() #Tokens with indices set to ``-100`` are ignored
            loss = loss_fct(prediction_scores.view(-1, self.config.vocab_size), labels.view(-1))
            return prediction_scores, loss
        else:
            return prediction_scores
笔记
BERT训练任务

P5 RNN理论及相关变体讲解

P6 seq2seq理论讲解 + P7 seq2seq存在的问题
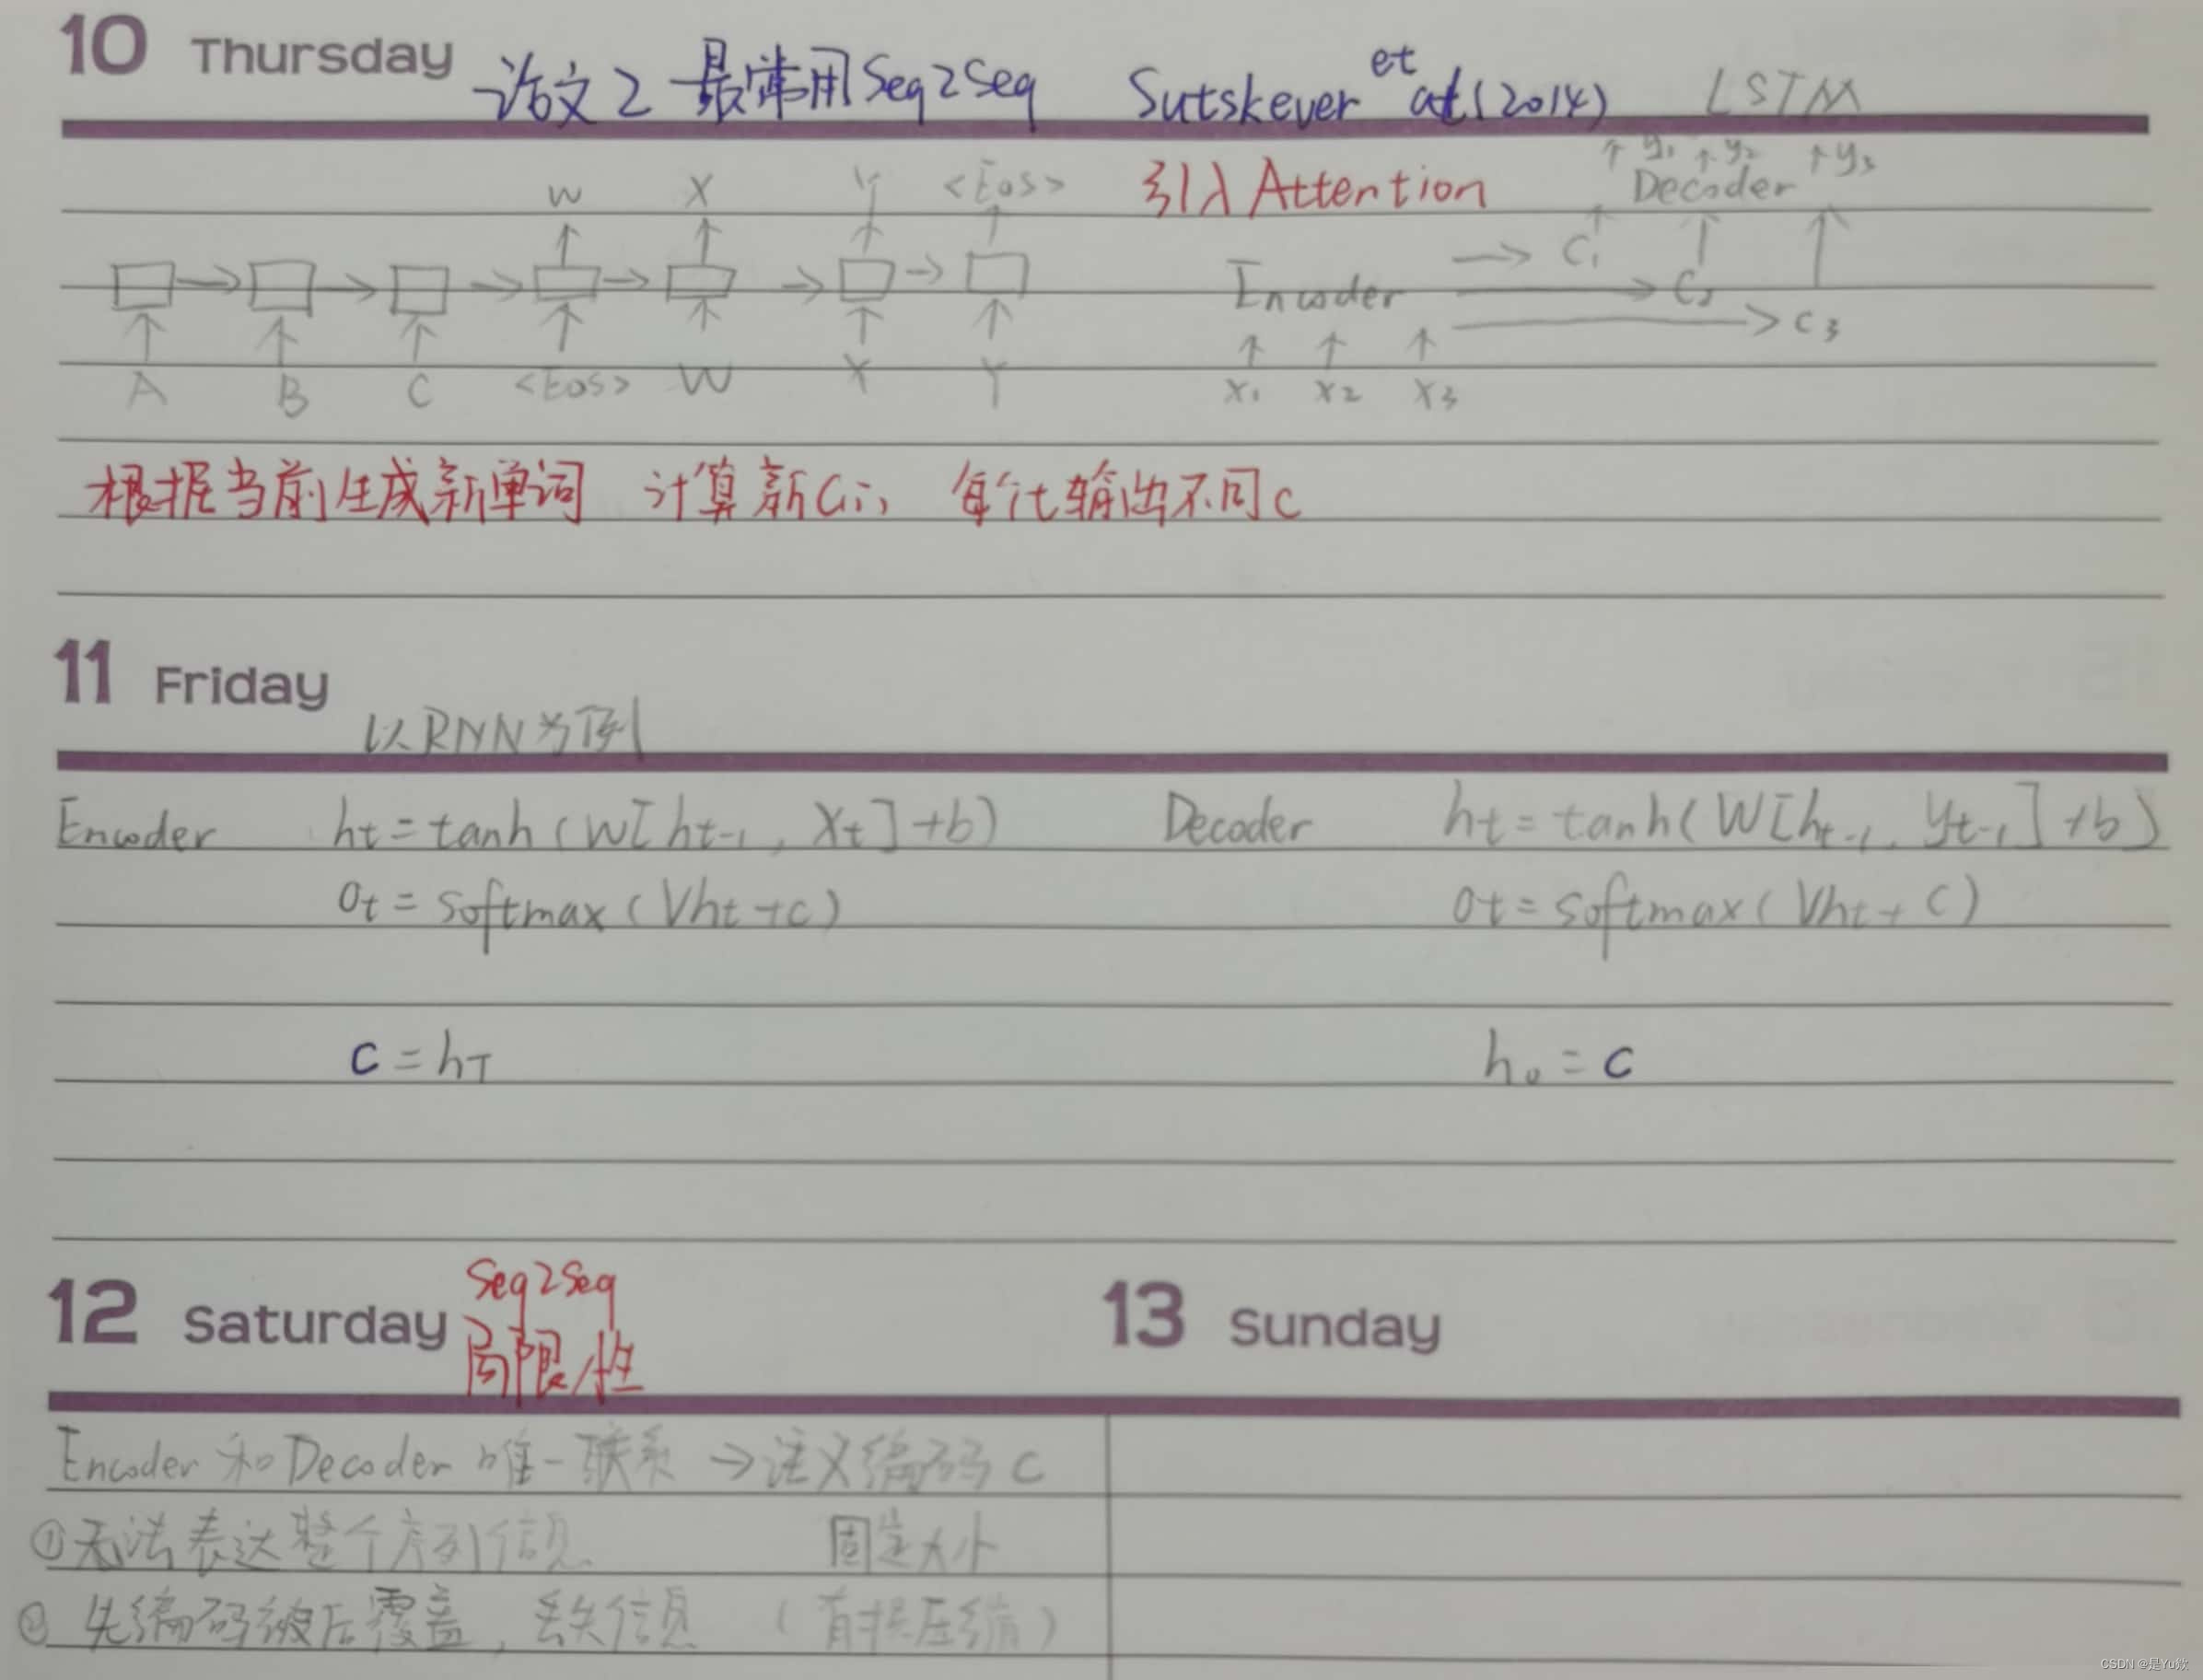
P8 注意力机制理论讲解 + P9 注意力机制数学公式讲解

P10 引出self-attention的两个问题

P11 self-attention理论讲解
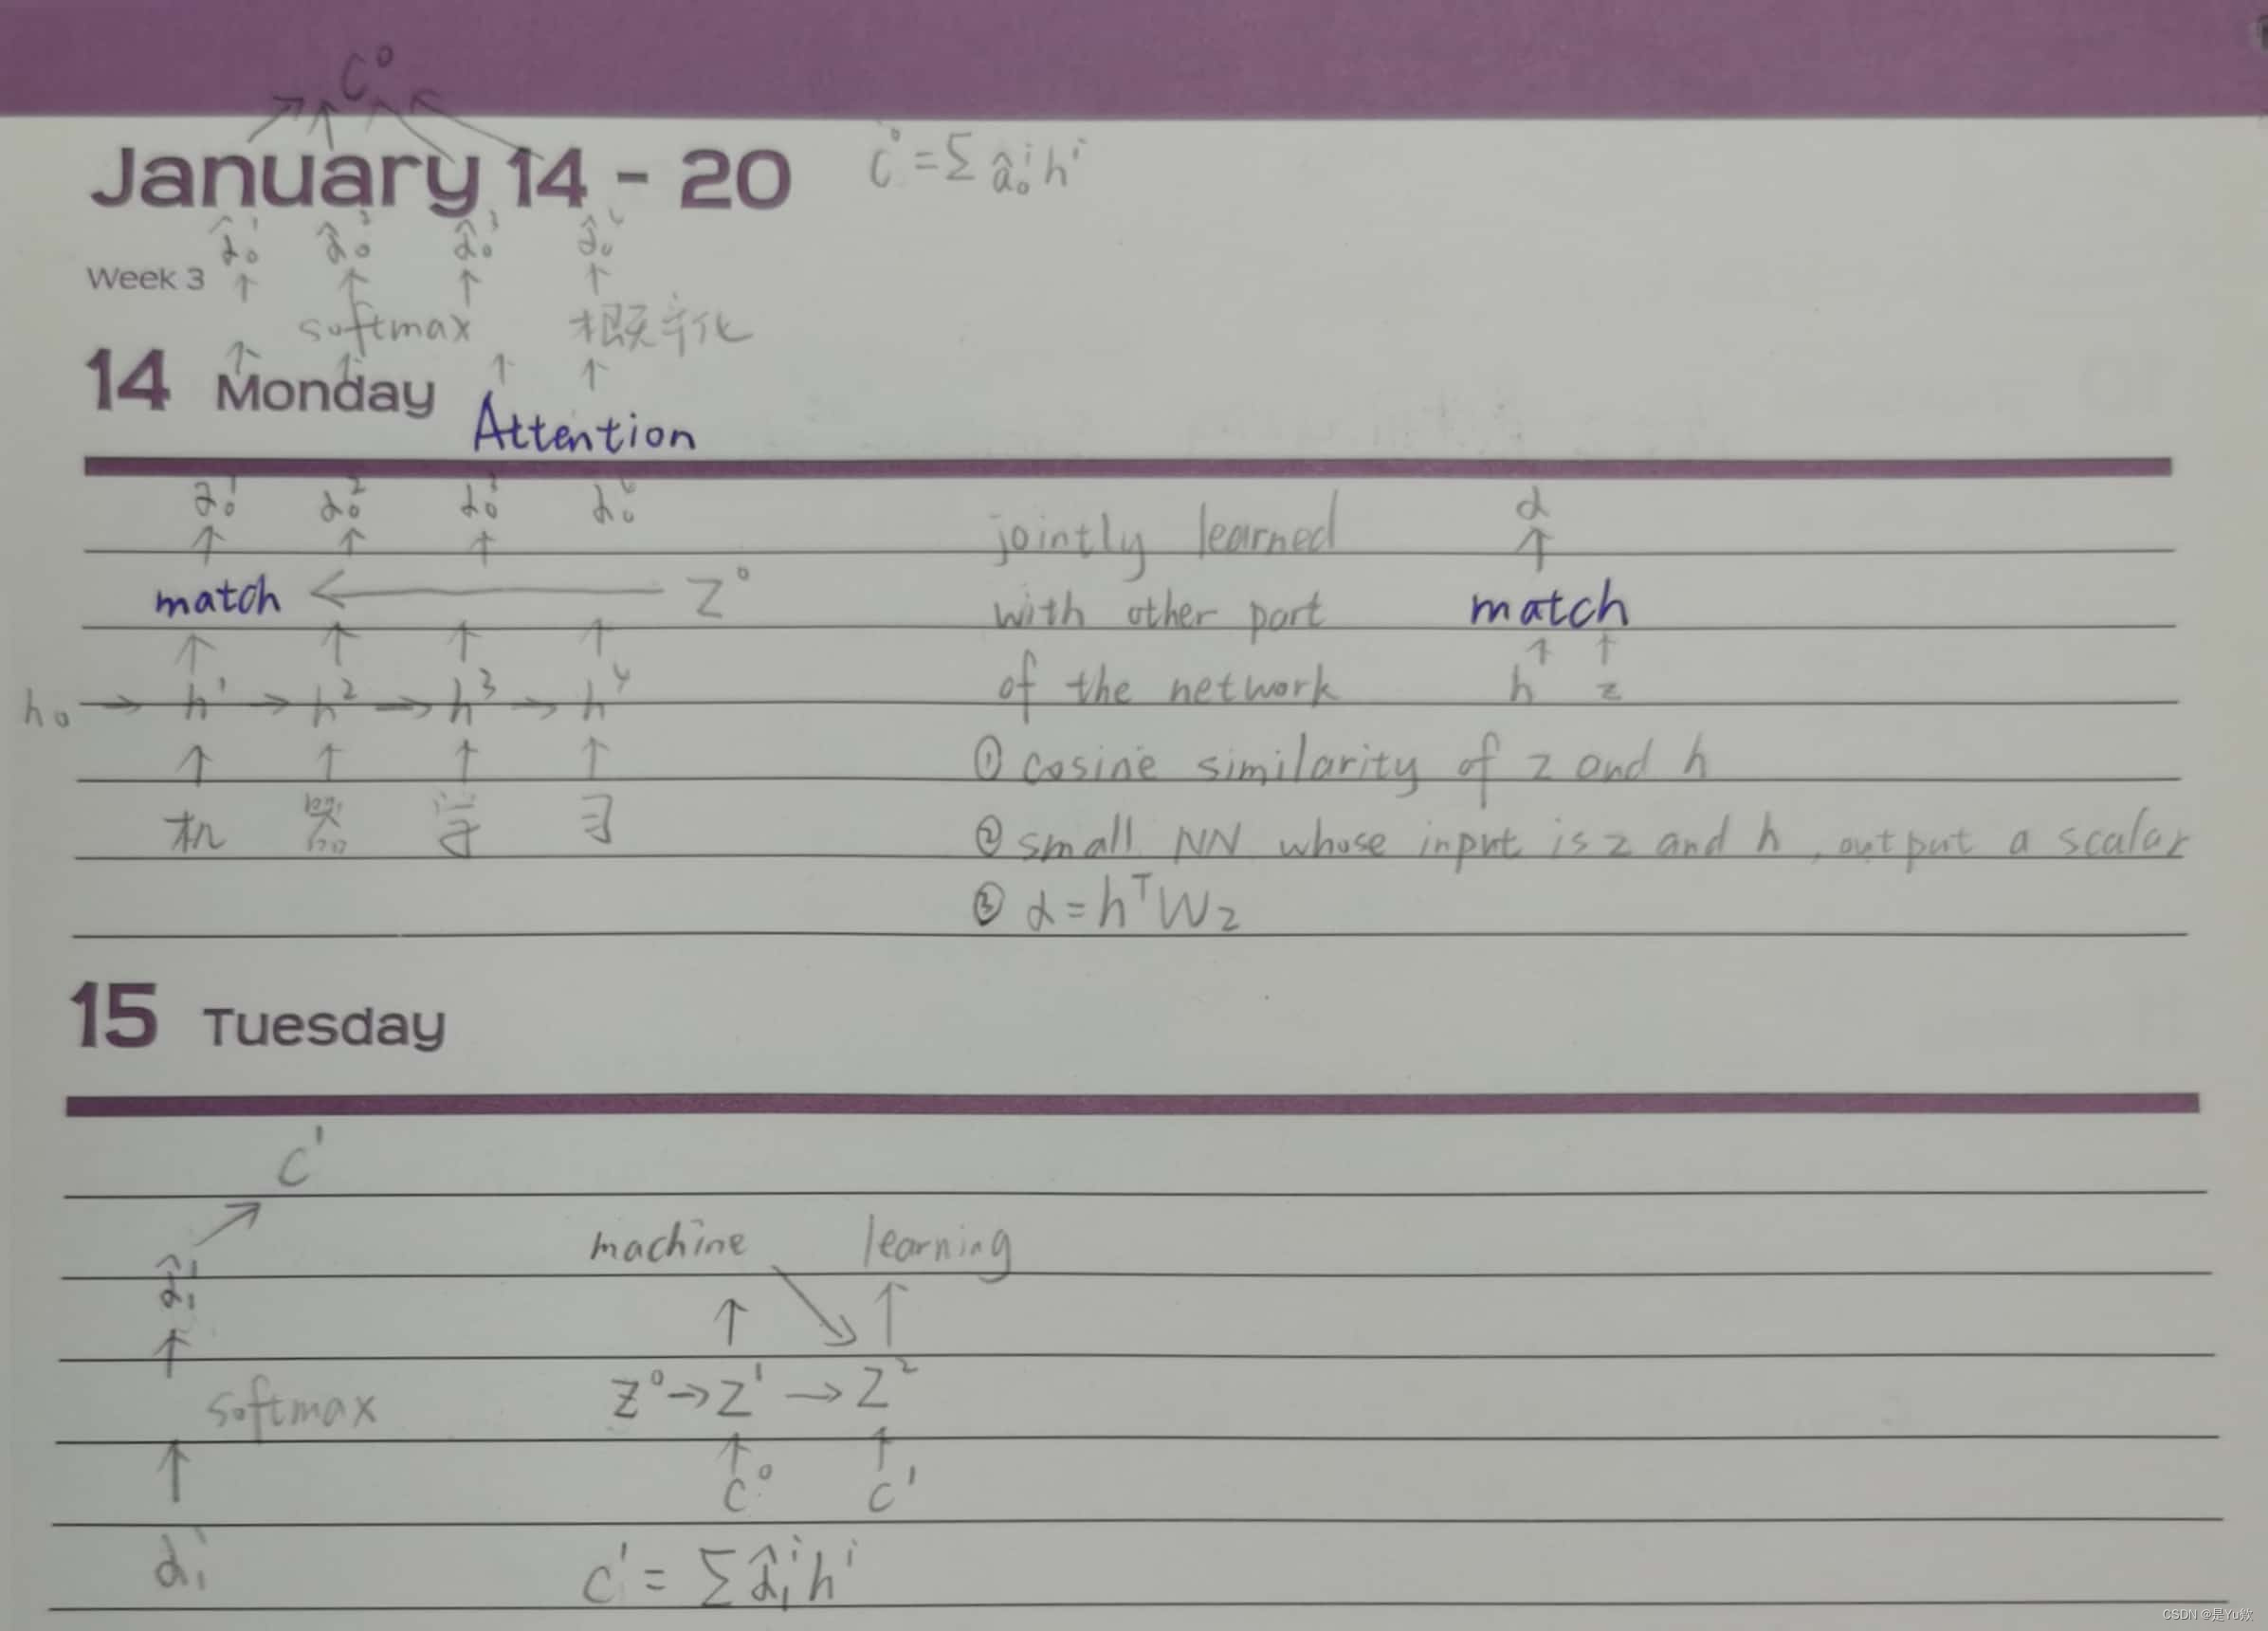
P12 self-attention数学理论讲解
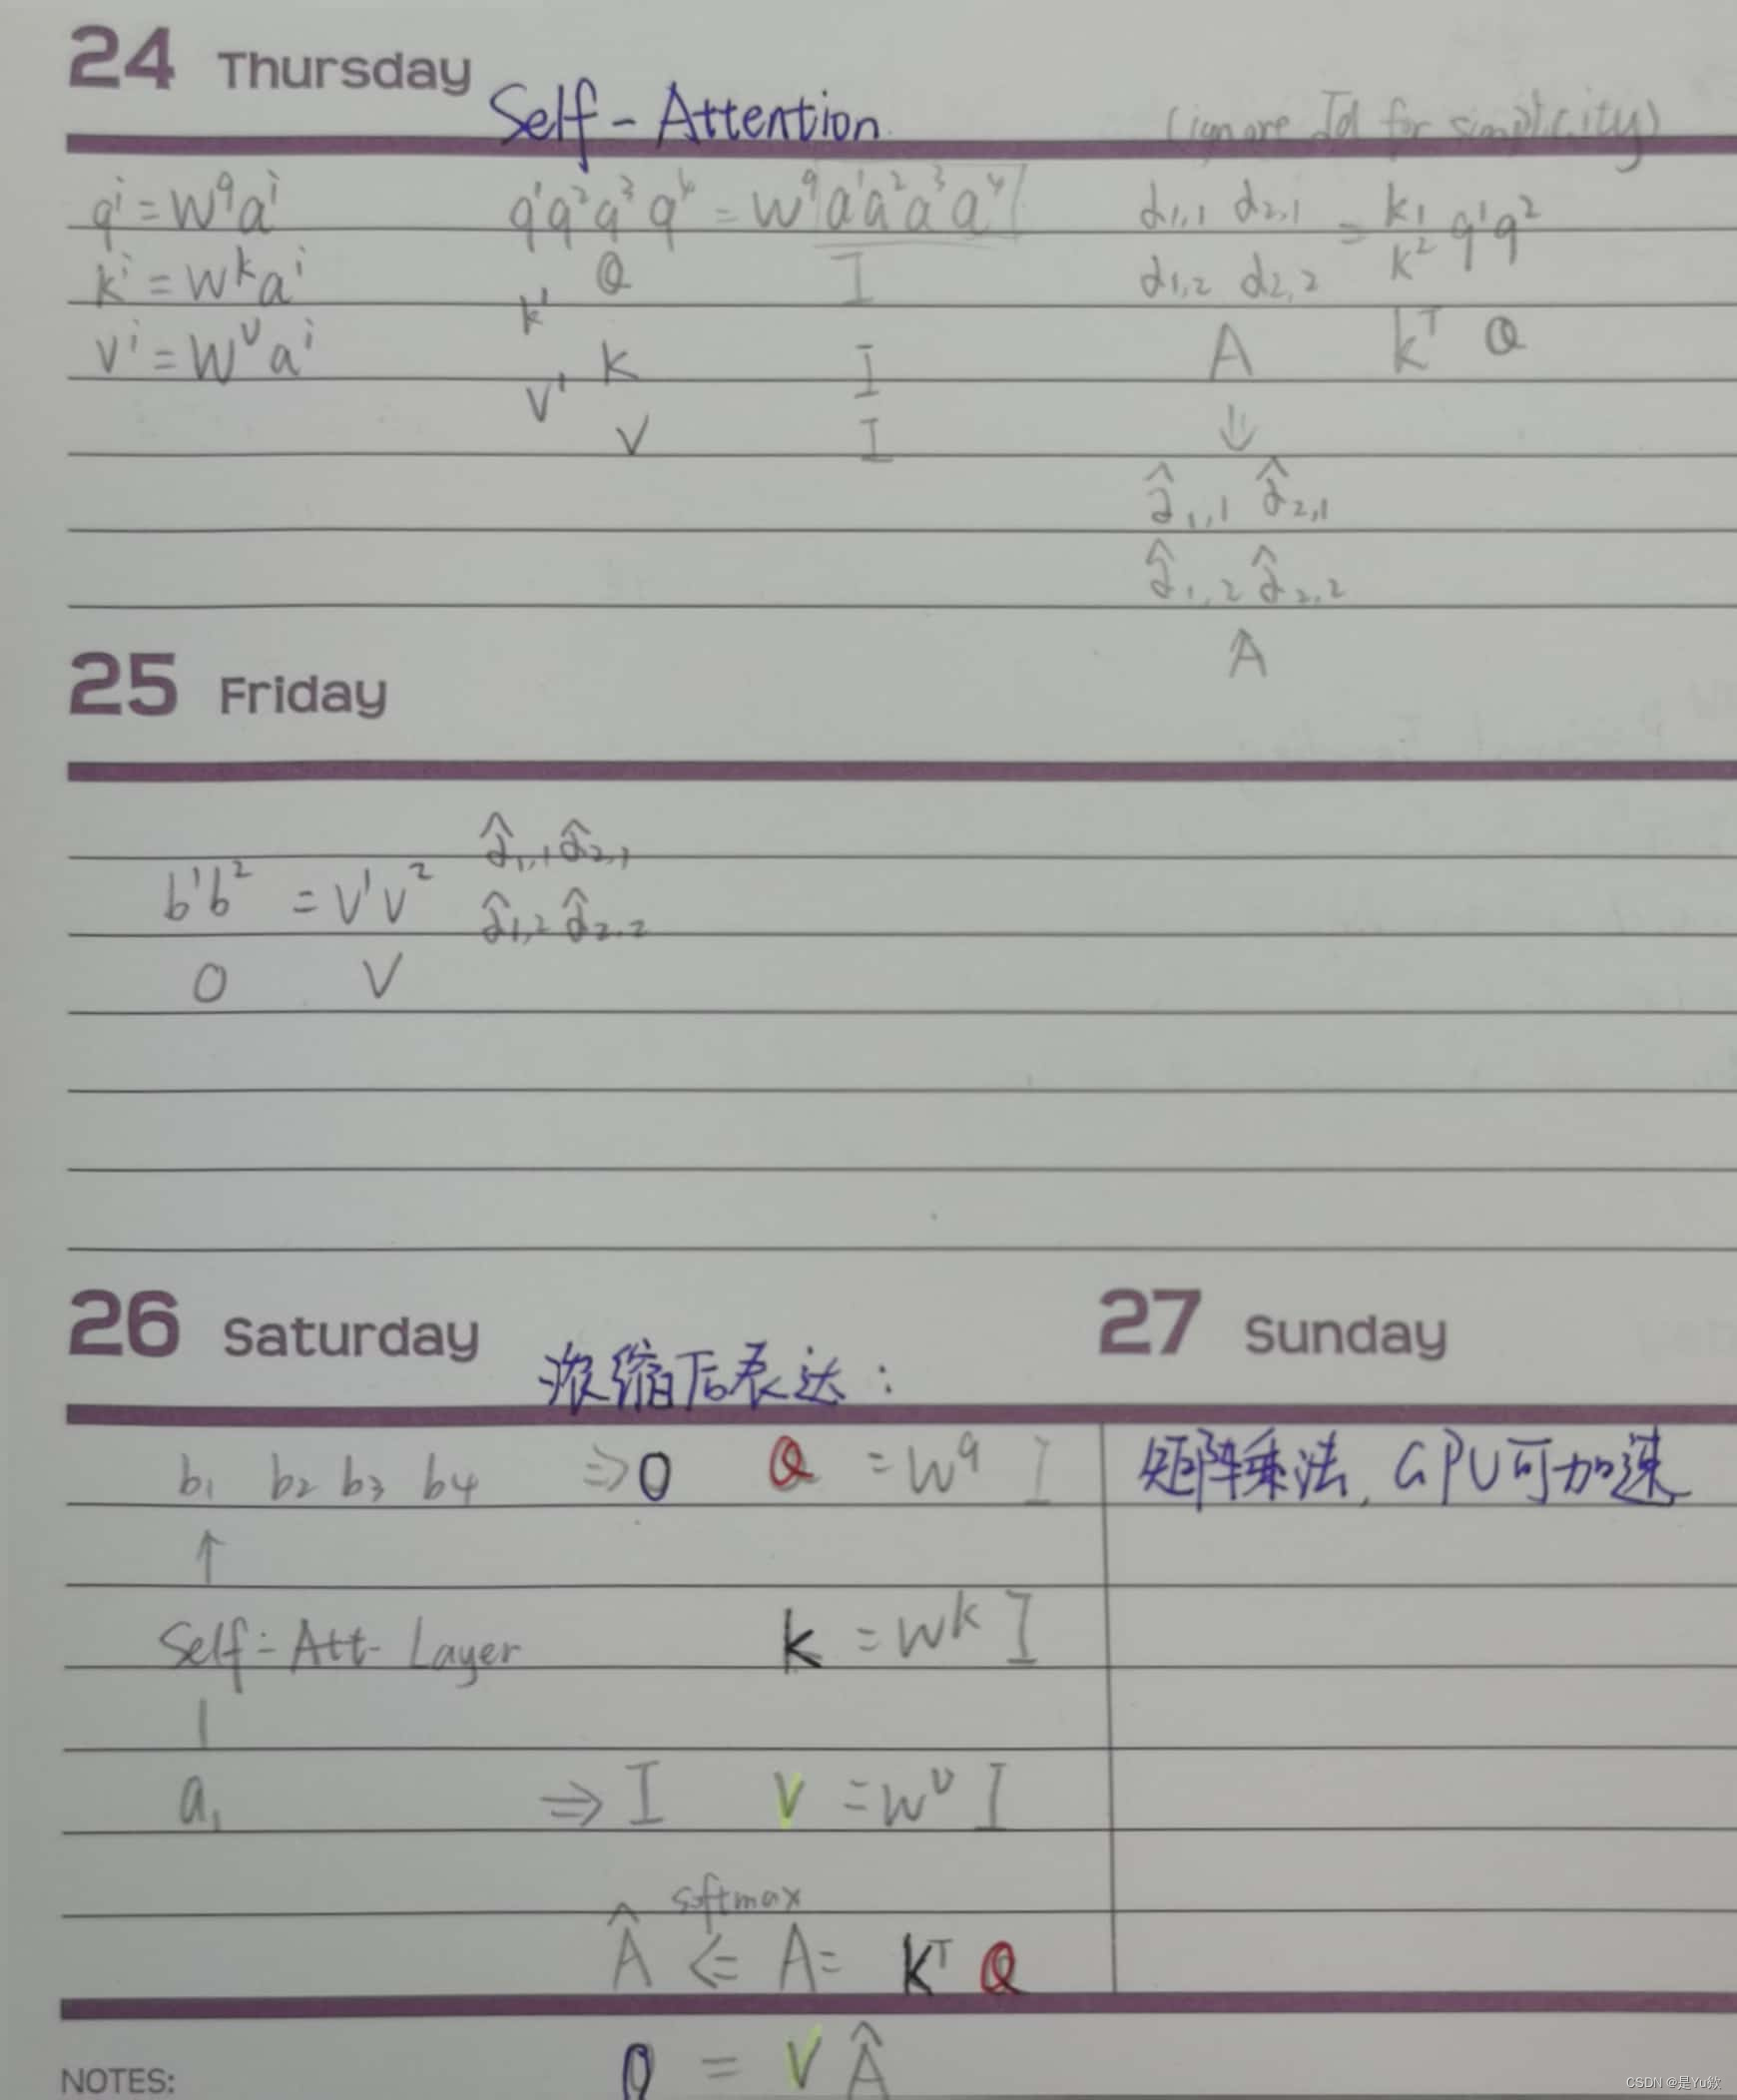
P13 Multi-head-self-attention理论讲解

P14 Transformer理论讲解
视频没看懂,结合代码+另一个链接理解的


