
【模型复现】自制数据集上复现目标检测域自适应 SSDA-YOLO
- 1. 环境安装
- 2. 数据集制作
- 3. 模型训练
- 4. 模型验证
- 5. 模型推理
- 6. 踩坑记录
- 6.1 AssertionError: train_target_real_fake: No labels in xxx/labels/train.cache. Can not train without labels.
- 6.2 ValueError: could not broadcast input array from shape (427,325,3) into shape (428,325,3)
- 6.3 RuntimeError: result type Float can't be cast to the desired output type long int.
- 6.4 RuntimeError: Expected all tensors to be on the same device, but found at least two devices, cuda:0 and cuda:2!
Code 链接: SSDA-YOLO
Paper 链接: SSDA-YOLO: Semi-Supervised Domain Adaptive YOLO for Cross-Domian Object Detection
1. 环境安装
# 创建环境
conda create -n ssda_yolo python=3.9

# 激活环境
conda activate ssda_yolo

# torch 安装
# 本机 CUDA 为 11.8,故安装了符合要求的 pytorch==1.13,这里需要自行根据 CUDA 版本安装适配的 torch 版本
pip install torch==1.13.1+cu117 torchvision==0.14.1+cu117 torchaudio==0.13.1 --extra-index-url https://download.pytorch.org/whl/cu117

# clone 代码
git clone https://github.com/hnuzhy/SSDA-YOLO.git

# pip 包
cd SSDA-YOLO
pip install -r requirements.txt
2. 数据集制作
2.1 数据准备
- 以下面展示
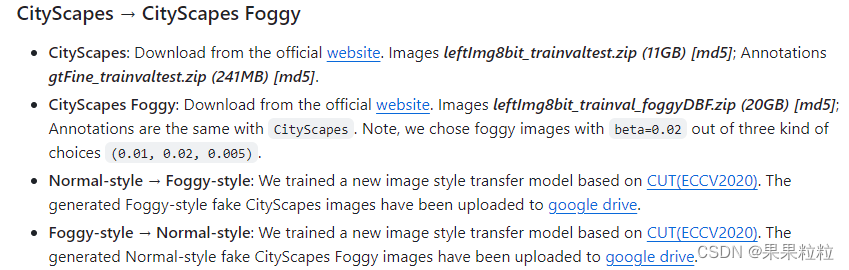
README.md中提到的CityScapes --> CityScapes Foggy域适应为例,需要准备数据集CityScapes、CityScapes Foggy、Normal-style --> Foggy-style、Foggy-style --> Normal-style。
- 其中
Normal-style --> Foggy-style和Foggy-style --> Normal-style均由CUT模型训练得来。CUT模型训练过程见链接: 【模型复现】自制数据集上复现风格迁移模型 CUT:Contrastive Unpaired Translation
2.2 数据结构
- 准备训练数据,数据集的文件结构为:
my_datasets/
├──cityscapes_source
│	├──cityscapes_real
│	│	├──images/train
│	│	│	├──xxx.jpg
│	│	│	└──xxx.jpg
│	│	└──labels/train
│	│		├──xxx.txt
│	│		└──xxx.txt
│	└──cityscapes_fake
│		├──images/train
│		│	├──xxx.jpg
│		│	└──xxx.jpg
│		└──labels/train
│			├──xxx.txt
│			└──xxx.txt
└──cityscapesfoggy_target
	├──cityscapesfoggy_real
	│	├──images
	│	│	├──train
	│	│	│	└──xxx.jpg
	│	│	│	└──xxx.jpg
	│	│	└──val
	│	│		└──xxx.jpg
	│	│		└──xxx.jpg
	│	└──labels
	│		├──train
	│		│	└──xxx.txt
	│		│	└──xxx.txt
	│		└──val
	│			└──xxx.txt
	│			└──xxx.txt
	└──cityscapesfoggy_fake
		├──images/train
		│	├──xxx.jpg
		│	└──xxx.jpg
		└──labels/train
			├──xxx.txt
			└──xxx.txt
3. 模型训练
3.1 数据文件配置
- 在
./data/yamls_sda路径下新建数据配置yaml文件并进行配置,修改数据加载路径等参数。path: 数据存放路径train_source_real:源域真实训练数据train_source_fake:源域上使用 CUT 生成目标域形式的数据train_target_real:目标域真实训练数据train_target_fake:目标域上使用 CUT 生成源域形式的数据test_target_real:目标域真实测试数据nc:标签数量names:标签名称
- 数据配置文件示例如下:

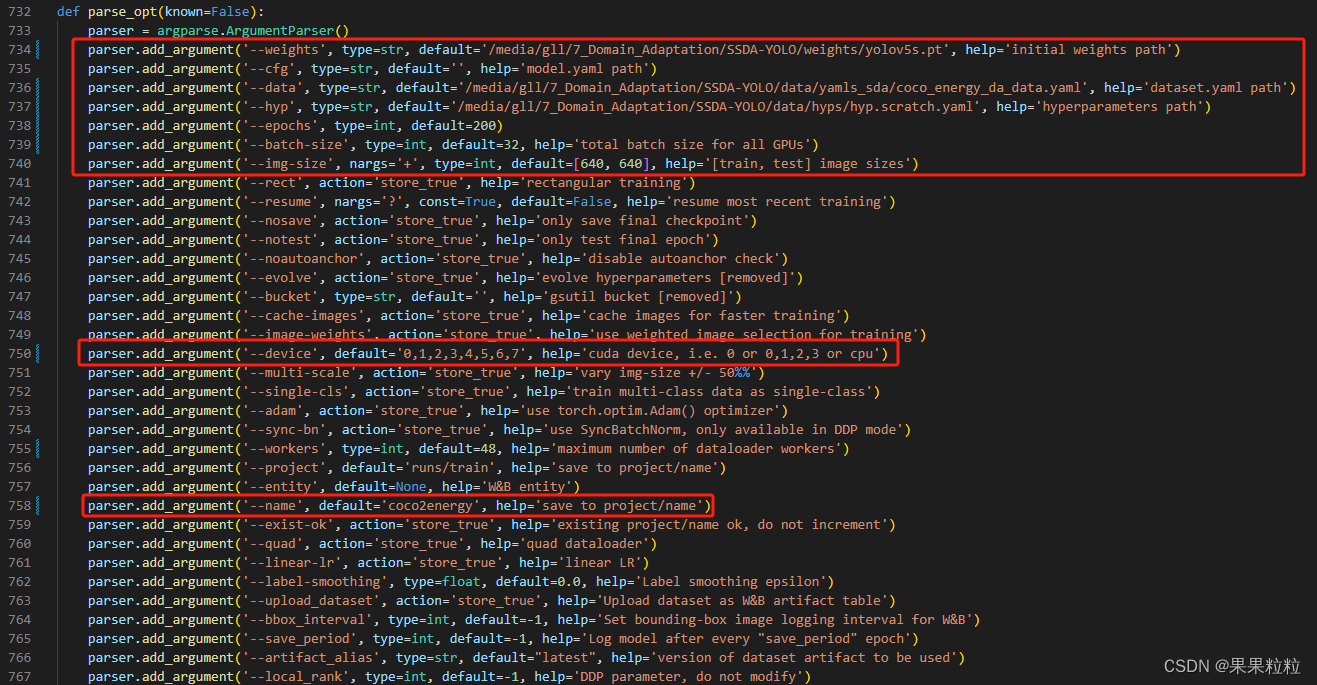
3.2 训练超参数配置
- 通过
ssda_yolov5_train.py进行训练超参数配置,按需进行超参数配置。
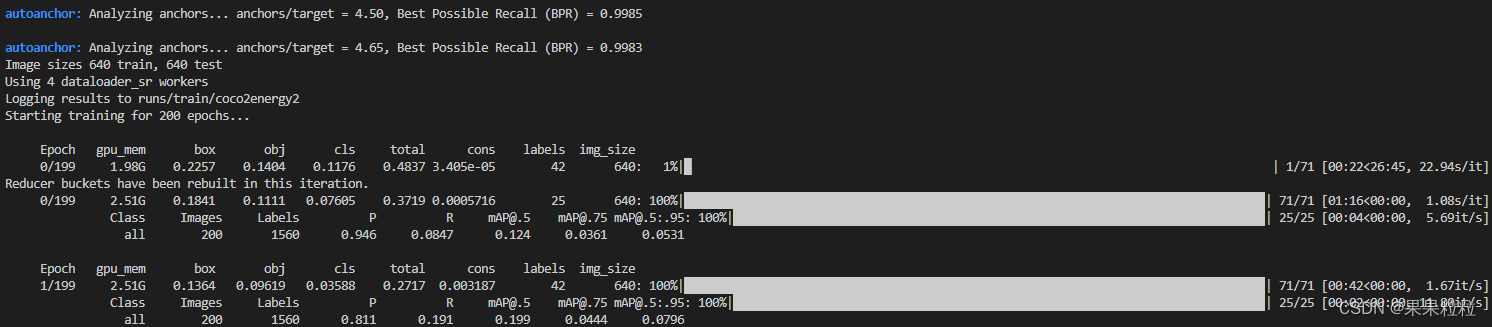
3.3 模型训练
- 训练指令
python -m torch.distributed.launch --nproc_per_node 8 ssda_yolov5_train.py - 在终端中运行训练命令,若看到下述界面,即成功复现!!!
4. 模型验证
4.1 验证超参数配置
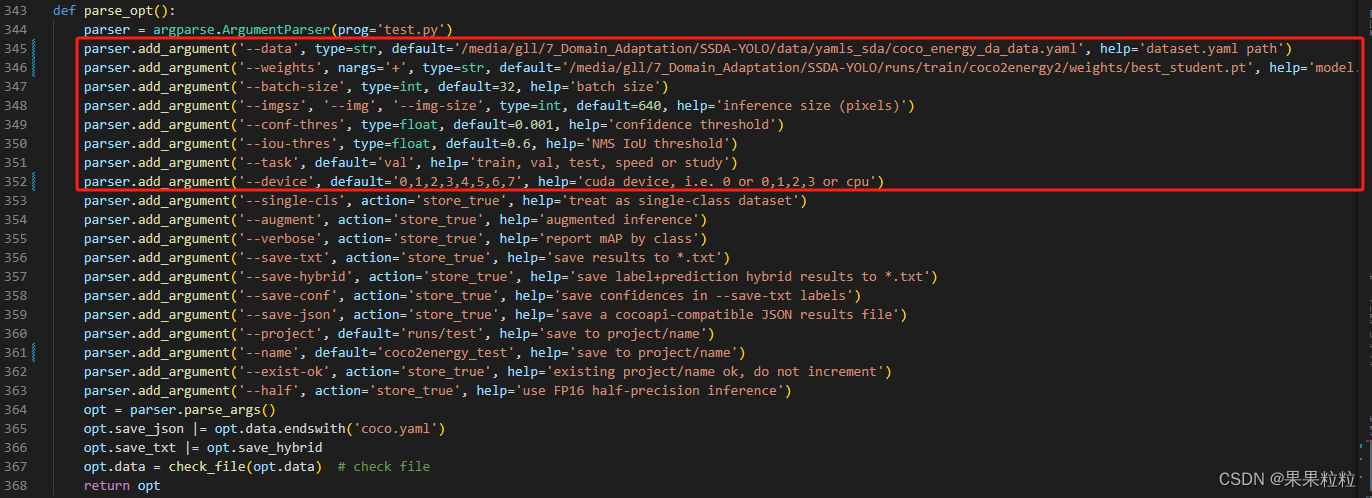
- 通过
ssda_yolov5_test.py进行验证超参数配置,按需进行超参数配置。
4.2 模型验证
- 验证指令
python ssda_yolov5_test.py - 验证成功界面如下。

5. 模型推理
- 官方代码中并未给出模型推理脚本,但分析代码不难发现,推理脚本可复用
YOLOv5-5.0的推理脚本detect.py,见链接 YOLOv5-5.0 detect.py,将代码放在主目录下配置参数即可。
5.1 推理超参数配置
- 通过
detect.py进行推理超参数配置,按需进行超参数配置。

5.2 模型推理
- 推理指令
python detect.py - 推理成功界面如下。

6. 踩坑记录
6.1 AssertionError: train_target_real_fake: No labels in xxx/labels/train.cache. Can not train without labels.
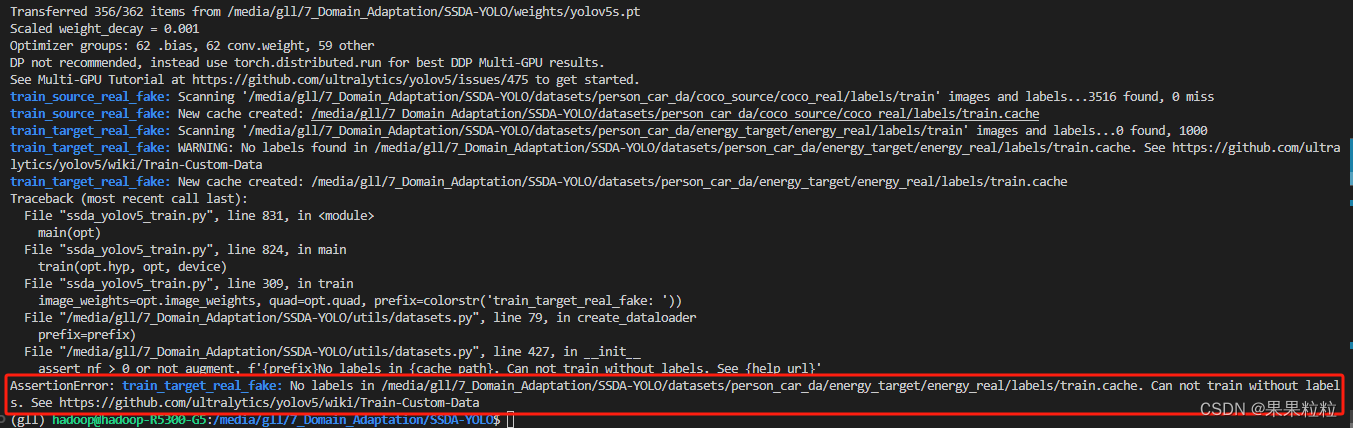
- 解决方法:
- 虽然
target的labels训练中未使用,但也需按照规范放置images和labels.
- 虽然
6.2 ValueError: could not broadcast input array from shape (427,325,3) into shape (428,325,3)
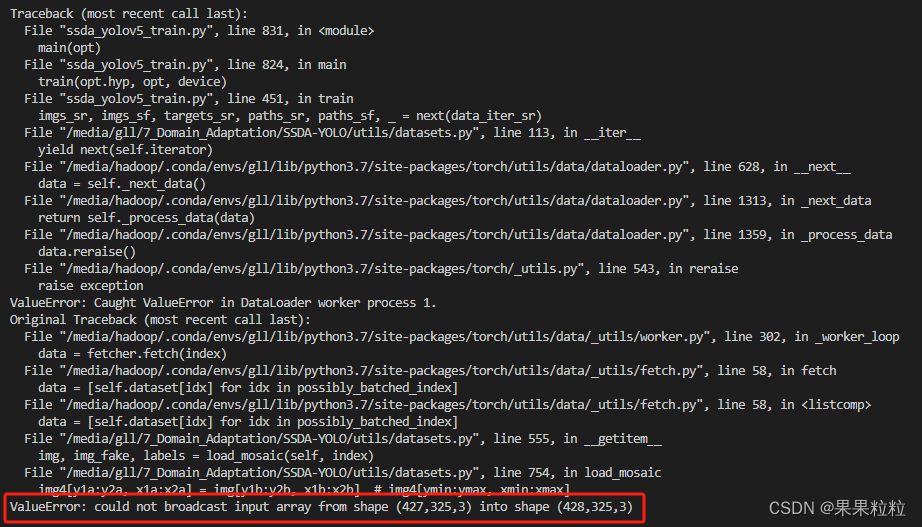
- 问题分析:
- 在进行
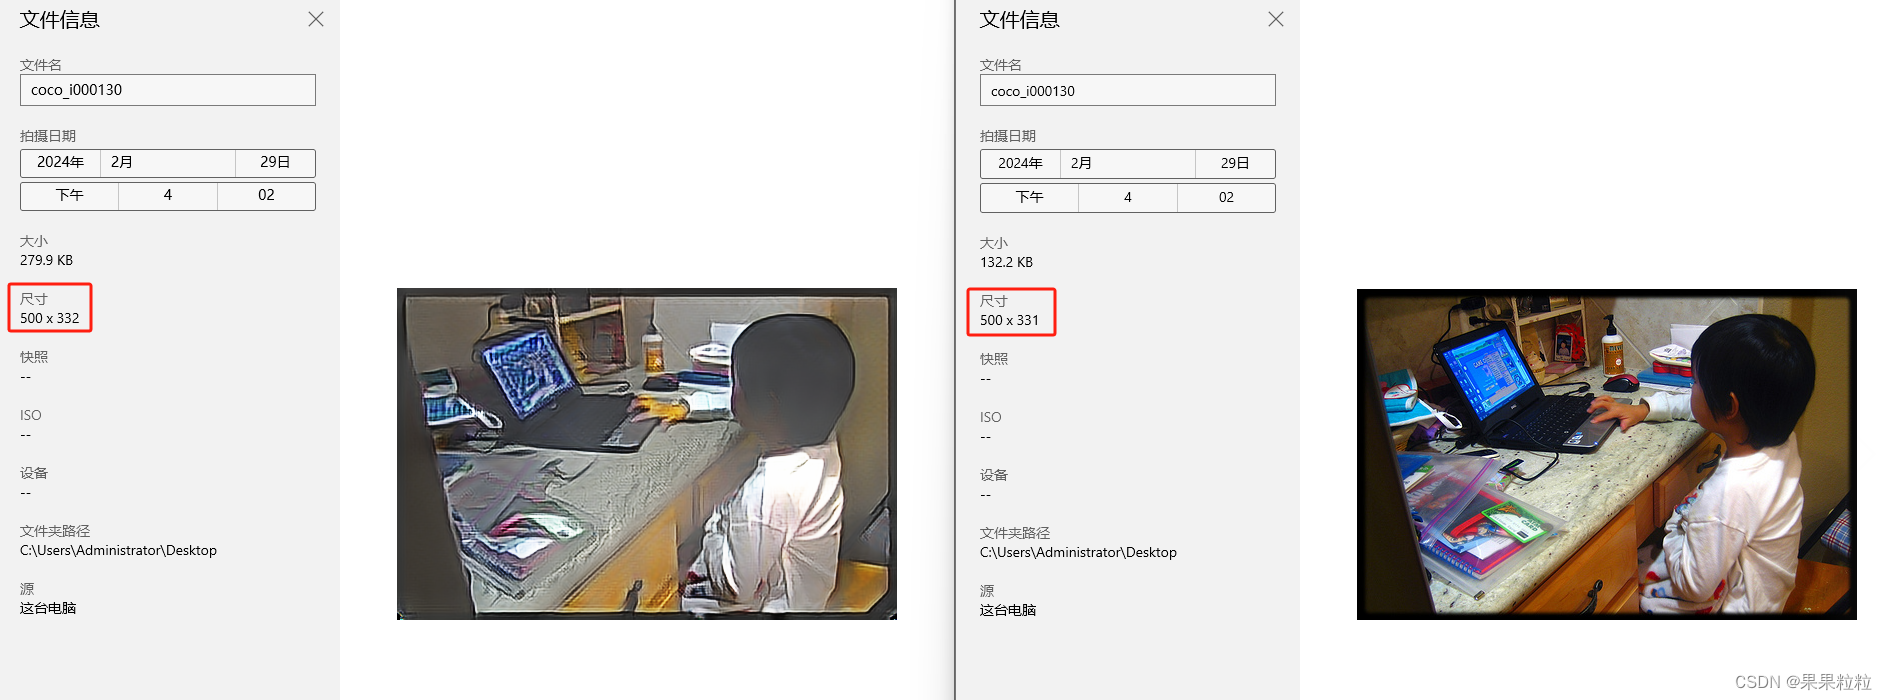
mosaic增强时,图片尺寸不符。查看soure_fake和source_real的尺寸后,发现经过CUT生成的图像和源域的图像中存在尺寸不一致的情况,导致增强时报错。
- 在进行
- 解决方法:
- 分别将
soure_fake & source_real和target_fake & target_real的尺寸调整一致后进行模型训练。 - 实现脚本如下:
import os
from PIL import Image

# 图像文件夹路径
folder_a = './real/images/train'  # 存放jpg图像的文件夹
folder_b = './fake/images/train'  # 存放png图像的文件夹

for filename in os.listdir(folder_a):
    if filename.lower().endswith('.jpg'):
        jpg_path = os.path.join(folder_a, filename)
        png_path = os.path.join(folder_b, filename.replace('.jpg', '.png'))

        if os.path.exists(png_path):
            with Image.open(jpg_path) as jpg_image:
                with Image.open(png_path) as png_image:
                    jpg_size = jpg_image.size
                    png_size = png_image.size

                    # 比较尺寸
                    if jpg_size != png_size:
                        print(f"尺寸不一致: {filename}")
                        # 如果尺寸不一致,调整png图像的大小
                        png_image_resized = png_image.resize(jpg_size, Image.ANTIALIAS)
                        png_image_resized.save(png_path)
                    else:
                        print(f"尺寸一致: {filename}")
        else:
            print(f"在文件夹B中找不到对应的png文件: {filename}")
- 分别将
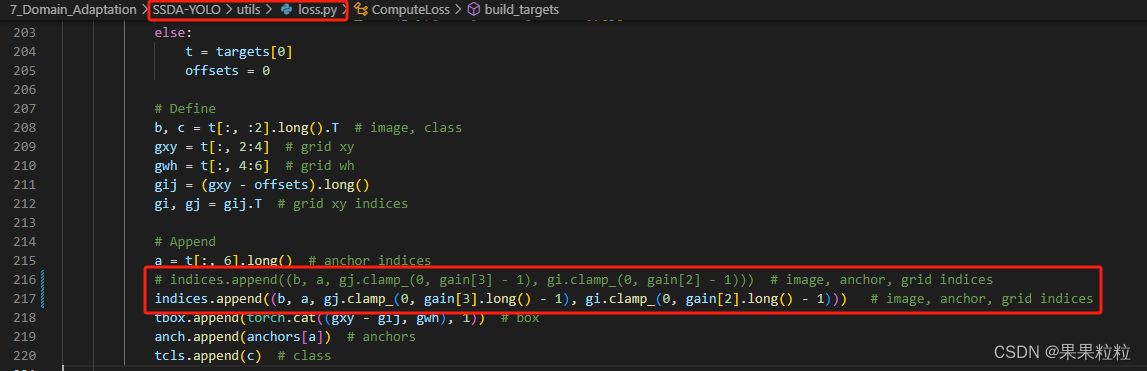
6.3 RuntimeError: result type Float can’t be cast to the desired output type long int.
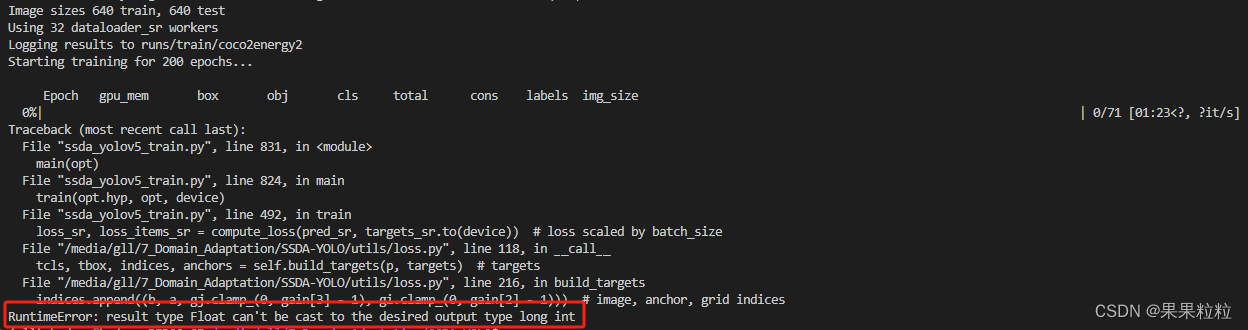
- 解决方法:
- 在
utils/loss.py第 216 行进行如下修改:
# indices.append((b, a, gj.clamp_(0, gain[3] - 1), gi.clamp_(0, gain[2] - 1))) # image, anchor, grid indices indices.append((b, a, gj.clamp_(0, gain[3].long() - 1), gi.clamp_(0, gain[2].long() - 1))) # image, anchor, grid indice- 修改完成后如下所示。
- 在
6.4 RuntimeError: Expected all tensors to be on the same device, but found at least two devices, cuda:0 and cuda:2!
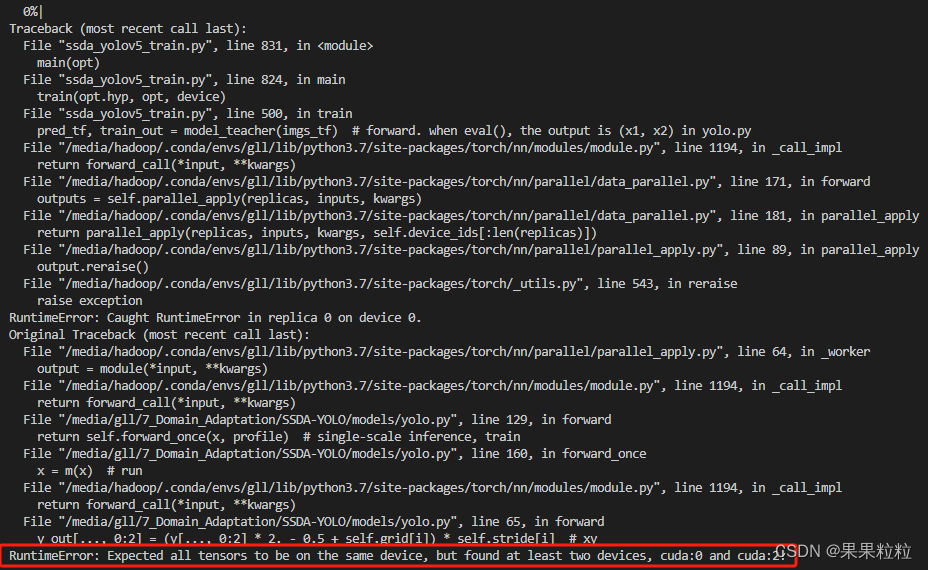
- 解决方法:
- 在使用多卡时,训练命令使用
python -m torch.distributed.launch --nproc_per_node 8 ssda_yolov5_train.py
- 在使用多卡时,训练命令使用


