今日内容
零、 复习昨日
一、使用Vue-Cli搭建Vue项目
1.1 什么是vue-cli
1.2 node.js的介绍及安装
node.js的介绍
node.js的安装


不要勾选这个,否则会下载很多东西

| 测试node.js是否安装成功: 在DOS窗口中输入“node -v” 查看版本,如果看到版本,就表示安装成功。(环境变量已经自动配置好) |
|---|
 |

npm config set registry https://registry.npm.taobao.org
1.3 使用node.js 安装 vue-cli
(管理员权限)使用如下命令安装vue-cli
npm install @vue/cli -g

# 如果出错,可以卸载,重新执行上一步安装
npm uninstall @vue/cli -g
| 当出现以下界面,表示正在安装: |
|---|
  |

1.4 使用vue-cli命令创建项目


1.5 使用图形界面方式创建

会自动打开浏览器,弹出页面


1.6 项目结构

| 文件名 | 解释 |
|---|---|
| build | webpack的一些配置 |
| config | 不同环境的配置,比如开发环境,生产环境等 |
| node_modules | npm install下载的依赖包 |
| public | 用于存放公共js文件夹、json文件和图片等 |
| dist | 存放项目打包后的文件 |
src | 项目的源码 |
| src/assets | 存放静态资源文件,如图片等 |
src/components | 存放公共组件 |
src/router | 静态路由表 |
src/store | vuex |
src/views | 开发的页面资源,路由页面相关的 |
src/main.js | 对应App.vue创建vue实例,也是入口文件 |
src/App.vue | 入口页面 |
| gitignore | git管理时,忽略的文件或文件夹 |
| package.json | 项目的核心配置记录,可以查看当前安装依赖的版本号 |
| index.html | 首页的入口 |
| vue.config.js | 可选的配置文件,存放在根目录中,@vue/cli-service 启动的时候会自动加载 |


二、idea开发vue

三、单文件组件[重点]
3.1 介绍
3.2 使用


<template>
  <div>
     <h1 class="red">这是测试单vue文件组件</h1>
    <h3>{{info}}</h3>
    <button @click='show()'>show</button>
  </div>
</template>

<script>
export default {
  name: "TestSingleVuePage",
  data:function (){
    return {
      info:"data-信息"
    }
  },
  methods:{
    show(){
      alert("单页面内弹出...")
    }
  }
}
</script>

<style scoped>
  .red {
    color: red;
  }
</style>


3.3 练习
练习: 再创建一个单页面TestSingleVuePage2.vue页面,定义一些内容, 然后在TestSingleVuePage.vue页面内使用该页面
四、Vue组件间的参数传递
4.1 父传子
创建子组件,设置参数 等待父组件给其传值
<template>
<div>
  <h1>这是 子组件</h1>
  <span>{{name}}</span> --
  <span>{{age}}</span> --
  <span>{{sex}}</span>
</div>
</template>

<script>
export default {
  name: "MySon",
  props:{
    name: {
      // 类型
      type: String,
      // 默认值
      default: '无名'
    },
    age: Number,
    sex: Boolean
  }
}
</script>

<style scoped>
</style>
创建父组件,给子组件传值
<template>
  <div>
    <h1>这是 父组件 </h1>
    <!-- 父组件使用子组件 -->
    <!--
         可以通过 v-bind 动态赋值,比如 v-bind:name="",
         也可以简写:age=""
         也可以静态赋值,比如 messages="" , 注意没有冒号
    -->
    <MySon v-bind:name="username" :age="age" sex="true"></MySon>
  </div>
</template>

<script>
import MySon from "@/components/MySon";

export default {
  name: "MyFather",
  components: {
    MySon
  },
  data: function () {
    return {
      username: "小儿砸",
      age: 18
    }
  }
}
</script>

<style scoped>

</style>
在App.vue注册父组件并使用父组件演示效果即可

4.2 子传父
子组件
<template>
  <div>
    <h1>这是 子组件2</h1>
    <button @click="sendNum">子组件将值num=10传递给父组件</button>
  </div>
</template>

<script>
export default {
  name: "MySon2",
  props: {},
  data: function () {
    return {
      num: 10
    }
  },
  methods: {
    sendNum() {
      // 触发父组件的事件,同时给事件传参
      this.$emit('addFun', this.num)
    }
  }
}
</script>

<style scoped>
</style>
父组件
<template>
  <div>
    <h1>这是 父组件2 </h1>
    <span>sum = {{sum}}</span>
    <MySon2 @addFun="addSum"></MySon2>
  </div>
</template>

<script>
import MySon2 from "@/components/MySon2";

export default {
  name: "MyFather2",
  components: {
    MySon2
  },
  data: function () {
    return {
      sum: 0
    }
  },
  methods:{
    addSum(v){
      this.sum += v;
    }
  }
}
</script>

<style scoped>

</style>
在App.vue注册父组件并使用父组件演示效果即可


五、Vue-router 路由[重点]
5.1 介绍
5.2 vue的路由
5.3 安装路由模块
npm install vue-router
# 如果报错,可能是npm版本过高,存在兼容性问题,那么使用如下命令
npm install --legacy-peer-deps vue-router@3.5.2
npm install --legacy-peer-deps vue-router@3.1.3

ps: 今天练习过一次以后,后续在创建项目时可以直接选择路由部分内容,创建出的项目直接就配置好了
5.5 路由初体验
5.5.1 创建MyInfo.vue
<template>
  <div>
    <h1>个人中心</h1>
  </div>
</template>

<script>
export default {
  name: "MyInfo"
}
</script>

<style scoped>

</style>
5.5.2 创建静态路由表
import Vue from 'vue'
import Router from 'vue-router'
import HelloWorld from '../components/HelloWorld'
import MyInfo from "../components/MyInfo";

Vue.use(Router)
// export是导出路由对象,只有导出了
// main.js文件头上面才能 import 导入
export default new Router({
    routes: [
        {
            path: '/', // 匹配<router-link to="">中的路径
            name: 'HelloWorld', // 这个name属性可写可不写
            component: HelloWorld // 要跳转的组件对象
        },
        {
            path: '/MyInfo',
            name: 'MyInfo',
            component: MyInfo
        }
    ],
    // mode: 'history'
    mode: 'hash'
})
5.5.3 引入路由模块并使用
import Vue from 'vue'
import App from './App'
import router from './router' //引入上一步导出的路由模块,并设置名字为router
Vue.config.productionTip = false

new Vue({
  render: h => h(App),
  router  // 使用路由
}).$mount('#app')
5.5.4 App.vue使用路由
<template>
  <div id="app">
    <ul>
      <li>
        <!--
           <router-link>用于导航,其实就是a标签
           to表示要跳转的资源的路径
           tag 将router-link渲染成想要的原生标签,默认是a标签,可以改成button
        -->
        <router-link to="/" tag="button">首页</router-link>
      </li>
      <li>
        <router-link to="/MyInfo">个人信息</router-link>
      </li>
    </ul>
    <!-- router-view 路由填充位,要跳转的组件在此展示,位置任意 -->
    <router-view/>
  </div>
</template>

<script>
import HelloWorld from './components/HelloWorld.vue'

export default {
  name: 'App',
  components: {
    HelloWorld
  }
}
</script>

<style>
#app {
  font-family: Avenir, Helvetica, Arial, sans-serif;
  -webkit-font-smoothing: antialiased;
  -moz-osx-font-smoothing: grayscale;
  text-align: center;
  color: #2c3e50;
  margin-top: 60px;
}
</style>
启动测试
5.6 编程式路由
创建公告页Note.vue
<template>
<div>
  <h1>网站公告</h1>
</div>
</template>

<script>
export default {
  name: "Note"
}
</script>
<style scoped>
</style>
src/router/index.js 注册路由
export default new Router({
    routes: [
        {
            path: '/',
            name: 'HelloWorld',
            component: HelloWorld
        },
        {
            path: '/MyInfo',
            name: 'MyInfo',
            component: MyInfo
        },
        {
            path: '/Note',
            name: 'Note',
            component: Note
        }
    ],
    // mode: 'history'
    mode: 'hash'
})
App.vue设置标签,绑定事件,事件触发函数,函数内编写代码实现路由

this.$router.push("/Note")
// 注意!!!!别写错,有个叫做this.$route
bug: 第一次点击跳转没事,再点一次报错
原因: vueRouter版本问题
解决:
- 降低版本
- 设置异常捕获 (推荐)
// 在router中的index.js中加上以下代码,注意加在use之前写
const routerPush = Router.prototype.push;
Router.prototype.push = function (location) {
    return routerPush.call(this, location).catch((err) => {});
};
5.7 参数的传递
5.7.1 声明式路由传参
在路由表中设参
export default new Router({
  routes: [
	...
    {
      path:'/MyInfo/:id', //设参
      component:MyInfo
    }
  ]
})
在App.vue中传参
<template>
  <div id="app">
    <ul>
      <li>
        <router-link to="/" tag="button">首页</router-link>
      </li>
      <li>
        <!-- 跳转至MyInfo,并携带id 1001 -->
        <router-link to="/MyInfo/1001">个人信息</router-link>
      </li>
    </ul>
    <!-- router-view 用于显示匹配的组件,类似显示路由到的组件的区域,位置任意 -->
    <router-view/>
  </div>
</template>

<script>
...
</script>

<style>
...
</style>
<template>
  <div>
    <h1>个人信息</h1>
    <span>id-->{{id}}</span>
  </div>
</template>

<script>
export default {
  name: "EmployeeList",
  data:function(){
    return {
      id:this.$route.params.id // 注意是$route不是$router
    }
  }
}
</script>
<style scoped>
</style>
5.7.2 编程式路由传参
App.vue的编程跳转js中设置要传递的数据
  methods:{
    toNote(){
      //this.$router.push("/Note")
      this.$router.push({path:"/Note",query:{id:1002}})
    }
  }
Note.vue中接收参数
<template>
<div>
  <h1>网站公告</h1>
  <span>id --> {{id}}</span>
</div>
</template>

<script>
export default {
  name: "Note",
  data:function(){
    return {
      id:this.$route.query.id  // 注意是query,因为是按照路径方式发送,注意查看浏览器url
    }
  }
}
</script>
ps: 后续也可以通过VueX来完成传递数据
5.8 嵌套路由


5.9 其他
路由重定向,导航守卫等等信息,查看官网自查
重定向| Vue Router (vuejs.org)
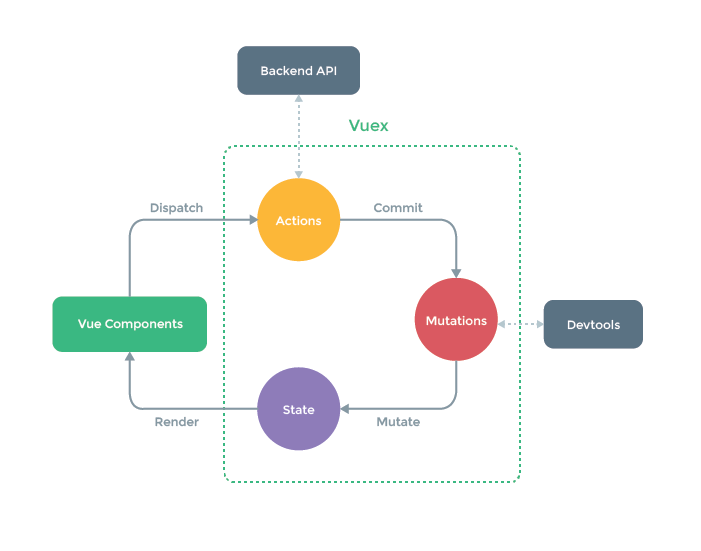
六、 Vuex[重点]
6.1 什么是Vuex
6.2 安装
# 本例使用的vue2,所以安装vuex装的是vuex3
npm install vuex@3

6.3 配置 vuex
import Vue from 'vue'
import Vuex from 'vuex'

Vue.use(Vuex)

export default new Vuex.Store({
  state: {
  },
  mutations: {
  }
})
import Vue from 'vue'
import App from './App.vue'
// 引入路由模块
import router from './router'
// 引入Vuex模块
import store from './store'

Vue.config.productionTip = false
// vue2 创建方式
new Vue({
  render: h => h(App),
  router,
  store  // 使用Vuex
}).$mount('#app')
6.4 演示
6.4.1 存&取
// store/index.js文件的state中定义数据
export default new Vuex.Store({
    state: {
        username:"无名",
        count:443,
        tga:"tga"
    },
    mutations: {
    }
})
在任何组件中使用 以下命令取值
this.$store.state.username
// username是state中定义的key
6.4.2 计算属性使用state
<template>
<div>
  计算属性取值:{{num}}
</div>
</template>

<script>
export default {
  name: "TestVueX",
  computed:{  // 【注意: 计算属性的写法】
    num() {
      return this.$store.state.count
    }
  }
}
</script>
6.4.3 mapState
<template>
<div>
  计算属性取值:{{count}}|
  计算属性取值:{{tga}}|
  计算属性取值:{{username}}|
</div>
</template>

<script>
// 【注意】 是 {} 引入
// 使用 import mapState from 'vuex' 的方式会将整个 vuex 模块导入,并将其中的 mapState 函数赋值给 mapState 变量。
// 而使用 import { mapState } from 'vuex' 的方式则是只导入 vuex 模块中的 mapState 函数
import {mapState} from 'vuex'
export default {
  name: "TestVueX",
  // computed:mapState({
  //   count: function (state) {
  //       return state.count
  //     }
  // }),

  // 如果使用和状态名一样的计算属性名,还可以这样写
  // 映射 this.count 为 store.state.count
  // computed: mapState(['count','tga','username']),

  // 如果有其他的计算属性,并且需要将vuex的state与其混合使用
  // 可以使用对象展开运算符'...'
  computed: {
    // 使用对象展开运算符将此对象混入到外部对象中
    // 映射为当前组件的计算属性
    ...mapState(['count','tga','username']),
  },

}
</script>

<style scoped>

</style>
6.4.4 修改数据
// store/index.js文件的mutations中定义方法修改数据
import Vue from 'vue'
import Vuex from 'vuex'
Vue.use(Vuex)
export default new Vuex.Store({
    state: {
        username:"无名"
    },
    mutations: {
        // 参数1 是Vuex-state对象
        // 参数2 是其他组件使用时传过来的值,这个参数叫做payload
        updateName(state,v){
            state.username = v  // 修改Vuex中的值
        }
    }
})
在其他组件中通过事件触发函数,在其中使用Vuex的方法修改数据
<template>
  <div id="app">
    <!--  演示Vuex取值  -->
    <h1>Vuex --> {{ username }}</h1>
    <input v-model="username">
    <button @click="editName">修改vuex中的值</button>

  </div>
</template>

<script>

export default {
  name: 'App',
  methods: {
    editName(){
      // 修改Vuex数据
      // updateName是 src/store/index.js中mutations中定义的函数名
      this.$store.commit('updateName', this.username)
    }
  },
  data: function () {
    return {
      // 从Vuex中取出数据
      username: this.$store.state.username
    }
  }
}
</script>
6.5.解决浏览器刷新后 Vuex 数据消失问题
- 问题描述
- 解决方案
-
安装插件
npm install vuex-persistedstate
-
配置
在/src/store/index.js中实现配置
import Vue from 'vue' import Vuex from 'vuex' // 引入持久化插件 import vuexPersistedstate from "vuex-persistedstate"; Vue.use(Vuex) export default new Vuex.Store({ state: { username:"无名66" }, mutations: { updateName(state,v){ state.username = v } }, plugins:[vuexPersistedstate()] // 加入插件 }) -
测试
浏览器刷新测试效果
6.6 其他Vuex知识
七、Promise
7.1 以前ajax中的问题
演示:

像上面这样,下面的那个打印日志的结果是:

并没有将ajax中请求的结果拼接,因为ajax是异步请求,即执行ajax时,会不等待回调执行就会去执行后续代码,也就是说,执行那个输出日志时,ajax的回调可能还没执行呢

分别多测试几次


多次刷新,多次请求,会发现结果顺序跟代码的上下顺序并不一样.
假如,三个请求的结果确实需要等输出了hello1再输出hello2,最后输出hello3的话,就需要嵌套处理.


7.2 Promise

<script type="text/javascript">
    var p = new Promise(function(resolve,reject){
        /**
          * resolve和reject都是方法
          * 成功是调用resolve([参数])函数
          * 失败时调用reject([参数])函数
          */
        // 异步请求
        $.ajax({
            url:'http://localhost:8080/vue/hello',
            success:function(data) {
                resolve(data);
            },
            error:function(){
                reject("出错啦");
            }
        })
    });
    p.then(function(ret){
        console.log(ret);
    },function(ret){
        console.log(ret);
    })
</script>
将以上代码封装成一个函数,就可以将jQuery中ajax嵌套调用的那种情况变得优雅一点
<script type="text/javascript">
    function queryData(path){
        var p = new Promise(function(resolve,reject){
            /**
             * resolve和reject都是方法
             * 成功是调用resolve([参数])函数
             * 失败时调用reject([参数])函数
             */
            // 异步请求
            $.ajax({
                url:path,
                success:function(data) {
                    resolve(data);
                },
                error:function(){
                    reject("出错啦");
                }
            })
        });
        return p;
    }
    queryData('http://localhost:8080/vue/hello1')
    .then(function(ret){
        console.log(ret);
    })
</script>
八、Axios[重点]
8.1 什么是 Axios
Axios 是一个开源的可以用在浏览器端和 NodeJS 的异步通信框架,她的主要作用就是实现 AJAX 异步通信,其功能特点如下:
-
从浏览器中创建 XMLHttpRequests
-
从 node.js 创建 http 请求
-
支持 Promise API
-
拦截请求和响应
-
转换请求数据和响应数据
-
取消请求
-
自动转换 JSON 数据
-
客户端支持防御 XSRF(跨站请求伪造)
-
官网基本用例 | Axios 中文文档 | Axios 中文网 (axios-http.cn)
由于 Vue.js 是一个 视图层框架 并且作者(尤雨溪)严格准守 SoC (关注度分离原则),所以 Vue.js 并不包含 AJAX 的通信功能,为了解决通信问题,作者单独开发了一个名为 vue-resource 的插件,不过在进入 2.0 版本以后停止了对该插件的维护并推荐了 Axios 框架
8.2 Axios的使用
8.2.1 安装vue axios
npm install --save axios vue-axios

8.2.2 在需要使用的页面中引入
比如UserInfo.vue页面需要发请求,那就在页面的script中引入即可
import axios from 'axios'
8.2.3 发送ajax请求
<template>
<div>
  <button @click="getInfo">查询数据</button>
  <hr>
    {{deptList}}
      <hr>
  <table>
    <th>
        部门编号
    </th>
    <th>
      部门名称
    </th>
    <th>
      部门地址
    </th>
    <tr v-for="dept in deptList">
        <td>{{dept.deptno}}</td>
        <td>{{dept.dname}}</td>
        <td>{{dept.loc}}</td>
    </tr>
  </table>
</div>
</template>

<script>
// 引入axios
import axios from 'axios'
export default {
  name: "TestAxios",
  data(){
    return {
      deptList:null
    }
  },
  methods:{
    getInfo(){
      // axios.get('/api/dept').then(function(ret){
      //   console.log(ret)
      //   this.deptList = ret.data // 【有bug,因为this问题】
      // })
      axios.get('/api/dept').then((ret)=>{
        console.log(ret) // 【注意:这个返回值不一般】
          // 可以查看官网https://www.axios-http.cn/docs/res_schema
          this.deptList = ret.data.data
      })
    }
  }
}
</script>

<style scoped>
</style>
8.2.4 服务端解决跨域问题
SpringBoot的controller层类上添加@CrossOrigin注解即可
8.2.5 BUG
在axios的回调中,无法使用this.数据 获得vuedata中的数据
造成axios取不到值得原因主要是this回调问题。当执行完函数function时,this指向放生变化。导致this指向函数体本身。这时this.data里的数据取不到。
简单直接的解决就是把function写成箭头函数形式,箭头函数不是构造函数,不会指定this,而是抓取上下文this作为自己的this
8.3 其他api演示
可以查看官网请求配置 | Axios 中文文档 | Axios 中文网 (axios-http.cn)
也可以看示例
<!-- get请求(1) 路径拼接参数 -->
axios.get('http://localhost:8080/vue/user?id=456').then(function(ret){
    console.log(ret.data);
})

<!-- get请求(2) Restful风格参数 -->
axios.get('http://localhost:8080/vue/user/123').then(function(ret){
    console.log(ret.data.);
})

<!-- get请求(3) 使用params传递参数 -->
axios.get('http://localhost:8080/vue/user',{
    params:{
        id:20001
    }
}).then(function(ret){
    console.log(ret.data);
})
<!-- post请求,发送的是json,后台需要使用@RequestBody -->
axios.post('http://localhost:8080/vue/user/json',{
    username:'张三',
    password:'987654'
}).then(function(ret){
    console.log(ret.data);
})
<!-- put请求 -->
axios.put('http://localhost:8080/vue/user/form',{
    username:'张三丰',
    password:'11111'
}).then(function(ret){
    console.log(ret.data);
}).catch(function (err){
   console.log(err)
})
8.4 Axios的响应
8.5 axios的全局配置
8.6 响应拦截
附录
对象展开运算符
对象展开运算符 ...(也称为扩展运算符)是一种用于展开对象或数组的语法,它允许将一个对象或数组拆分成单独的元素,并在其他对象或数组中使用。
在 JavaScript 中,... 运算符可以用在多种场景中,下面分别介绍它们的用法。
-
展开对象:
可以使用对象展开运算符...来创建一个新对象,并将另一个对象中的属性和值复制到新对象中。这可以用于对象浅拷贝或对象合并。示例:
const obj1 = { name: 'John', age: 30 }; const obj2 = { ...obj1, city: 'New York' }; console.log(obj2); // 输出:{ name: 'John', age: 30, city: 'New York' } -
合并对象:
将多个对象合并成一个新对象的简便方法。如果有相同的属性,后面的对象的属性值会覆盖前面的对象的属性值。示例:
const obj1 = { name: 'John', age: 30 }; const obj2 = { city: 'New York' }; const obj3 = { ...obj1, ...obj2 }; console.log(obj3); // 输出:{ name: 'John', age: 30, city: 'New York' } -
展开数组:
在数组中使用...可以将一个数组展开为独立的元素,可以用于创建一个新数组或者在函数调用时传递参数。示例:
const arr1 = [1, 2, 3];
const arr2 = [...arr1, 4, 5];

console.log(arr2);
// 输出:[1, 2, 3, 4, 5]
const arr = [1, 2, 3]; someFunction(...arr); // 将数组中的元素作为参数传递给函数
页面中使用axios发请求的时候
8.6 响应拦截
附录
对象展开运算符
对象展开运算符 ...(也称为扩展运算符)是一种用于展开对象或数组的语法,它允许将一个对象或数组拆分成单独的元素,并在其他对象或数组中使用。
在 JavaScript 中,... 运算符可以用在多种场景中,下面分别介绍它们的用法。
-
展开对象:
可以使用对象展开运算符...来创建一个新对象,并将另一个对象中的属性和值复制到新对象中。这可以用于对象浅拷贝或对象合并。示例:
const obj1 = { name: 'John', age: 30 }; const obj2 = { ...obj1, city: 'New York' }; console.log(obj2); // 输出:{ name: 'John', age: 30, city: 'New York' } -
合并对象:
将多个对象合并成一个新对象的简便方法。如果有相同的属性,后面的对象的属性值会覆盖前面的对象的属性值。示例:
const obj1 = { name: 'John', age: 30 }; const obj2 = { city: 'New York' }; const obj3 = { ...obj1, ...obj2 }; console.log(obj3); // 输出:{ name: 'John', age: 30, city: 'New York' } -
展开数组:
在数组中使用...可以将一个数组展开为独立的元素,可以用于创建一个新数组或者在函数调用时传递参数。示例:
const arr1 = [1, 2, 3];
const arr2 = [...arr1, 4, 5];

console.log(arr2);
// 输出:[1, 2, 3, 4, 5]
const arr = [1, 2, 3]; someFunction(...arr); // 将数组中的元素作为参数传递给函数


