CSS基础
<head>
	<style>
		选择器{
			属性名:属性值;
			属性名:属性值;
		}
	</style>
</head>
<!DOCTYPE html>
<html lang="en">
<head>
	<meta charset="UTF-8">
	<title>Document</title>
	<style>
		p{
			color:red;
			background: #cccccc;
		}
		h2{
			color:blue;
		}
	</style>
</head>
<body>
	<p>CSS从入门到精通</p>
	<h2>主讲:hector</h2>
</body>
</html>
1、基础选择器
1.1 标签选择器
也称为元素选择器,使用HTML标签作为选择器的名称
以标签名作为样式应用的依据
1.2 类选择器
使用自定义的名称,以 . 号作为前缀,然后再通过HTML标签的class属性调用类选择器
以标签的class属性作为样式应用的依据
注意事项:
- 调用时不能添加 . 号 同时调用多个类选择器时,以 空格 分隔 类选择器名称不能以 数字 开头
1.3 ID选择器
使用自定义名称,以 # 作为前缀,然后通过HTML标签的id属性进行名称匹配
以标签的id属性作为样式应用的依据,一对一的关系
1.4优先级
行内样式>ID选择器>类选择器>标签选择器
原因:首先加载标签选择器,再加载类选择器,然后加载ID选择器,最后加载行内样式
后加载会覆盖先加载的同名样式
1.5内外部样式加载顺
就近原则
原因:按照书写顺序依次加载,在同优先级的前提下,后加载的会覆盖先加载的同名样式,所以离的越近
在这里插入代码片`<!DOCTYPE html>
<html lang="en">
<head>
	<meta charset="UTF-8">
	<title>Document</title>
	<link rel="stylesheet" type="text/css" href="style/world.css">

	<style>
		div{
			font-size:20px;
		}
		.hello{
			font-weight:bold;
			color:blue;
		}
		#world{
			text-decoration: underline;
			color:green;
		}
		p{
			color:red;
		}
	</style>
</head>
<body>
	<div class="hello" id="world" style="color:#ff7300">CSS从入门到精通</div>
<p>主讲:叽叽</p>
</body>
</html>
`
四、常用CSS属性


3.列表属性

4.表格属性
<!DOCTYPE html>
<html lang="en">
<head>
	<meta charset="UTF-8">
	<title>Document</title>
	<style>
		table{
			width:500px;
			border:1px solid blue;
			border-collapse:collapse;
		}
		td{
			border:1px solid blue;
		}
	</style>
</head>
<body>
	<!-- table>(tr>td{td$}*5)*4 -->
	<table cellspacing="0px"cellpadding="0px">
		<tr>
			<td>bbb</td>
			<td>aaa</td>
			<td>aaa</td>
			<td>td4</td>
			<td>td5</td>
		</tr>
		<tr>
			<td>aaa</td>
			<td>aaa</td>
			<td>bbb</td>
			<td>td4</td>
			<td>td5</td>
		</tr>
		<tr>
			<td>td1</td>
			<td>td2</td>
			<td>td3</td>
			<td>td4</td>
			<td>td5</td>
		</tr>
		<tr>
			<td>td1</td>
			<td>td2</td>
			<td>td3</td>
			<td>td4</td>
			<td>td5</td>
		</tr>
	</table>
</body>
</html>
盒子模型
2.1 border
表示盒子的边框
分为四个方向:
上top、右right、下bottom、左left
border-top、border-right、border-bottom、border-left
每个边框包含三种样式:
border-top-color、border-top-width、border-top-style
border-right-color、border-right-width、border-right-style
border-bottom-color、border-bottom-width、border-bottom-style
border-left-color、border-left-width、border-left-style
样式style的取值:
solid实线、dashed虚线、dotted点线、double双线、inset内嵌的3D线、outset外嵌的3D线
简写,三种方式:
按方向简写:
border-top、border-right、border-bottom、border-left
书写顺序:
border-顺序:width style color
按样式简写:
border-color、border-width、border-style
书写顺序:
border-样式:top right bottom left
必须按顺时针方向书写,同时可以缩写:
border-width:2px;--------->四个边框的宽度均为2px
border-width:1px 2px;
border-width:1px 2px 4px;
规则:如果省略,则认为上下一样,左右一样
终级简写:
如果四个边框样式完全相同,border:width style color;
2.2 padding
表示盒子的内边距,即内容与边框之间的距离
同样也分为四个方向,也可以简写(按顺时针方向,默认上下一样,左右一样)
注意:如果上下冲突,则以上为准,如果左右冲突,则以左为准
2.3 margin
表示盒子的外边距,即盒子与盒子之间的距离
同样也分为四个方向,也可以简写(按顺时针方向,默认上下一样,左右一样)
六、定位方式
1.简介
通过position属性实现对元素的定位,有四种定位方式
常用取值:
取值 含义 说明
static 默认值 按照常规文档流进行显示
relative 相对定位 相对于标签原来的位置进行的定位
absolute 绝对定位 相对于第一个非static定位的父标签的定位
fixed 固定定位 相对于浏览器窗品进行定位
设置定位方式后,还要设置定位属性(偏移量):top、bottom、left、right
2.相对定位
先设置元素的position属性为relative,然后再设置偏移量
3.绝对定位
先设置父标签为非static定位,然后设置元素的position属性为absolute,最后再设置偏移量
注意:
一般来说都会将父标签设置为非static定位
如果父标签不是非static定位,则会相对于浏览器窗口进行定位
设置元素为绝对定位后,元素会浮到页面上方
4.固定定位
先设置元素的position属性为fixed,然后再设置偏移量
设置元素为固定定位后,元素会浮动在面面上方
5.z-index
设置元素定位方式后,元素会浮在页面上方,此时可以通过z-index属性设置优先级,控制元素的堆叠顺序
取值为数字,值越大优先级越高,默认为auto(大多数浏览器默认为0)
注意:只能给非static定位的元素设置z-index属性
四、其他CSS属性
1.浮动和清除
1.1 浮动属性
通过float属性来实现元素的浮动,可以让块级元素脱离常规的文档流,向左或向右移动,在同一行显示,
如果一行显示不下,则会换行显示
常用取值:
- left左浮动
- right右浮动
- none不浮动,默认值
设置float属性后,元素会浮在页面上层,此时父容器无法计算自己尺寸,如果我们还想显示父容器通常会在末尾添加一个清除了float属性的空的div来解决
<!DOCTYPE html>
<html lang="en">
<head>
	<meta charset="UTF-8">
	<title>Document</title>
	<style>
		#container{
			/* width:800px; */
			border:1px solid #000000;
		}
		.div1,.div2,.div3,.div4{
			width:100px;
			height:50px;
		}
		.div1{
			background:red;
			float:left;
		}
		.div2{
			background:blue;
			float:left;
		}
		.div3{
			background:green;
			float:left;
		}
		.div4{
			background:cyan;
			float:left;
		}
		.clr{
			clear:left;
		}
	</style>
</head>
<body>
	<div id="container">
		<div class="div1">div1</div>
		<div class="div2">div2</div>
		<div class="div3">div3</div>
		<div class="div4">div4</div>
		<div class="clr"></div>
	</div>
	aaa
</body>
</html>

2.元素的显示和隐藏
2.1 display
通过display属性设置元素是否显示,以及是否独占一行
常用取值:

布局
<!DOCTYPE html>
<html lang="en">
<head>
	<meta charset="UTF-8">
	<title>Document</title>
	<link rel="stylesheet" href="css/style1.css">
</head>
<body>
	<div id="container">
		<header class="header">
			header
		</header>
		<article class="main">
			main
		</article>
		<footer class="footer">
			footer
		</footer>
	</div>
</body>
</html>

<!DOCTYPE html>
<html lang="en">
<head>
	<meta charset="UTF-8">
	<title>Document</title>
	 <link rel="stylesheet" href="css/style2.css">
</head>
<body>
	<div id="container">
		<header class="header">
			herder
		</header>
		<article class="wrapper">
			<section>
				main
			</section>
			<aside>
				right aside
			</aside>
		</article>
		<footer class="footer">
			footer
		</footer>
	</div>
</body>
</html>

<!DOCTYPE html>
<html lang="en">
<head>
	<meta charset="UTF-8">
	<title>Document</title>
	<link rel="stylesheet" href="css/style4.css">
</head>
<body>
	<div id="container">
		<header class="header">
            header
        </header>
		<article class="wrapper">
			<section class="main">
				main
			</section>
			<aside class="left">
				left
			</aside>
			<aside class="right">
				right
			</aside>
		</article>
		<footer class="footer">
            footer
        </footer>
    </div>
</body>
</html>

2.1 圆角边框 border-radius(重点)

2.2 盒子阴影 box-shadow(重点)
h-shadow: 越大越往右;
v-shadow: 越大越往下;
blur: 越大越模糊;
spread: 越大阴影越大。

2.4 CSS3 新增选择器
① 属性选择器
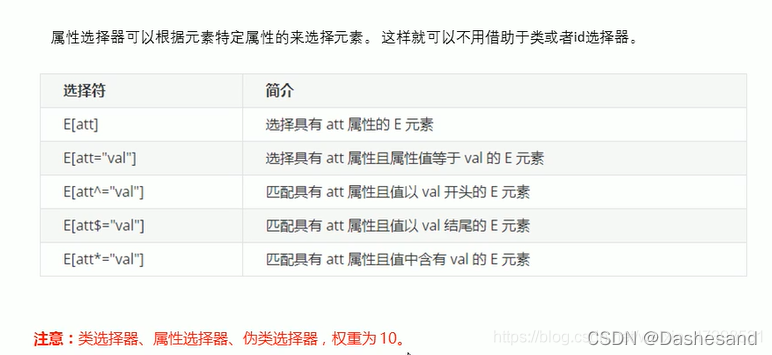
<!DOCTYPE html>
<html lang="en">
<head>
<meta charset="UTF-8">
<meta name="viewport" content="width=device-width, initial-scale=1.0">
<title>新增选择器</title>
<style>
input[value] {
color: pink;
}
input[type=text] {
color: red;
}
/* 选择div中具有class的属性值以icon开头的元素 */
div[class^=icon] {
color: seagreen;
}
/* 选择div中具有class的属性值以data结尾的元素 */
section[class$=data] {
color: blue;
}
</style>
</head>
<body>
<!-- 1.利用属性选择器就可以不用借助于类或者id选择器 -->
<!-- <input type="text" value="请输入用户名">
<input type="text"> -->
<!-- 2.属性选择器可以选择属性=值的某些属性 -->
<input type="text">
<input type="password">
<!-- 3.属性选择器可以选择属性值开头的某些元素 -->
<div class="icon1">小图标1</div>
<div class="icon2">小图标2</div>
<div class="icon3">小图标3</div>
<div class="icon4">小图标4</div>
<div>我是打酱油的</div>
<!-- 3.属性选择器可以选择属性值开结尾的某些元素 -->
<section class="icon1-data">五</section>
<section class="icon2-data">四</section>
<section class="icon3-data">三</section>
</body>
</html>


<head>
    <meta charset="UTF-8">
    <meta name="viewport" content="width=device-width, initial-scale=1.0">
    <title>css3过渡</title>
    <style>
        div {
            width: 200px;
            height: 100px;
            background-color: pink;
            /* transition: 要过渡的属性  花费时间 运动曲线 何时开始 */
            /* 如果想写多个属性利用逗号进行隔开 */
            /* 如果想要所有属性都变写个all就行了 */
            transition: width 1s, height 1s;
            /* transition: all 1s; */
        }

        div:hover {
            width: 300px;
            height: 300px;
        }
    </style>
</head>

<body>
    <div></div>
</body>
<head>
    <meta charset="UTF-8">
    <meta name="viewport" content="width=device-width, initial-scale=1.0">
    <title>进度条</title>
    <style>
        .bar {
            overflow: hidden;
            width: 150px;
            height: 15px;
            border: 1px solid red;
            border-radius: 8px;
        }

        .bar_in {
            width: 50%;
            height: 100%;
            background-color: red;
            transition: width 1s;
        }

        .bar:hover .bar_in {
            width: 100%;
        }
    </style>
</head>

<body>
    <div class="bar">
        <div class="bar_in"></div>
    </div>
</body>


