前言
文章连载中
######采用pacemaker+haproxy的模式实现高可用,pacemaker提供资源管理及VIP(虚拟IP),haproxy提供方向代理及负载均衡
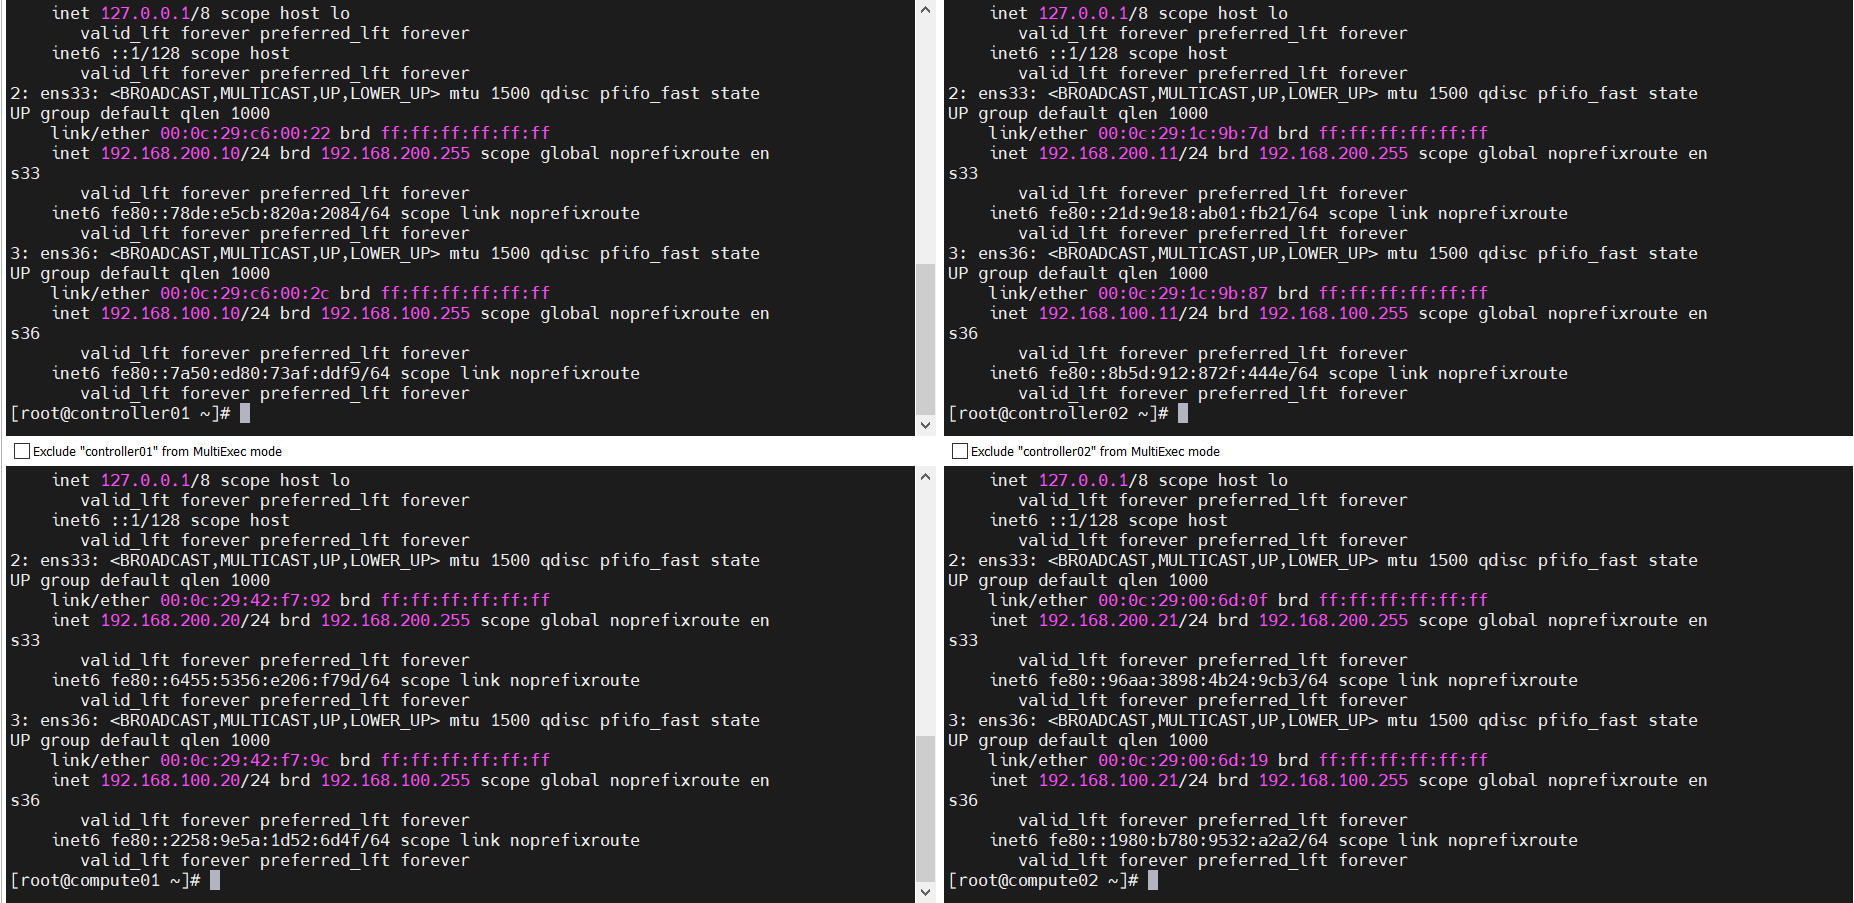
节点规划
| 节点 | IP | 配置 |
|---|---|---|
| controller01 | NAT:192.168.200.10 | |
| 仅主机:192.168.100.10 | ||
| controller02 | NAT:192.168.200.11 | |
| 仅主机:192.168.100.11 | ||
| compute01 | NAT:192.168.200.20 | |
| 仅主机:192.168.100.20 | ||
| compute02 | NAT:192.168.200.21 | |
| 仅主机:192.168.100.21 | ||
| VIP | 192.168.100.100 |
组件表
| controller01 | controller02 | compute01 | compute02 |
|---|---|---|---|
| mariadb | mariadb | ||
密码表
| 服务 | 用户:密码 | 备注 |
|---|---|---|
| mariadb | root:000000 | |
| rabbitmq-server | openstack:000000 | |
| pcs | hacluster:000000 | https://192.168.100.10:2224/login |
一、基本环境配置
#网络环境自行配置,不详细列出,问题可参考“问题与解决”
#设置对应节点的用户名
hostnamectl set-hostname controller01
hostnamectl set-hostname controller02
hostnamectl set-hostname compute01
hostnamectl set-hostname compute02
#关闭所有节点的防火墙和selinux
systemctl stop firewalld
systemctl disable firewalld
sed -i 's\SELINUX=enforcing\SELINUX=disable\' /etc/selinux/config
setenforce 0
yum install vim wget net-tools lsof -y
#配置hosts
cat >> /etc/hosts <<EOF
192.168.100.10 controller01
192.168.100.11 controller02
192.168.100.20 compute01
192.168.100.21 compute02
EOF
#将hosts文件远程复制给其他设备,这里因为要输入密码,不能全部复制粘贴,需要一条一条复制
scp /etc/hosts root@192.168.100.11:/etc/hosts
scp /etc/hosts root@192.168.100.20:/etc/hosts
scp /etc/hosts root@192.168.100.21:/etc/hosts
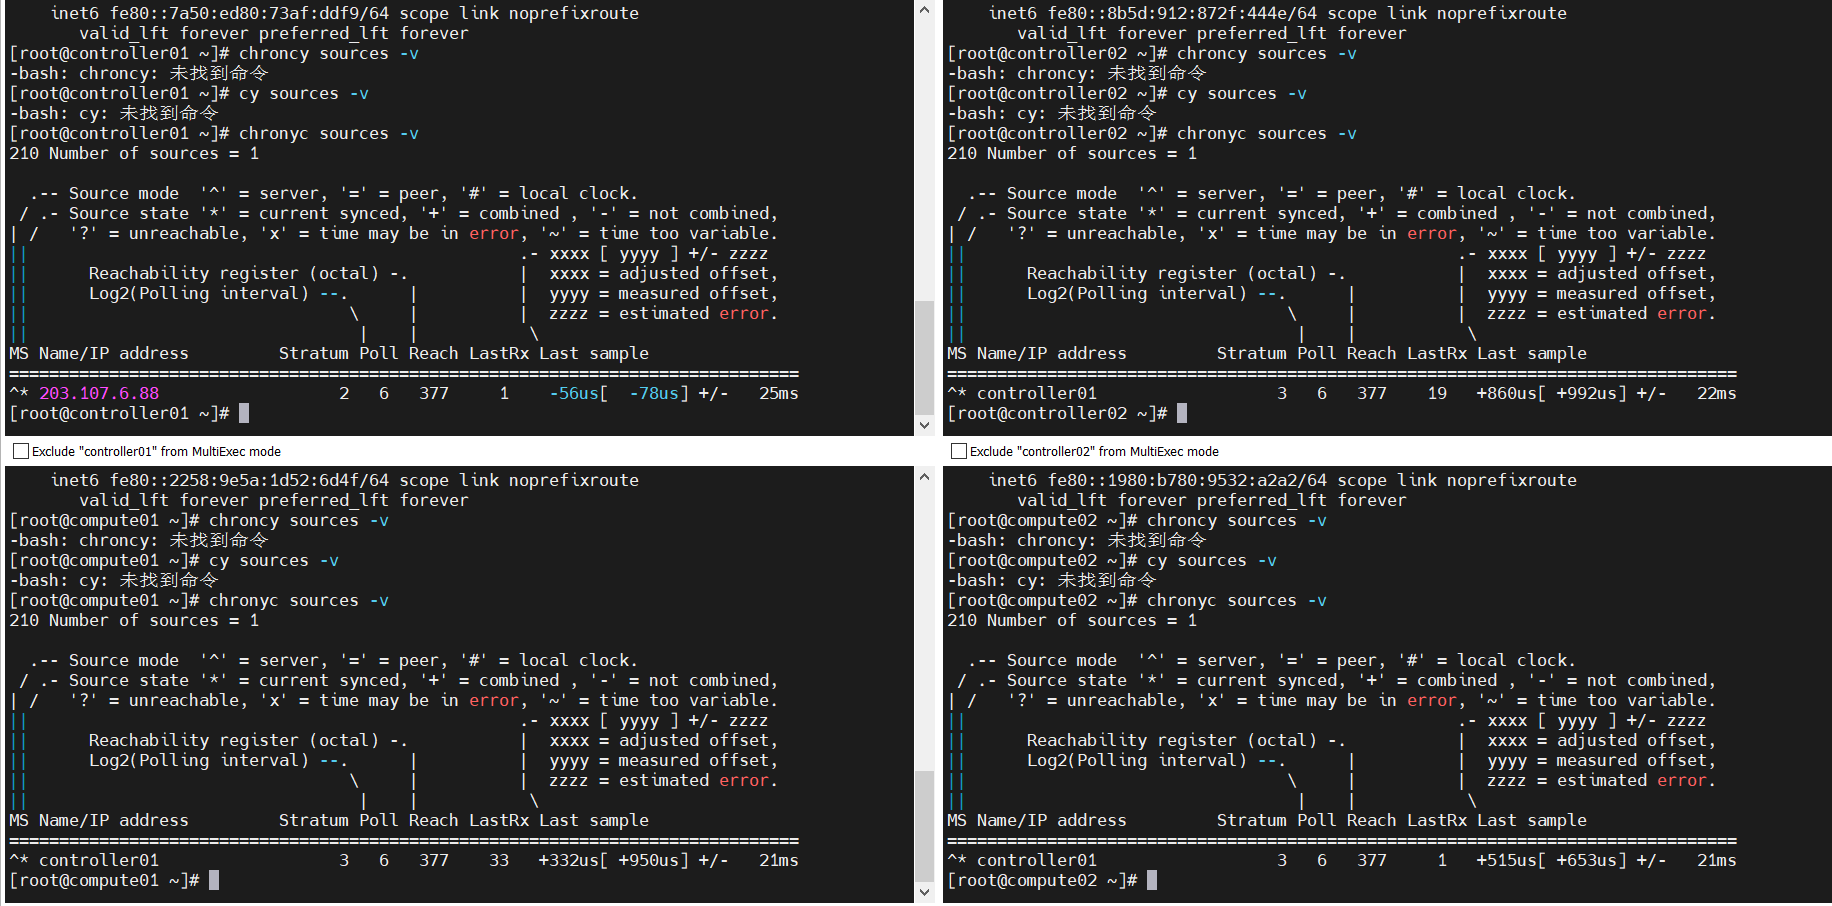
#设置时间同步,设置controller01节点做时间同步服务器
yum install chrony -y
sed -i '3,6d' /etc/chrony.conf
sed -i '3a\server ntp3.aliyun.com iburst\' /etc/chrony.conf
sed -i 's\#allow.*\allow all\' /etc/chrony.conf
sed -i 's\#local stratum 10\local stratum 10\' /etc/chrony.conf
systemctl enable chronyd.service
systemctl restart chronyd.service
#其他节点同步controller01的时间
yum install chrony -y
sed -i '3,6d' /etc/chrony.conf
sed -i '3a\server controller01 iburst\' /etc/chrony.conf
systemctl restart chronyd.service
systemctl enable chronyd.service
chronyc sources -v
#内核参数优化,在控制节点上添加,
modprobe br_netfilter
echo 'net.ipv4.ip_forward = 1' >>/etc/sysctl.conf
echo 'net.bridge.bridge-nf-call-iptables = 1' >>/etc/sysctl.conf
echo 'net.bridge.bridge-nf-call-ip6tables = 1' >>/etc/sysctl.conf
echo 'net.ipv4.ip_nonlocal_bind = 1' >>/etc/sysctl.conf
sysctl -p
#所有节点下载Train版的软件包
yum install centos-release-openstack-train -y
yum upgrade
yum clean all
yum makecache
yum install python-openstackclient -y
yum install openstack-utils -y
成功截图:
二、MariaDB双主高可用配置MySQL-HA
controller01和controller02节点的数据库 设置互为主从
2.1、安装数据库
#所有的controller安装数据库#安装一些必备软件
yum install mariadb mariadb-server python2-PyMySQL -y
systemctl restart mariadb.service
systemctl enable mariadb.service
yum -y install gcc gcc-c++ gcc-g77 ncurses-devel bison libaio-devel cmake libnl* libpopt* popt-static openssl-devel
2.2、设置controller01为主controller02为从
初始化mariadb,在全部控制节点初始化数据库密码
######全部controller#####
mysql_secure_installation


#输入root用户的当前密码(不输入密码)
Enter current password for root (enter for none):
#设置root密码?
Set root password? [Y/n] y
#新密码:
New password:
#重新输入新的密码:
Re-enter new password:
#删除匿名用户?
Remove anonymous users? [Y/n] y
#禁止远程root登录?
Disallow root login remotely? [Y/n] n
#删除测试数据库并访问它?
Remove test database and access to it? [Y/n] y
#现在重新加载特权表?
Reload privilege tables now? [Y/n] y
修改mariadb配置文件
在全部控制节点修改配置文件/etc/my.cnf
######controller01######
确保/etc/my.cnf中有如下参数,没有的话需手工添加,并重启mysql服务。
[mysqld]
log-bin=mysql-bin #启动二进制文件
server-id=1 #服务器ID(两个节点的ID不能一样)
systemctl restart mariadb
mysql -uroot -p000000
#创建一个用户用于同步数据
grant replication slave on *.* to 'backup'@'%' identified by 'backup'; flush privileges;
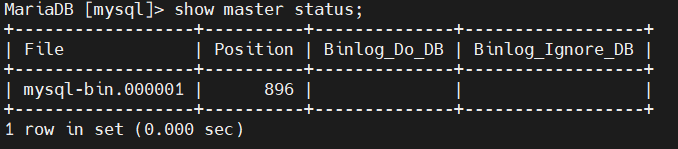
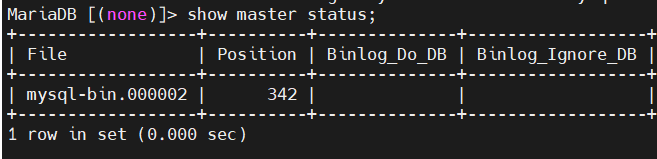
#查看master的状态,记录下File和Position然后在controller02上面设置从controller01同步需要使用。
show master status;
######配置controller02######
确保/etc/my.cnf中有如下参数,没有的话需手工添加,并重启mysql服务。
[mysqld]
log-bin=mysql-bin #启动二进制文件
server-id=2 #服务器ID(两个节点的ID不能一样)
systemctl restart mariadb
mysql -uroot -p000000
#创建一个用户用于同步数据
grant replication slave on *.* to 'backup'@'%' identified by 'backup'; flush privileges;
#查看master的状态,记录下File和Position然后在controller02上面设置从controller01同步需要使用。
show master status;
#设置controller02以01为主进行数据库同步,,master_log_file='mysql-bin.000001',master_log_pos=639;是上图查到的信息
change master to master_host='192.168.100.10',master_user='backup',master_password='backup',master_log_file='mysql-bin.000001',master_log_pos=896;
exit; #退出数据库
systemctl restart mariadb #重启数据库
mysql -uroot -p000000
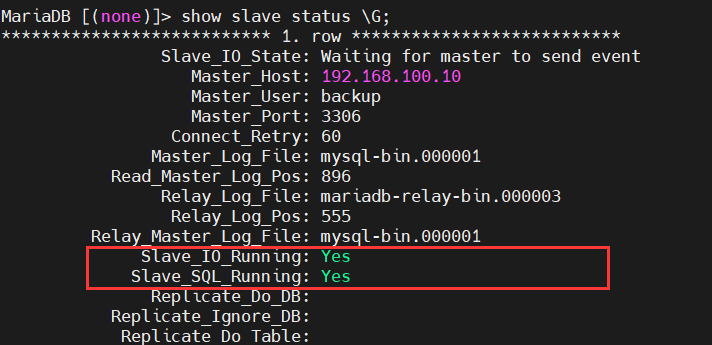
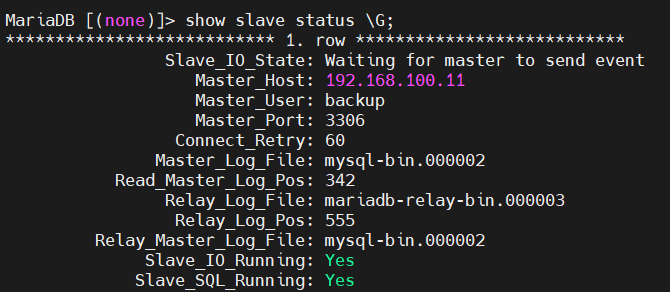
show slave status \G; #查看数据库的状态
//Slave_IO_Running: Yes
//Slave_SQL_Running: Yes
#两项都显示Yes时说明从controller02同步数据成功。
#至此controller01为主controller02为从的主从架构数据设置成功!
2.3、设置controller02为主controller01为从。
######controller02######
进入数据库查看数据库的状态
mysql -uroot -p000000;
show master status;
######controller01######
#设置controller01和controller02互为主从(即双master)
mysql -uroot -p000000;
change master to master_host='192.168.100.11',master_user='backup',master_password='backup',master_log_file='mysql-bin.000002',master_log_pos=342;
#master_log_file='mysql-bin.000002',master_log_pos=342;填上图所示信息
exit;

######controller01#######
#重启数据库#查看数据库的状态
systemctl restart mariadb
mysql -uroot -p000000
show slave status \G;
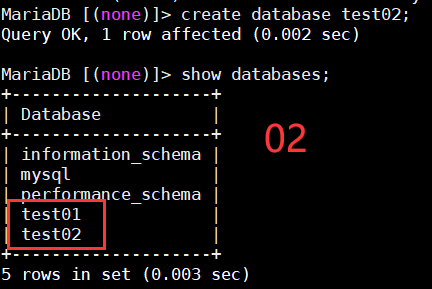
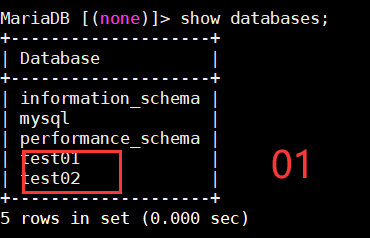
2.4、测试同步(自行测试)
三、RabbitMQ集群(控制节点)
#####全部controller节点######
yum install erlang rabbitmq-server python-memcached -y
systemctl enable rabbitmq-server.service
#####controller01#####
systemctl start rabbitmq-server.service
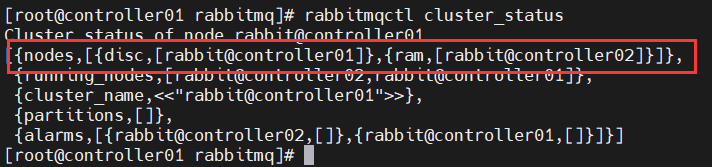
rabbitmqctl cluster_status
scp /var/lib/rabbitmq/.erlang.cookie controller02:/var/lib/rabbitmq/
#####controller02######
#修改controller02节点.erlang.cookie文件的用户/组
chown rabbitmq:rabbitmq /var/lib/rabbitmq/.erlang.cookie
#启动controller02节点的rabbitmq服务
systemctl start rabbitmq-server
#构建集群,controller02节点以ram节点的形式加入集群
rabbitmqctl stop_app
rabbitmqctl join_cluster --ram rabbit@controller01
rabbitmqctl start_app
#查询集群状态
rabbitmqctl cluster_status
#####controller01#####
# 在任意节点新建账号并设置密码,以controller01节点为例
rabbitmqctl add_user openstack 000000
rabbitmqctl set_user_tags openstack administrator
rabbitmqctl set_permissions -p "/" openstack ".*" ".*" ".*"
#设置消息队列的高可用
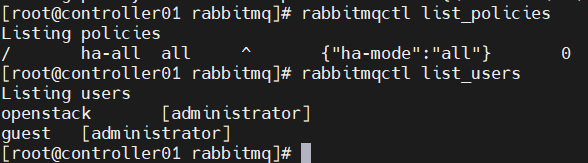
rabbitmqctl set_policy ha-all "^" '{"ha-mode":"all"}'
#查看消息队列策略
rabbitmqctl list_policies
四、Memcached(控制节点)
#####全部控制节点
#安装memcache的软件包
yum install memcached python-memcached -y

#设置本地监听
#controller01
sed -i 's\OPTIONS="-l 127.0.0.1,::1"\OPTIONS="-l 127.0.0.1,::1,controller01"\' /etc/sysconfig/memcached
sed -i 's\CACHESIZE="64"\CACHESIZE="1024"\' /etc/sysconfig/memcached

#controller02
sed -i 's\OPTIONS="-l 127.0.0.1,::1"\OPTIONS="-l 127.0.0.1,::1,controller02"\' /etc/sysconfig/memcached
sed -i 's\CACHESIZE="64"\CACHESIZE="1024"\' /etc/sysconfig/memcached


#开机自启(所有controller节点)
systemctl enable memcached.service
systemctl start memcached.service
systemctl status memcached.service
五、Etcd集群(控制节点)
#####所有controller节点#####
yum install -y etcd
cp -a /etc/etcd/etcd.conf{,.bak}		//备份配置文件

####controller01#####
cat > /etc/etcd/etcd.conf <<EOF
[Member]
ETCD_DATA_DIR="/var/lib/etcd/default.etcd"
ETCD_LISTEN_PEER_URLS="http://0.0.0.0:2380"
ETCD_LISTEN_CLIENT_URLS="http://192.168.100.10:2379,http://127.0.0.1:2379"
ETCD_NAME="controller01"
[Clustering]
ETCD_INITIAL_ADVERTISE_PEER_URLS="http://192.168.100.10:2380"
ETCD_ADVERTISE_CLIENT_URLS="http://192.168.100.10:2379"
ETCD_INITIAL_CLUSTER="controller01=http://192.168.100.10:2380,controller02=http://192.168.100.11:2380"
ETCD_INITIAL_CLUSTER_TOKEN="etcd-cluster-01"
ETCD_INITIAL_CLUSTER_STATE="new"
EOF


#####controller02#####
cat > /etc/etcd/etcd.conf <<EOF
[Member]
ETCD_DATA_DIR="/var/lib/etcd/default.etcd"
ETCD_LISTEN_PEER_URLS="http://0.0.0.0:2380"
ETCD_LISTEN_CLIENT_URLS="http://192.168.100.11:2379,http://127.0.0.1:2379"
ETCD_NAME="controller02"
[Clustering]
ETCD_INITIAL_ADVERTISE_PEER_URLS="http://192.168.100.11:2380"
ETCD_ADVERTISE_CLIENT_URLS="http://192.168.100.11:2379"
ETCD_INITIAL_CLUSTER="controller01=http://192.168.100.10:2380,controller02=http://192.168.100.11:2380"
ETCD_INITIAL_CLUSTER_TOKEN="etcd-cluster-01"
ETCD_INITIAL_CLUSTER_STATE="new"
EOF


#####controller01######
#修改etcd.service
vim /usr/lib/systemd/system/etcd.service
#修改成以下

[Service]
Type=notify
WorkingDirectory=/var/lib/etcd/
EnvironmentFile=-/etc/etcd/etcd.conf
User=etcd
# set GOMAXPROCS to number of processors
ExecStart=/bin/bash -c "GOMAXPROCS=$(nproc) /usr/bin/etcd \
--name=\"${ETCD_NAME}\" \
--data-dir=\"${ETCD_DATA_DIR}\" \
--listen-peer-urls=\"${ETCD_LISTEN_PEER_URLS}\" \
--listen-client-urls=\"${ETCD_LISTEN_CLIENT_URLS}\" \
--initial-advertise-peer-urls=\"${ETCD_INITIAL_ADVERTISE_PEER_URLS}\" \
--advertise-client-urls=\"${ETCD_ADVERTISE_CLIENT_URLS}\" \
--initial-cluster=\"${ETCD_INITIAL_CLUSTER}\"  \
--initial-cluster-token=\"${ETCD_INITIAL_CLUSTER_TOKEN}\" \
--initial-cluster-state=\"${ETCD_INITIAL_CLUSTER_STATE}\""
Restart=on-failure
LimitNOFILE=65536


#拷贝该配置文件到controller02
scp -rp /usr/lib/systemd/system/etcd.service controller02:/usr/lib/systemd/system/

#####全部controller#####
#设置开机自启
#######同时启动#######
systemctl enable etcd
systemctl restart etcd
systemctl status etcd

#验证
etcdctl cluster-health
etcdctl member list

六、使用开源的pacemaker cluster stack做为集群高可用资源管理软件
#####所有controller#####
yum install pacemaker pcs corosync fence-agents resource-agents -y
#启动pcs服务
systemctl enable pcsd
systemctl start pcsd
#修改集群管理员hacluster密码
echo 000000 | passwd --stdin hacluster
######(controller01)#######
#认证操作
#节点认证,组建集群,需要采用上一步设置的password
pcs cluster auth controller01 controller02 -u hacluster -p 000000 --force
#创建并命名集群,
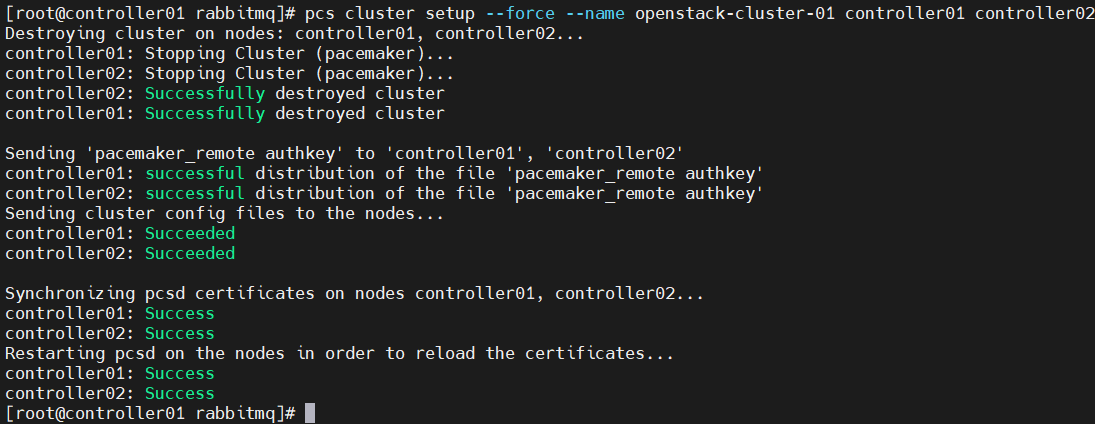
pcs cluster setup --force --name openstack-cluster-01 controller01 controller02
pacemaker集群启动
#####controller01#####
pcs cluster start --all
pcs cluster enable --all
#命令记录
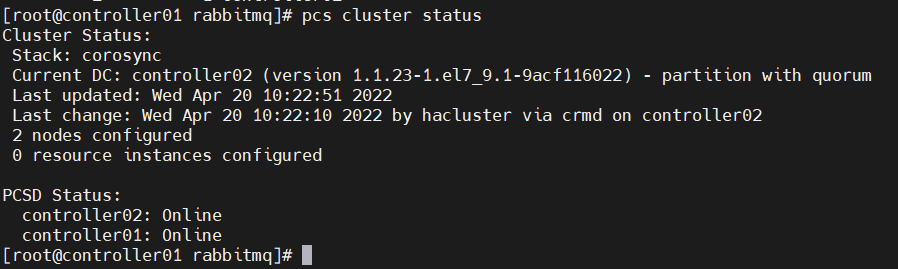
pcs cluster status //查看集群状态
pcs status corosync //corosync表示一种底层状态等信息的同步方式
corosync-cmapctl | grep members //查看节点
pcs resource //查看资源
设置高可用属性
#####controller01#####
#设置合适的输入处理历史记录及策略引擎生成的错误与警告
pcs property set pe-warn-series-max=1000 \
pe-input-series-max=1000 \
pe-error-series-max=1000

#cluster-recheck-interval默认定义某些pacemaker操作发生的事件间隔为15min,建议设置为5min或3min
pcs property set cluster-recheck-interval=5
pcs property set stonith-enabled=false


#因为资源问题本次只采用了两控制节点搭建,无法仲裁,需忽略法定人数策略
pcs property set no-quorum-policy=ignore
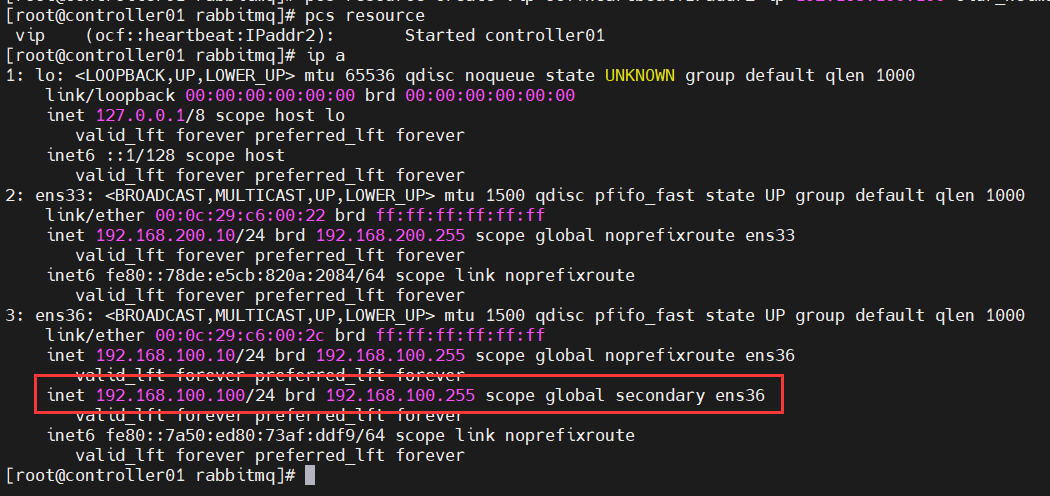
配置 vip
#####controller01#####
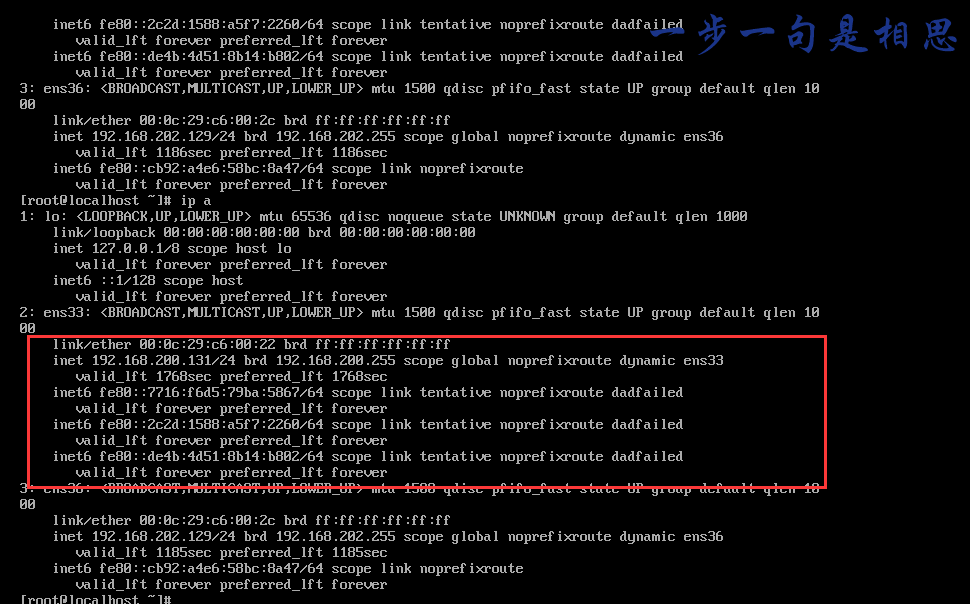
pcs resource create vip ocf:heartbeat:IPaddr2 ip=192.168.100.100 cidr_netmask=24 op monitor interval=30s
#查看集群资源和生成的VIP情况
pcs resource
ip a
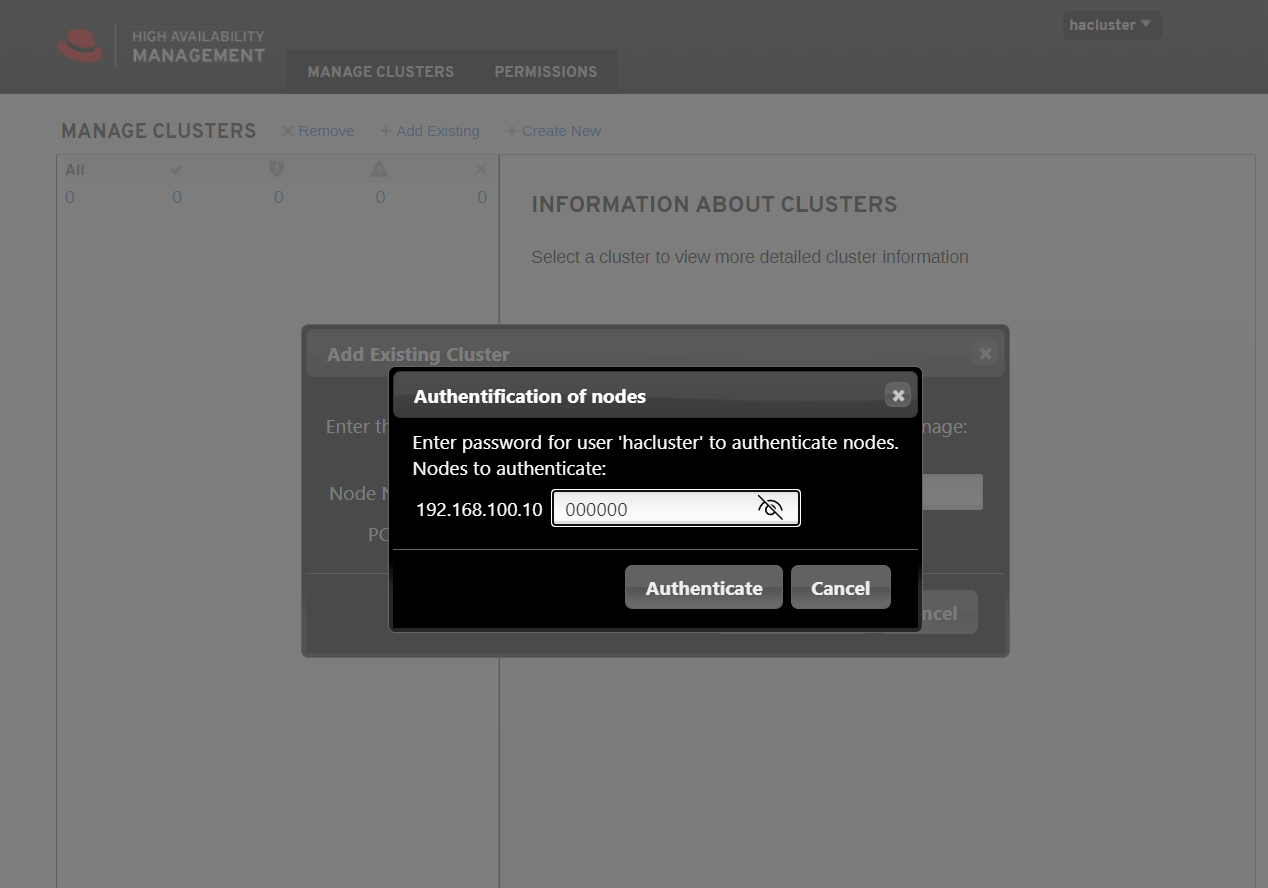
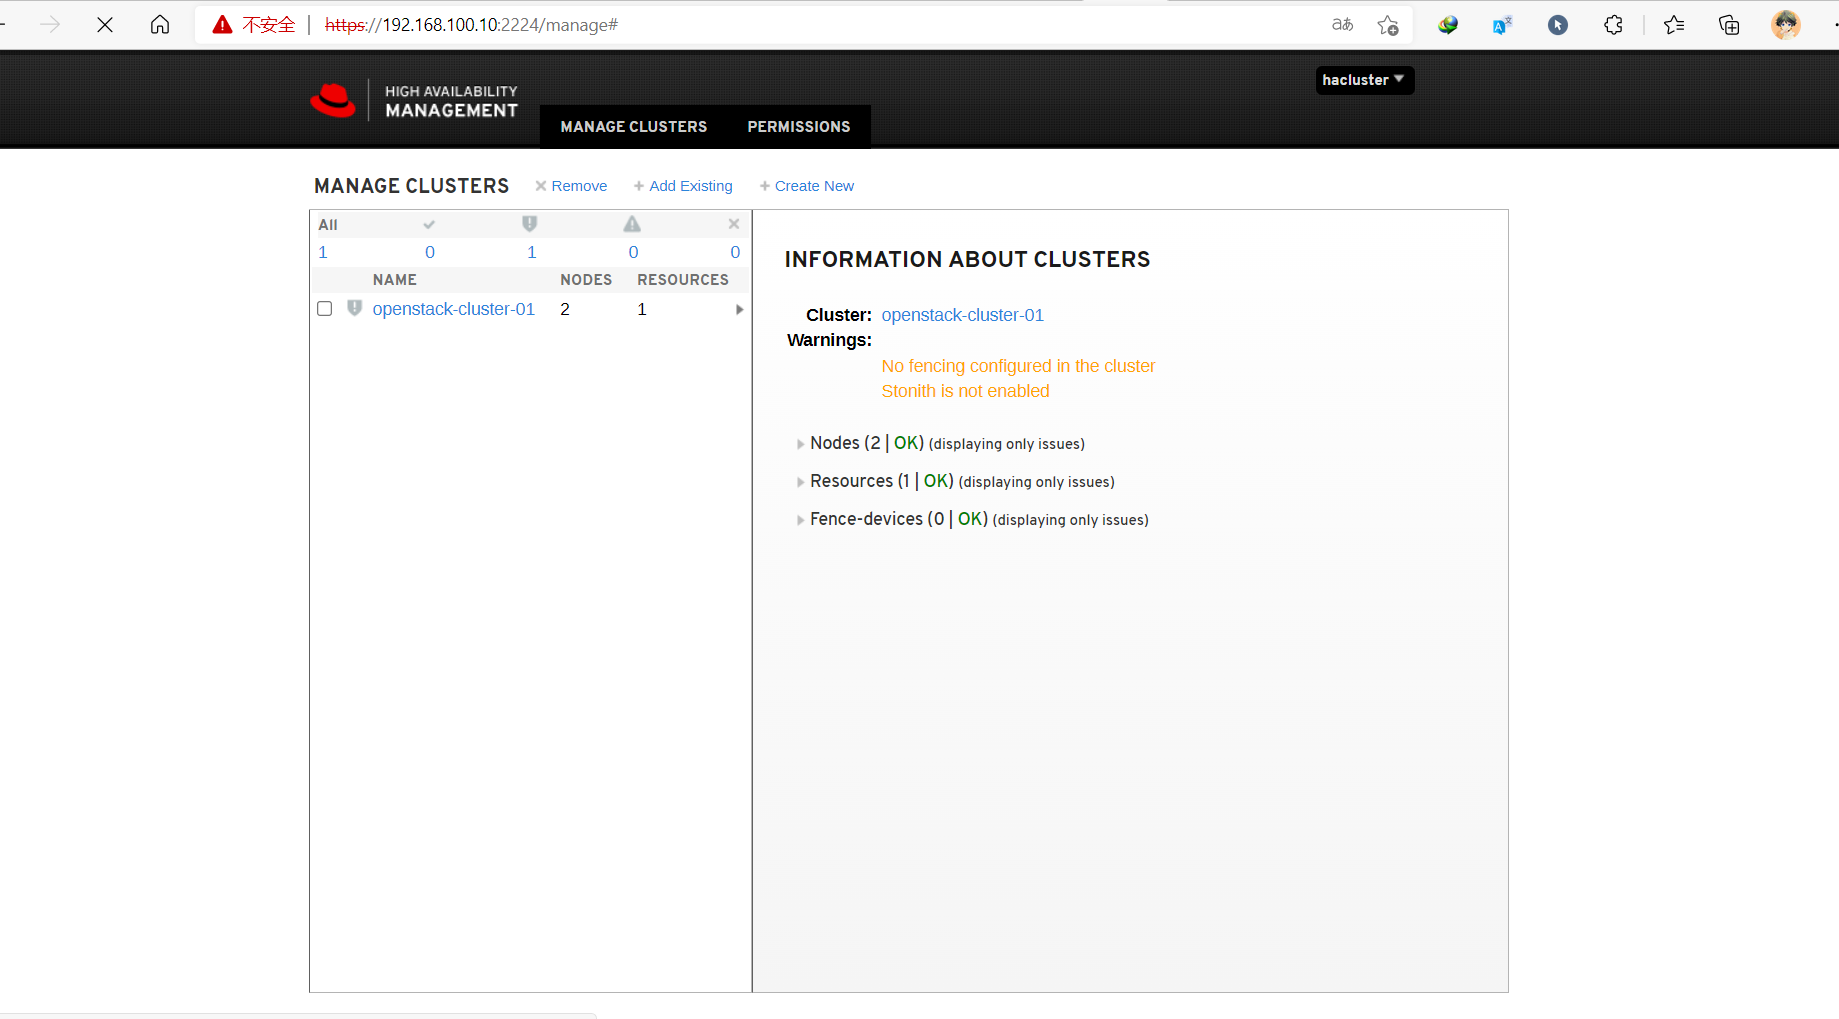
高可用性管理
通过web访问任意控制节点:https://192.168.100.10:2224,账号/密码(即构建集群时生成的密码):hacluster/000000。虽然以命令行的方式设置了集群,但web界面默认并不显示,手动添加集群,实际操作只需要添加已组建集群的任意节点即可,如下
七、部署Haproxy
#####全部controller#####
yum install haproxy -y
#开启日志功能
mkdir /var/log/haproxy
chmod a+w /var/log/haproxy

#编辑配置文件
vim /etc/rsyslog.conf

#取消以下注释:
15 $ModLoad imudp
16 $UDPServerRun 514
19 $ModLoad imtcp
20 $InputTCPServerRun 514

#在文件最后添加haproxy配置日志
local0.=info    -/var/log/haproxy/haproxy-info.log
local0.=err     -/var/log/haproxy/haproxy-err.log
local0.notice;local0.!=err      -/var/log/haproxy/haproxy-notice.log

#重启rsyslog
systemctl restart rsyslog
#####全部controller节点#####
#备份配置文件
cp /etc/haproxy/haproxy.cfg /etc/haproxy/haproxy.cfg.bak

vim /etc/haproxy/haproxy.cfg
global
  log      127.0.0.1     local0
  chroot   /var/lib/haproxy
  daemon
  group    haproxy
  user     haproxy
  maxconn  4000
  pidfile  /var/run/haproxy.pid
  stats    socket /var/lib/haproxy/stats

defaults
mode                    http
log                     global
option                  httplog
option                  dontlognull
option http-server-close
option forwardfor       except 127.0.0.0/8
option                  redispatch
retries                 3
timeout http-request    10s
timeout queue           1m
timeout connect         10s
timeout client          1m
timeout server          1m
timeout http-keep-alive 10s
timeout check           10s
maxconn                 4000


#haproxy监控页
listen stats
    bind 0.0.0.0:1080
    mode http
    stats enable
    stats uri /
    stats realm OpenStack\ Haproxy
    stats auth admin:admin
    stats  refresh 30s
    stats  show-node
    stats  show-legends
    stats  hide-version


#horizon服务
listen dashboard_cluster
    bind  192.168.100.100:80
    balance  source
    option  tcpka
    option  httpchk
    option  tcplog
    server controller01 192.168.100.10:80 check inter 2000 rise 2 fall 5
    server controller02 192.168.100.11:80 check inter 2000 rise 2 fall 5


#为rabbirmq提供ha集群访问端口,供openstack各服务访问;
#如果openstack各服务直接连接rabbitmq集群,这里可不设置rabbitmq的负载均衡
listen rabbitmq_cluster
    bind 192.168.100.100:5673
    mode tcp
    option tcpka
    balance roundrobin
    timeout client  3h
    timeout server  3h
    option  clitcpka
    server controller01 192.168.100.10:5672 check inter 10s rise 2 fall 5
    server controller02 192.168.100.11:5672 check inter 10s rise 2 fall 5


#glance_api服务
listen glance_api_cluster
    bind  192.168.100.100:9292
    balance  source
    option  tcpka
    option  httpchk
    option  tcplog
    timeout client 3h
    timeout server 3h
    server controller01 192.168.100.10:9292 check inter 2000 rise 2 fall 5
    server controller02 192.168.100.11:9292 check inter 2000 rise 2 fall 5


#keystone_public _api服务
listen keystone_public_cluster
    bind 192.168.100.100:5000
    balance  source
    option  tcpka
    option  httpchk
    option  tcplog
    server controller01 192.168.100.10:5000 check inter 2000 rise 2 fall 5
    server controller02 192.168.100.11:5000 check inter 2000 rise 2 fall 5


listen nova_compute_api_cluster
    bind 192.168.100.100:8774
    balance  source
    option  tcpka
    option  httpchk
    option  tcplog
    server controller01 192.168.100.10:8774 check inter 2000 rise 2 fall 5
    server controller02 192.168.100.11:8774 check inter 2000 rise 2 fall 5


listen nova_placement_cluster
    bind 192.168.100.100:8778
    balance  source
    option  tcpka
    option  tcplog
    server controller01 192.168.100.10:8778 check inter 2000 rise 2 fall 5
    server controller02 192.168.100.11:8778 check inter 2000 rise 2 fall 5

listen nova_metadata_api_cluster
    bind 192.168.100.100:8775
    balance  source
    option  tcpka
    option  tcplog
    server controller01 192.168.100.10:8775 check inter 2000 rise 2 fall 5
    server controller02 192.168.100.11:8775 check inter 2000 rise 2 fall 5


listen nova_vncproxy_cluster
    bind 192.168.100.100:6080
    balance  source
    option  tcpka
    option  tcplog
    server controller01 192.168.100.10:6080 check inter 2000 rise 2 fall 5
    server controller02 192.168.100.11:6080 check inter 2000 rise 2 fall 5


listen neutron_api_cluster
    bind 192.168.100.100:9696
    balance  source
    option  tcpka
    option  httpchk
    option  tcplog
    server controller01 192.168.100.10:9696 check inter 2000 rise 2 fall 5
    server controller02 192.168.100.11:9696 check inter 2000 rise 2 fall 5


listen cinder_api_cluster
    bind 192.168.100.100:8776
    balance  source
    option  tcpka
    option  httpchk
    option  tcplog
    server controller01 192.168.100.10:8776 check inter 2000 rise 2 fall 5
    server controller02 192.168.100.11:8776 check inter 2000 rise 2 fall 5

#mariadb服务;
#设置controller01节点为master,controller02节点为backup,一主多备的架构可规避数据不一致性;
#另外官方示例为检测9200(心跳)端口,测试在mariadb服务宕机的情况下,
#虽然”/usr/bin/clustercheck”脚本已探测不到服务,但受xinetd控制的9200端口依然正常,
#导致haproxy始终将请求转发到mariadb服务宕机的节点,暂时修改为监听3306端口
#listen galera_cluster
#    bind 192.168.100.100:3306
#    balance  source
#   mode    tcp
#    server controller01 192.168.100.10:3306 check inter 2000 rise 2 fall 5
#    server controller02 192.168.100.11:3306 backup check inter 2000 rise 2 fall 5


####将配置文件拷贝到其他节点中:
scp /etc/haproxy/haproxy.cfg controller02:/etc/haproxy/haproxy.cfg
配置内核参数
#####所有controller#####
#net.ipv4.ip_nonlocal_bind = 1是否允许no-local ip绑定,关系到haproxy实例与vip能否绑定并切换
#net.ipv4.ip_forward:是否允许转发
echo 'net.ipv4.ip_nonlocal_bind = 1' >>/etc/sysctl.conf
echo "net.ipv4.ip_forward = 1" >>/etc/sysctl.conf
sysctl -p
启动服务
systemctl enable haproxy
systemctl restart haproxy
systemctl status haproxy
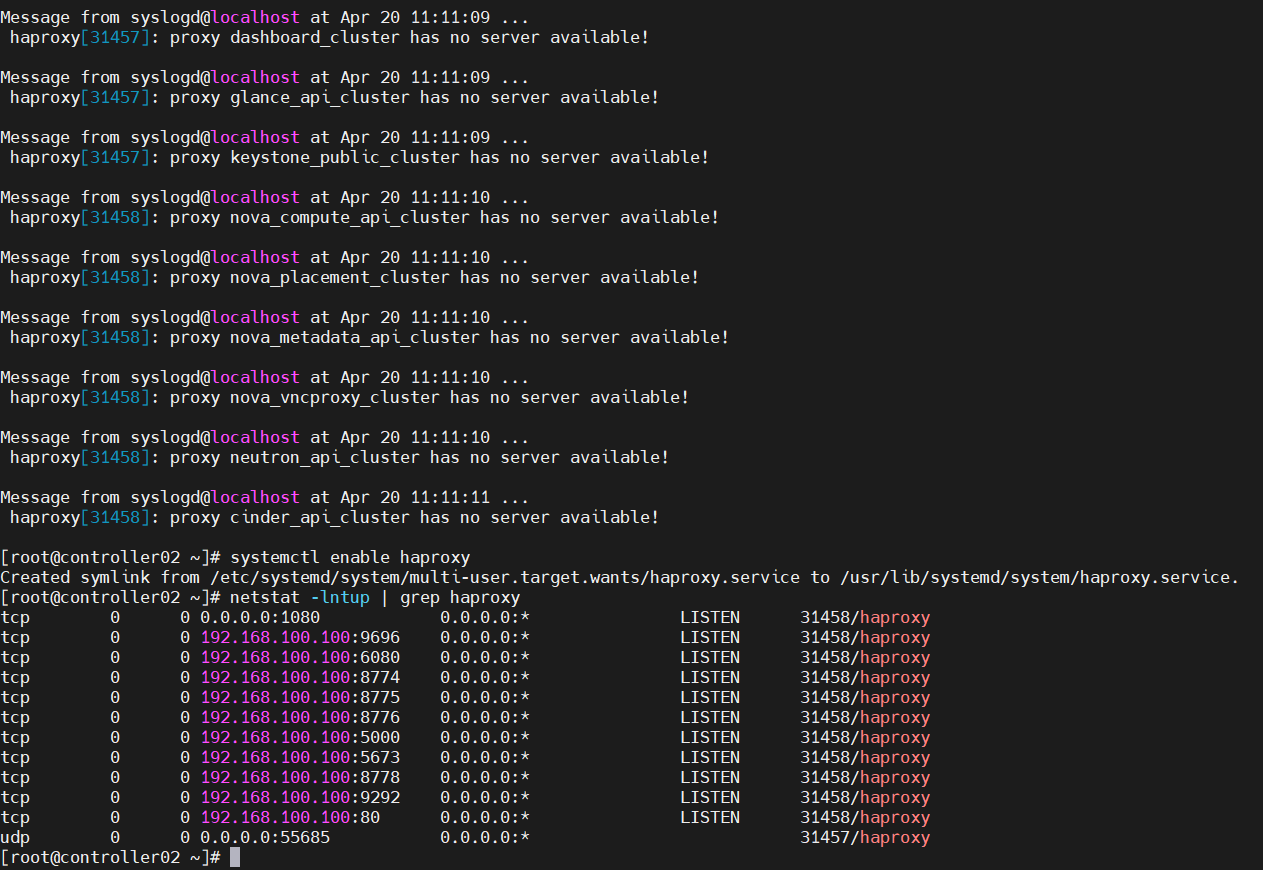
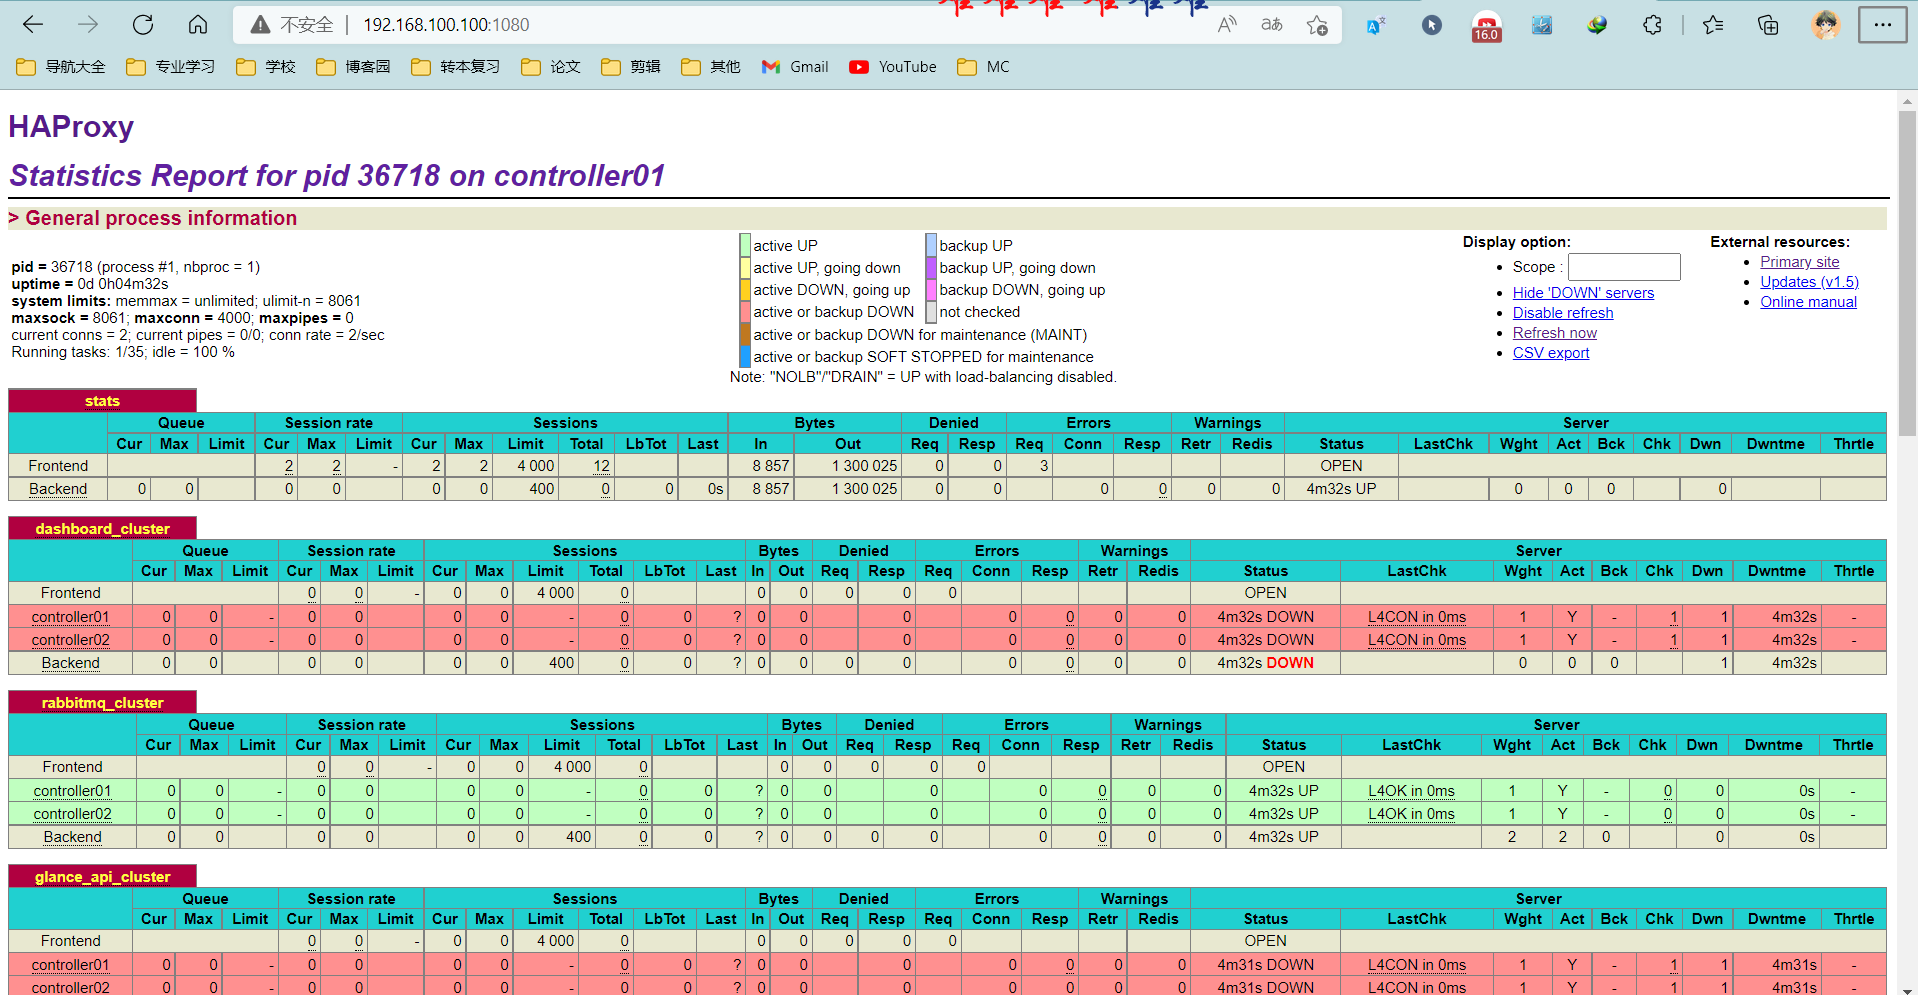
#访问:http://192.168.100.100:1080 用户名/密码:admin/admin
#rabbitmq已安装所有显示绿色,其他服务未安装;在此步骤会显示红色
添加pcs资源
#####controller01#####
#添加资源 lb-haproxy-clone
pcs resource create lb-haproxy systemd:haproxy clone
pcs resource

#####controller01#####
#设置资源启动顺序,先vip再lb-haproxy-clone;
pcs constraint order start vip then lb-haproxy-clone kind=Optional

#官方建议设置vip运行在haproxy active的节点,通过绑定lb-haproxy-clone与vip服务,
#所以将两种资源约束在1个节点;约束后,从资源角度看,其余暂时没有获得vip的节点的haproxy会被pcs关闭
pcs constraint colocation add lb-haproxy-clone with vip
pcs resource
#####controller01#####
#hosts添加mysqlvip和havip解析
sed -i '$a 192.168.100.100 havip' /etc/hosts
scp /etc/hosts controller02:/etc/hosts
scp /etc/hosts compute01:/etc/hosts
scp /etc/hosts compute02:/etc/hosts
高可用配置(pacemaker&haproxy)部署完毕
八、openstackT版各个组件部署
1、Keystone部署
1.1、配置keystone数据库
问题与解决
问题1:UUID相同
描述:出现以下情况,多半是VMware中完整复制造成的UUID相同的情况。可使用nmcli con命令比较各台设备的UUID是否相同。
解决办法:使用命令uuidgen ens33(ens33为网卡名)生成新的随机的UUID,并且填入对应网卡的配置文件,重启网卡即可。
uudi=`uuidgen ens33`
sed -i 's\^UUID=.*\UUID='$uudi'\' /etc/sysconfig/network-scripts/ifcfg-ens33
systemctl restart network
nmcli con
命令合集
#生成新的网卡配置文件
nmcli con add con-name ens36 type ethernet ifname ens36


