为什么要学习微服务
在项目开发中随着业务越来越多,导致功能之间耦合性高、开发效率低、系统运行缓慢难以维护、不稳定。微服务
架构可以解决这些问题,而Spring Cloud是微服务架构最流行的实现,所以我们今天来学习Spring Cloud.
微服务的作用
微服务架构是使用一套小服务来开发单个应用的方式或途径,每个服务基于单一业务能力构建,运行在自己的进程
中,并使用轻量级机制通信,通常是HTTP API,并能够通过自动化部署机制来独立部署。这些服务可以使用不同的
编程语言实现,以及不同数据存储技术,并保持最低限度的集中式管理。 微服务结构图 :

微服务的搭建
接下来我用一个比较简单的案例来浅谈我的学习心德
简单的微服务结构介绍

- Eureka:用户注册中心,相当于一个管理平台,用于连接和管理,类似于滴滴打车平台官方。
- GateWay: 微服务的防火墙,主要用于保障系统安全,网址路由和过滤;
- Gtiee:服务器配置类,使用码云平台进行集中网络配置,为团队开发带来便利;
- Server:项目的主要执行程序,相当于出租车
- Client:客户使用层,提供了Server的方法接口,调用接口方法执行系统程序。
执行的先后顺序
Eureka → GateWay → Gtiee → Server →Client。
架构各个功能简介
1. 创建项目主题框架
结构

Pom 配置
<modules>
        <module>billconfig-eureka</module>
        <module>billconfig-gateway</module>
        <module>billconfig-gitee</module>
        <module>billserver-bill</module>
        <module>billclient-bill</module>
    </modules>

    <!--添加SpringBoot父工程坐标,属于SpringBoot的依赖自动匹配版本-->
    <parent>
        <groupId>org.springframework.boot</groupId>
        <artifactId>spring-boot-starter-parent</artifactId>
        <version>2.1.5.RELEASE</version>
        <relativePath/>
    </parent>

    <!--版本集中配置-->
    <properties>
        <java.version>11</java.version>
        <spring-cloud.version>Greenwich.SR1</spring-cloud.version>
        <mapper.starter.version>2.1.5</mapper.starter.version>
        <mysql.version>8.0.23</mysql.version>
    </properties>

    <dependencyManagement>
        <dependencies>
            <!-- springCloud -->
            <dependency>
                <groupId>org.springframework.cloud</groupId>
                <artifactId>spring-cloud-dependencies</artifactId>
                <version>${spring-cloud.version}</version>
                <type>pom</type>
                <scope>import</scope>
            </dependency>
            <!-- 通用Mapper启动器 -->
            <dependency>
                <groupId>tk.mybatis</groupId>
                <artifactId>mapper-spring-boot-starter</artifactId>
                <version>${mapper.starter.version}</version>
            </dependency>
            <!-- mysql驱动 -->
            <dependency>
                <groupId>mysql</groupId>
                <artifactId>mysql-connector-java</artifactId>
                <version>${mysql.version}</version>
            </dependency>
        </dependencies>
    </dependencyManagement>

    <!--简化实体类开发构件Lombok-->
    <dependencies>
        <dependency>
            <groupId>org.projectlombok</groupId>
            <artifactId>lombok</artifactId>
        </dependency>
    </dependencies>
    <!--maven插件-->
    <build>
        <plugins>
            <plugin>
                <groupId>org.springframework.boot</groupId>
                <artifactId>spring-boot-maven-plugin</artifactId>
            </plugin>
        </plugins>
    </build>
成功后的结构

2. Eureka注册中心
原理图

pom配置
<artifactId>billconfig-eureka</artifactId>

<!--Eureka注册中心依赖-->
<dependencies>
    <dependency>
        <groupId>org.springframework.cloud</groupId>
        <artifactId>spring-cloud-starter-netflix-eureka-server</artifactId>
    </dependency>
    <dependency>
        <groupId>javax.xml.bind</groupId>
        <artifactId>jaxb-api</artifactId>
    </dependency>
    <dependency>
        <groupId>com.sun.xml.bind</groupId>
        <artifactId>jaxb-impl</artifactId>
        <version>2.3.0</version>
    </dependency>
    <dependency>
        <groupId>org.glassfish.jaxb</groupId>
        <artifactId>jaxb-runtime</artifactId>
        <version>2.3.0</version>
    </dependency>
    <dependency>
        <groupId>javax.activation</groupId>
        <artifactId>activation</artifactId>
        <version>1.1</version>
    </dependency>
</dependencies>
EurekaApplication配置
在这里插入代码片
```# 服务器端口配置
server:
port: 10086
# JDBC配置
spring:
application:
name: bill-server-eureka
eureka:
client:
service-url:
# eureka 服务地址,如果是集群的话;需要指定其它集群eureka地址
defaultZone: http://127.0.0.1:10086/eureka
# 不注册自己
register-with-eureka: false
# 不拉取服务
fetch-registry: false
#### 执行成功后界面
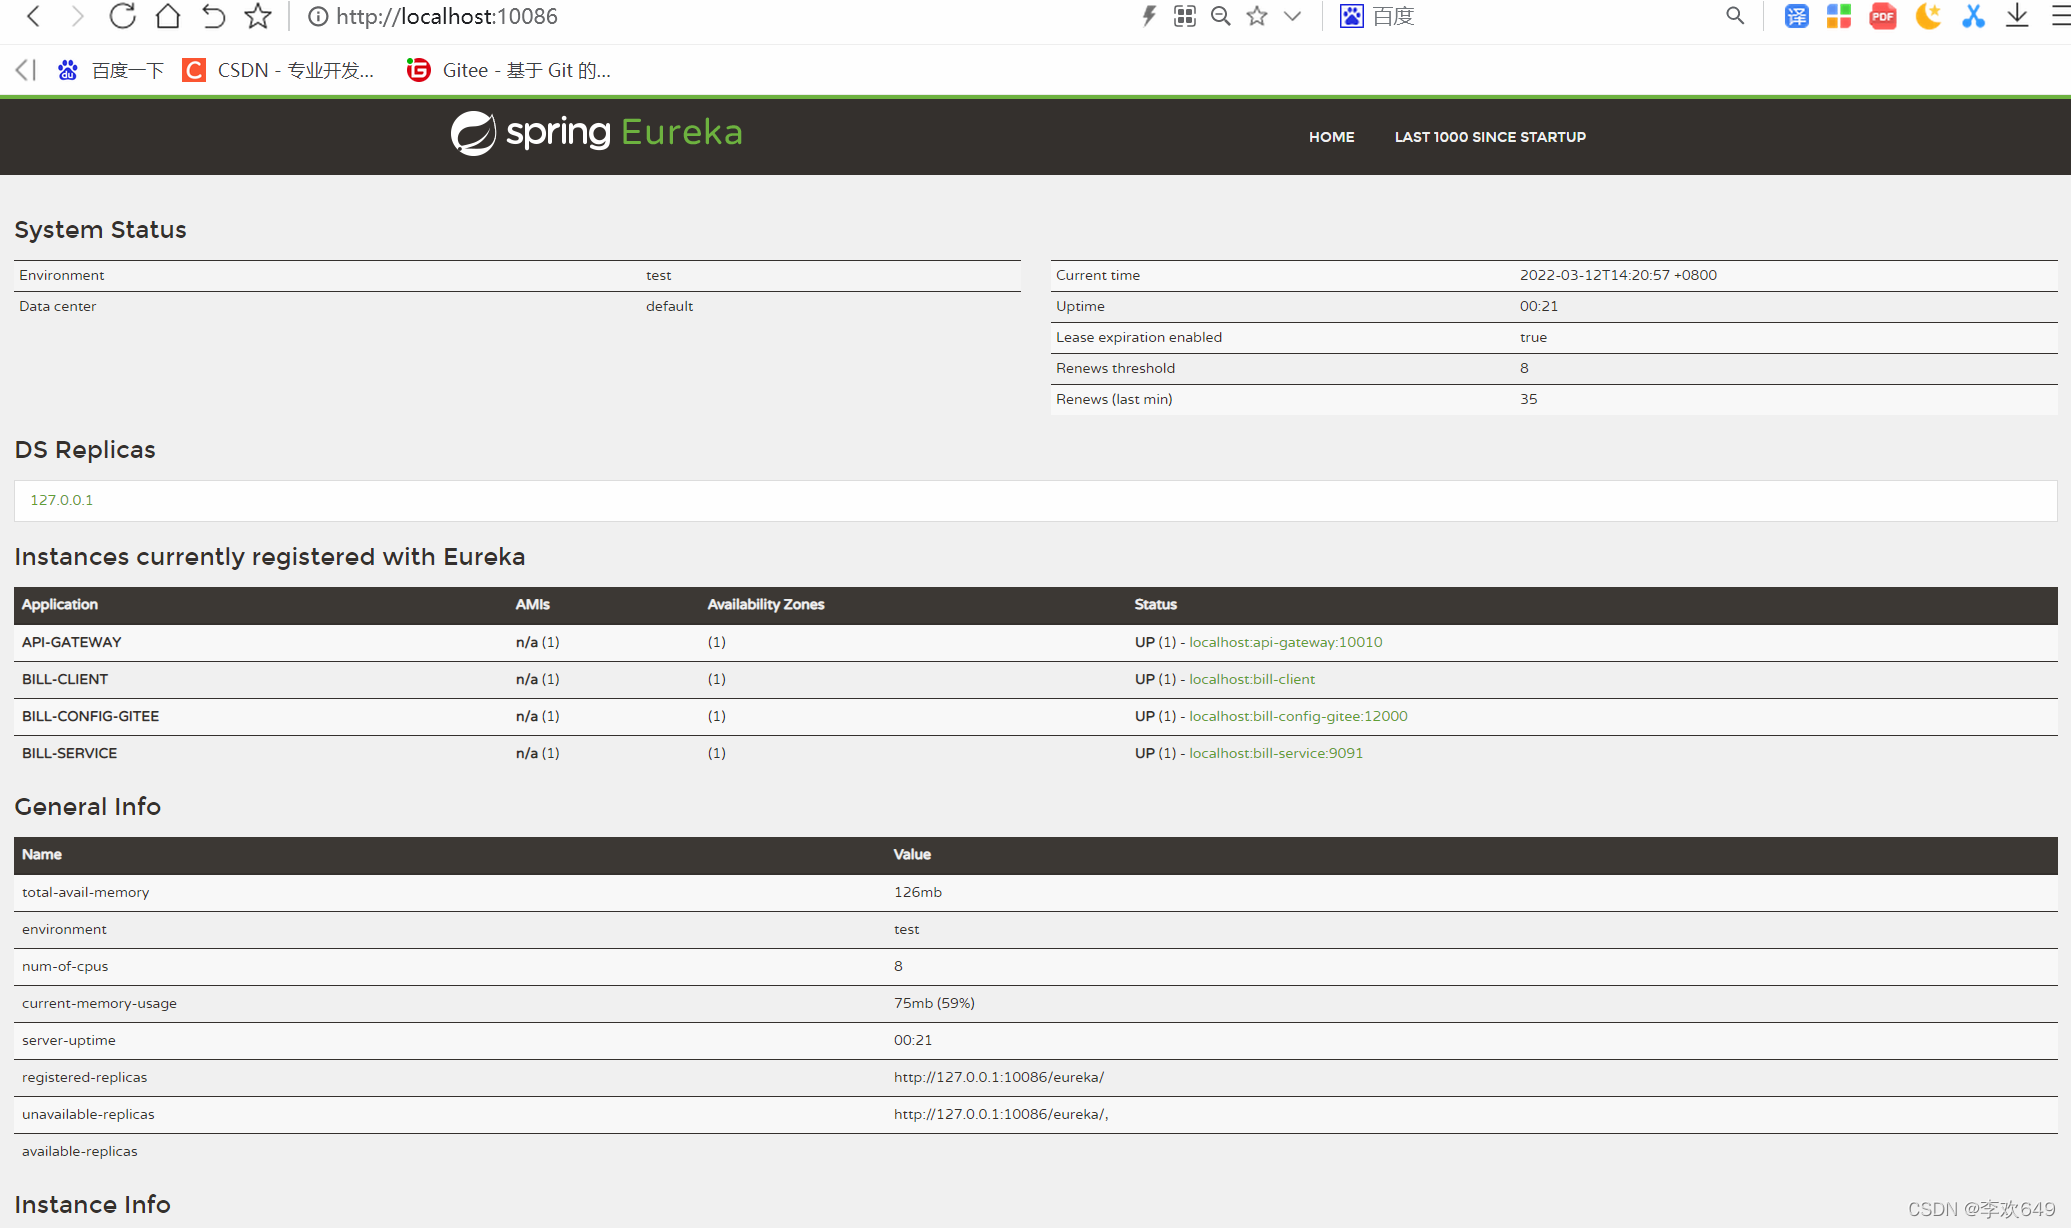
有了注册平台,接下来可以搭建其他的板块了
### 2. GateWay
主要是进行配置
```java
server:
port: 10010
spring:
application:
name: api-gateway
cloud:
gateway:
routes:
#路由的id,可以随意些
- id: bill-config-gateway
#代理的微服务地址,路径被固定了
#uri: http://127.0.0.1:9091
#代理的微服务地址,路径可灵活调用
uri: lb://bill-service
#路由断言:可以配置映射路径,例如:访问http://127.0.0.1:10010/user/7,会跳转至 http://127.0.0.1:9091/user/7进行执行
predicates:
- Path=/bill/**
# 过滤器:PrefixPath:表示添加前缀,StripPrefix:表示过滤1个路径,2表示两个路径,以此类推
filters:
# -Prefixpath=/billl
# - StripPrefix=1
default-filters:
# 默认过滤器,对所有路由都生效
- AddResponseHeader=X-Response-Foo, Bar
- AddResponseHeader=abc-myname,lxs
eureka:
client:
service-url:
defaultZone: http://127.0.0.1:10086/eureka
instance:
prefer-ip-address: true
主执行方法配置
@SpringBootApplication
@EnableEurekaServer     //声明当前应用时Eureka服务
public class EurekaApplication {
    public static void main(String[] args) {
        SpringApplication.run(EurekaApplication.class, args);
    }
}
搭建成功

3. Gtiee
配置截图

pom配置
    <dependencies>
        <!--向Eureka注册依赖:配置中心服务器端组件-->
        <dependency>
            <groupId>org.springframework.cloud</groupId>
            <artifactId>spring-cloud-config-server</artifactId>
        </dependency>
        <!--向Eureka注册依赖:客户端方注册-->
        <dependency>
            <groupId>org.springframework.cloud</groupId>
            <artifactId>spring-cloud-starter-netflix-eureka-client</artifactId>
        </dependency>
        <!--Spring Cloud Bus,消息总线可以为微服务做监控-->
        <dependency>
            <groupId>org.springframework.cloud</groupId>
            <artifactId>spring-cloud-bus</artifactId>
        </dependency>
        <!--Spring Cloud Bus,消息总线可以为微服务做监控-->
        <dependency>
            <groupId>org.springframework.cloud</groupId>
            <artifactId>spring-cloud-stream-binder-rabbit</artifactId>
        </dependency>
    </dependencies>
Application配置
# 服务器端口配置
server:
  port: 12000

# Spring基础配置
spring:
  application:
    # 作为发布到eureka的标识
    name: bill-config-gitee
  cloud:
    config:
      server:
        git:
          # 使用Git远程仓库配置,需要添加配置文件路径
          uri: https://gitee.com/ahuan520love/my-config.git
  # 消息总线可以为微服务做监控配置,当前时默认的配置
  rabbitmq:
    host: localhost
    port: 5672
    username: guest
    password: guest

# eureka配置中心配置
eureka:
  client:
    service-url:
      defaultZone: http://127.0.0.1:10086/eureka

# 暴露触发消息总线的地址
management:
  endpoints:
    web:
      exposure:
        #  暴露触发消息总线的地址
        include: bus-refresh
主执行方法配置
@SpringBootApplication
@EnableConfigServer     //开启配置服务
public class GiteeApplication {
   public static void main(String[] args) {
       SpringApplication.run(GiteeApplication.class, args);
   }
}
搭建成功

4. Server
pom配置
<dependencies>
    <!--Web启动器-->
    <dependency>
        <groupId>org.springframework.boot</groupId>
        <artifactId>spring-boot-starter-web</artifactId>
    </dependency>
    <!-- 通用Mapper启动器 -->
    <dependency>
        <groupId>tk.mybatis</groupId>
        <artifactId>mapper-spring-boot-starter</artifactId>
    </dependency>
    <!-- mysql驱动 -->
    <dependency>
        <groupId>mysql</groupId>
        <artifactId>mysql-connector-java</artifactId>
    </dependency>
    <!--SpringBoot测试类依赖-->
    <dependency>
        <groupId>org.springframework.boot</groupId>
        <artifactId>spring-boot-starter-test</artifactId>
    </dependency>
    <!--向Eureka注册依赖:服务方注册-->
    <dependency>
        <groupId>org.springframework.cloud</groupId>
        <artifactId>spring-cloud-starter-netflix-eureka-client</artifactId>
    </dependency>
    <!--从配置中心获取配置依赖-->
    <dependency>
        <groupId>org.springframework.cloud</groupId>
        <artifactId>spring-cloud-starter-config</artifactId>
    </dependency>
    <!--Spring Cloud Bus,消息总线可以为微服务做监控-1-->
    <dependency>
        <groupId>org.springframework.cloud</groupId>
        <artifactId>spring-cloud-bus</artifactId>
    </dependency>
    <!--Spring Cloud Bus,消息总线可以为微服务做监控-2-->
    <dependency>
        <groupId>org.springframework.cloud</groupId>
        <artifactId>spring-cloud-stream-binder-rabbit</artifactId>
    </dependency>
    <!--Spring Cloud Bus,消息总线可以为微服务做监控-3-->
    <dependency>
        <groupId>org.springframework.boot</groupId>
        <artifactId>spring-boot-starter-actuator</artifactId>
    </dependency>

    <!--SpringBoot网页模板引擎依赖-->
    <dependency>
        <groupId>org.springframework.boot</groupId>
        <artifactId>spring-boot-starter-thymeleaf</artifactId>
    </dependency>
    <!--SpringBoot测试类依赖-->
    <dependency>
        <groupId>org.springframework.boot</groupId>
        <artifactId>spring-boot-starter-test</artifactId>
    </dependency>
    <!--分页插件依赖-->
    <dependency>
        <groupId>com.github.pagehelper</groupId>
        <artifactId>pagehelper-spring-boot-starter</artifactId>
        <version>1.2.3</version>
    </dependency>
</dependencies>
bootstrap.yml 配置(主要配置源于Gitee,这里使用补充配置)
# Spring基础配置
spring:
  cloud:
    config:
      # 要与仓库中的配置文件的application保持一致
      name: billcloud
      # 要与仓库中的配置文件的profile保持一致
      profile: dev
      # 要与仓库中的配置文件所属的版本(分支)一样
      label: master
      discovery:
        # 使用配置中心
        enabled: true
        # 配置中心服务名
        service-id: bill-config-gitee
  application:
    name: bill-service

  # 配置rabbitmq信息;如果是都与默认值一致则不需要配置
  rabbitmq:
    host: localhost
    port: 5672
    username: guest
    password: guest

# 微服务注册中心eureka
eureka:
  client:
    service-url:
      # eureka 服务地址,如果是集群的话;需要指定其它集群eureka地址
      defaultZone: http://127.0.0.1:10086/eureka
  instance:
    prefer-ip-address: true

hystrix:
  command:
    default:
      execution:
        isolation:
          thread:
            timeoutInMilliseconds: 6000 #服务降级超时时间,默认1S

ribbon:
  ConnectTimeout: 1000 # 连接超时时长
  ReadTimeout: 2000 # 数据通信超时时长
  MaxAutoRetries: 0 # 当前服务器的重试次数
  MaxAutoRetriesNextServer: 0 # 重试多少次服务
主执行方法配置
@SpringBootApplication
@MapperScan("com.kkb.billserver.dao")  //tk.mybatis 扫描Mapper方法
@EnableDiscoveryClient  //开启Eureka客户端发现功能
public class ServerApplication {
   public static void main(String[] args) {
       SpringApplication.run(ServerApplication.class, args);
   }
搭建成功

5. Client
pom配置
    <dependencies>
        <!--Web启动器-->
        <dependency>
            <groupId>org.springframework.boot</groupId>
            <artifactId>spring-boot-starter-web</artifactId>
        </dependency>
        <!--向Eureka注册依赖:客户方注册-->
        <dependency>
            <groupId>org.springframework.cloud</groupId>
            <artifactId>spring-cloud-starter-netflix-eureka-client</artifactId>
        </dependency>
        <!--Feign:把Rest的请求进行隐藏和伪装-->
        <dependency>
            <groupId>org.springframework.cloud</groupId>
            <artifactId>spring-cloud-starter-openfeign</artifactId>
        </dependency>
    </dependencies>
Application配置
# 作为发布到eureka的标识
spring:
 application:
   name: bill-client

# 微服务注册中心eureka
eureka:
 client:
   service-url:
     # eureka 服务地址,如果是集群的话;需要指定其它集群eureka地址
     defaultZone: http://127.0.0.1:10086/eureka
   # 注册自己
   register-with-eureka: true
   # 拉取服务
   fetch-registry: true
   #拉取服务地址列表的间隔时间
   registry-fetch-interval-seconds: 10

# Fegin内置负载均衡
ribbon:
 # 连接超时时长
 ConnectTimeout: 1000
 # 数据通信超时时长
 ReadTimeout: 2000
 # 当前服务器的重试次数
 MaxAutoRetries: 0
 # 重试多少次服务
 MaxAutoRetriesNextServer: 0
 # 是否对所有的请求方式都重试
 OkToRetryOnAllOperations: false

# Feign内置熔断器
feign:
 hystrix:
   # 开启feign的熔断功能
   enabled: true
# Feign内置日志
#logging:
#  level:
#    com.kkb: debug
主执行方法配置
@SpringBootApplication
@EnableDiscoveryClient  //开启eureka客户端发现功能
@EnableFeignClients     //开启feign客户端功能
public class BillClientApplication {
   public static void main(String[] args) {
       SpringApplication.run(BillClientApplication.class, args);
   }

   // RestTemplate模板工具类,对基于HTTP的客户端进行了封装,并且实现了对象与json的序列化和反序列化
   @Bean
   @LoadBalanced
   public RestTemplate restTemplate() {
       return new RestTemplate();
   }
}
搭建成功

总结
如上步骤全部搭建完成那就恭喜你进阶了第一步,说实话全部弄懂真的很难,需要继续往下学习和多多练习。
如上为个人学习的新的浅谈,如有不妥,还需要大家多多指导,谢谢!


