【OpenCV 完整例程】67. 空间域图像增强的综合应用
5. 空间域图像增强技术的综合应用
空间域图像增强的方法很多,各有不同的特点和作用。对于一幅具体图像,往往要根据图像的实际情况,综合使用几种图像增强的方法,以便达到较为理想的结果。
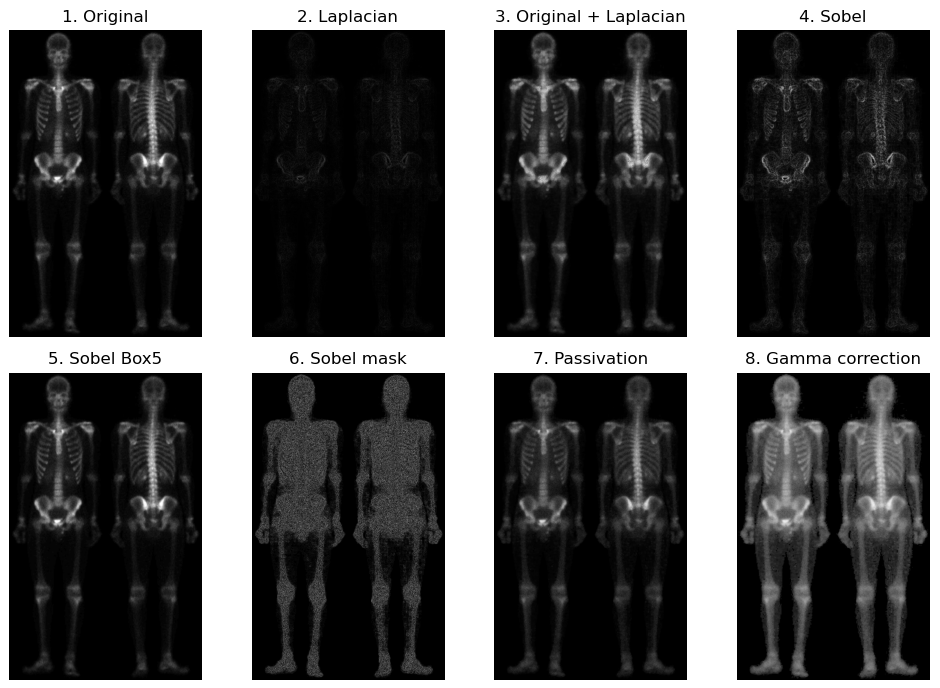
本节以人体骨骼扫描图像(来自G.E.MedicalSystem)为例,要求对图像进行锐化以显示更多的骨骼细节。原始图像的灰度级比较狭窄,噪声含量大,简单使用一种图像增强方法难以达到理想的结果,需要综合应用空间域图像增强技术:首先使用拉普拉斯变换突出细节,然后使用梯度算子增强突出的边缘,再使用低通滤波器降低噪声,以此为模板得到需要的锐化图像,最后用伽马校正调整灰度级的动态范围。具体步骤如下:
(1)拉普拉斯变换,突出原始图像的细节;
(2)原始图像叠加拉普拉斯变换图像,恢复背景特征;
(3)Sobel 梯度算子,增强突出的边缘;
(4)用盒式滤波器平滑梯度图像;
(5)拉普拉斯与平滑梯度相乘得到掩蔽模板;
(6)原始图像与掩蔽模板叠加,得到锐化图像;
(7)Gamma 变换,增大灰度级的动态范围。
例程 1.82 空间域图像增强技术的综合应用
    # 1.82 空间域图像增强技术的综合应用
    # 原始图像,人体骨骼扫描图像
    img = cv2.imread("../images/bonescan.tif", flags=0)  # 人体骨骼扫描图像

    # 图 2:拉普拉斯变换,突出细节
    kernLaplace = np.array([[0, 1, 0], [1, -4, 1], [0, 1, 0]], np.int8)  # Laplacian kernel
    # kernLaplaceD = np.array([[1, 1, 1], [1, -8, 1], [1, 1, 1]], np.int8)  # Diagonal Laplacian kernel
    Laplacian = cv2.filter2D(img, ddepth=-1, kernel=kernLaplace)
    imgLaplacian = np.uint8(cv2.normalize(Laplacian, None, 0, 255, cv2.NORM_MINMAX))

    # 图 3:原始图像 + 拉普拉斯变换,恢复背景特征
    AddLap = img + imgLaplacian
    imgAddLap = np.uint8(cv2.normalize(AddLap, None, 0, 255, cv2.NORM_MINMAX))

    # 图 4:Sobel 梯度算子,增强突出的边缘
    SobelX = cv2.Sobel(img, cv2.CV_16S, 1, 0)  # 计算 x 轴方向
    SobelY = cv2.Sobel(img, cv2.CV_16S, 0, 1)  # 计算 y 轴方向
    absX = cv2.convertScaleAbs(SobelX)  # 转回 uint8
    absY = cv2.convertScaleAbs(SobelY)  # 转回 uint8
    SobelXY = cv2.addWeighted(absX, 0.5, absY, 0.5, 0)  # 用绝对值近似平方根
    imgSobel = np.uint8(cv2.normalize(SobelXY, None, 0, 255, cv2.NORM_MINMAX))

    # 图 5:用 (5,5) 盒式滤波器平滑梯度图像
    kernelBox = np.ones(5, np.float32) / (5 * 5)  # 生成归一化盒式核
    SobelBox = cv2.filter2D(img, -1, kernelBox)  # cv2.filter2D 方法
    imgSobelBox = cv2.normalize(SobelBox, None, 0, 255, cv2.NORM_MINMAX)

    # 图 6:图2 与 图5 相乘得到模板 mask,突出了强边缘,相对较低了噪声
    mask = imgLaplacian * imgSobelBox
    imgMask = np.uint8(cv2.normalize(mask, None, 0, 255, cv2.NORM_MINMAX))

    # 图7:原始图像与图 6 相加,得到锐化图像,大部分细节更清晰
    passivation = img + imgMask * 0.3
    imgPassi = np.uint8(cv2.normalize(passivation, None, 0, 255, cv2.NORM_MINMAX))

    # 图8: 幂律变换(Gamma 变换),增大灰度级的动态范围
    epsilon = 1e-5  # 非常小的值以防出现除0的情况
    # Gamma = np.zeros_like(imgPassi, dtype=np.float)
    Gamma = np.power(imgPassi + epsilon, 0.5)
    imgGamma = np.uint8(cv2.normalize(Gamma, None, 0, 255, cv2.NORM_MINMAX))

    # 绘图
    plt.figure(figsize=(10, 7))
    titleList = ["1. Original", "2. Laplacian", "3. Original + Laplacian", "4. Sobel",
                 "5. Sobel Box5", "6. Sobel mask", "7. Passivation", "8. Gamma correction"]
    imageList = [img, imgLaplacian, imgAddLap, imgSobel, imgSobelBox, imgMask, imgPassi, imgGamma]
    for i in range(8):
        plt.subplot(2,4,i+1), plt.title(titleList[i]), plt.axis('off')
        plt.imshow(imageList[i], 'gray', vmin=0, vmax=255)
    plt.tight_layout()
    plt.show()

(本节完)
版权声明:
youcans@xupt 原创作品,转载必须标注原文链接
Copyright 2021 youcans, XUPT
Crated:2022-1-12


